Earlier this year while I was hard at work on the Nintendo Extension Ctrl library, I challenged myself to try and support as many different types of controllers as possible. As a part of that I picked up a DJ Hero controller for the Nintendo Wii on Ebay for $10.
And then it hit me: with a little bit of effort, I could write some code that would allow me to play the character of Lucio in Overwatch using this turntable! So that’s exactly what I did.
Introducing the DJ
For the uninitiated, Lucio is one of the original members of the Overwatch hero roster. He’s a Brazilian DJ and healer, keeping his team supported by playing healing and speedboosting tunes (literally).
His controller is going to be made from a DJ Hero turntable. The turntable is a rhythm game controller built by Activision for the game of the same name, made after the immense success of the Guitar Hero franchise in the late 2000’s. The game was well received but never sold that well, and these plastic controllers have sat in people’s closets ever since.
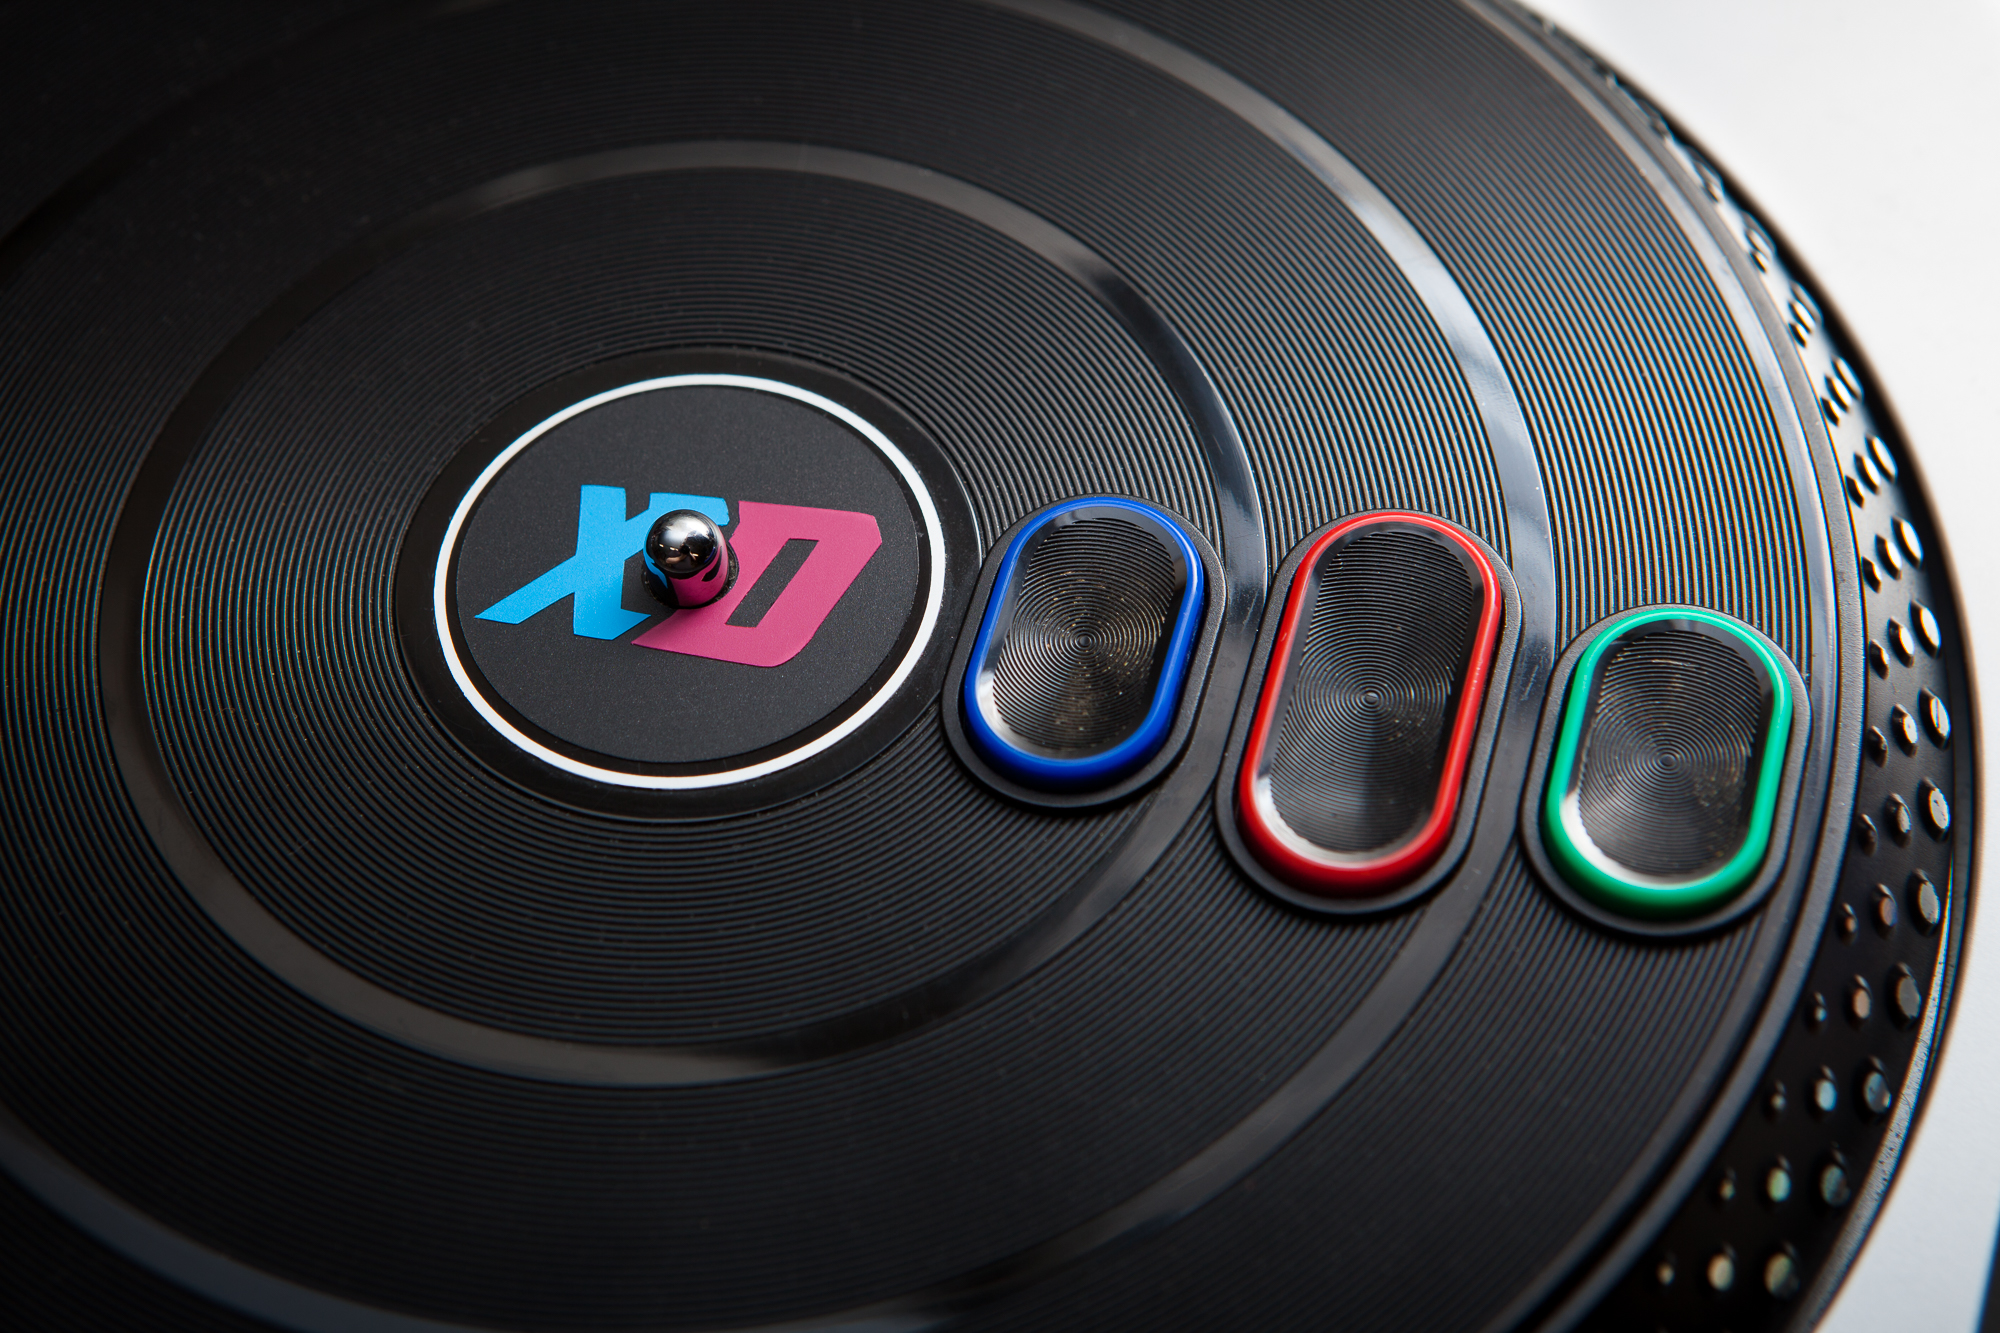
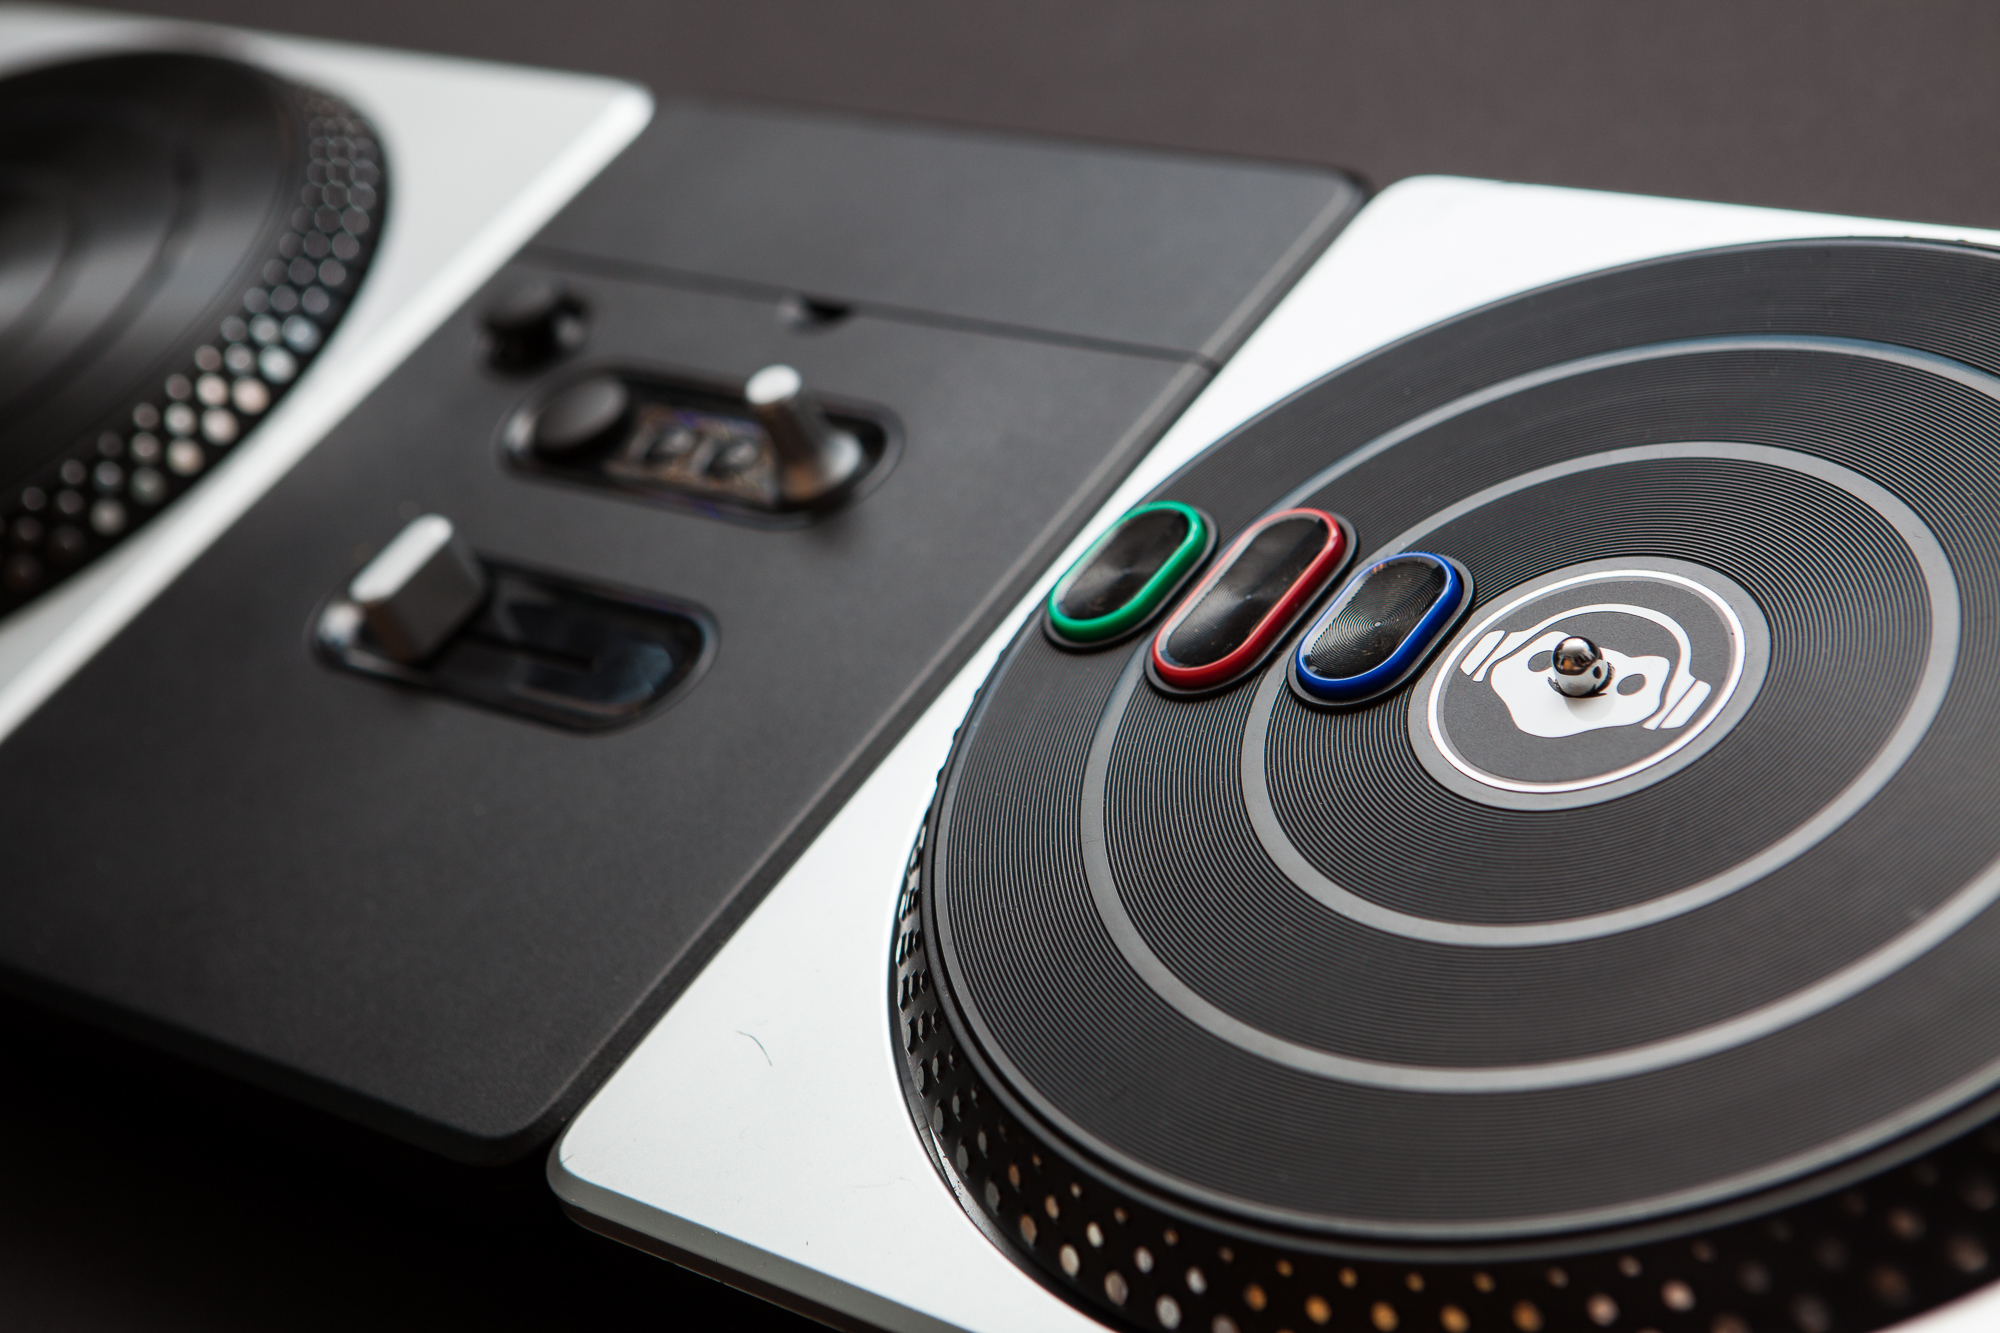
The controller is made up of a bi-directional turntable with three buttons and a base unit with a rotary encoder, linear potentiometer, and “euphoria” button. The base unit also includes several controls for interacting with the game console outside of the game. On the Wii version of the turntable, these controls include an analog stick and two additional buttons (‘+’ and ‘-‘).
Lucio’s identity as a DJ is a central part of his character: his key contribution to the team is his ability to play music, he has a highlight intro where he is mixing songs on a dual-turntable mixer (“In the Groove”), and he even has two abilities – “crossfade” and “amp it up” – that are directly linked to real-world DJ actions. Retrofitting a DJ Hero controller to play him is going to work great!
Overview
Because some things just work better in video form, here’s a basic overview of how the controller works:
The controller uses a microcontroller that talks to the turntable and translates the controls to mouse / keyboard movement. The user only needs to plug in the USB cable and they’re off! Drivers are installed automatically by the PC, and there is no additional software required. Here’s how to play:
Single Turntable
When using a single turntable (either side), spinning the turntable will move the crosshair horizontally. Holding the minus (-) button will switch this to control vertical aim.
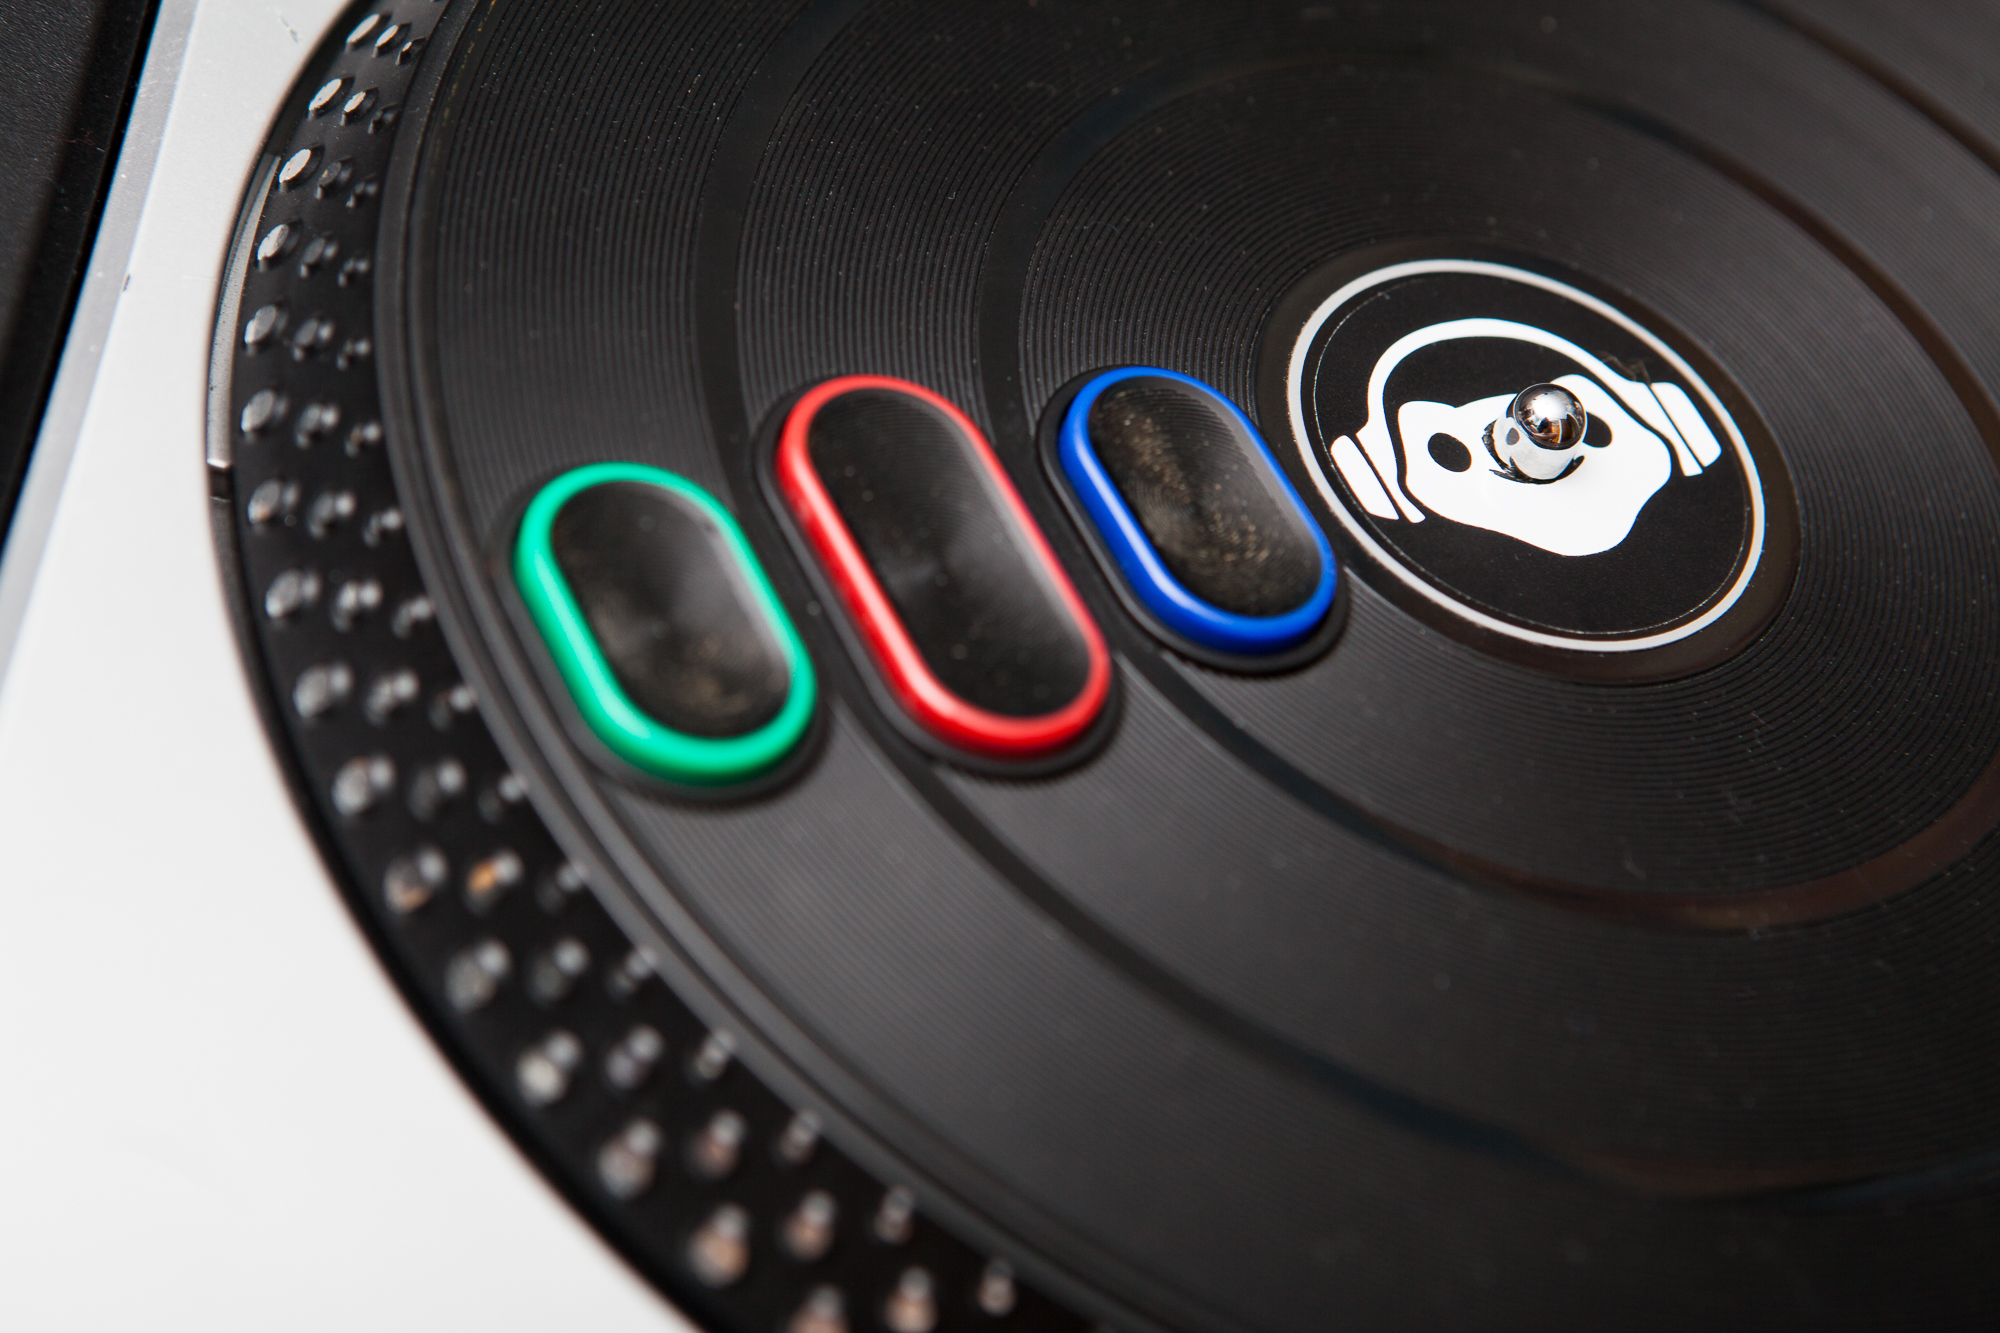
The green (outermost) button is primary fire, and the blue (innermost) button is secondary fire (“soundwave”, colloquially known as “boop”). The red (center) button is jump, which is positioned front and center for wall-riding.
The controller functions the same whether the turntable is connected to either the left or the right side.
Dual Turntable
Like with the original DJ Hero game, I’ve designed the Lucio controller to support dual turntable gameplay! This allows the user to connect a second turntable for better control.
With two turntables connected, one turntable is the main (primary) turntable and one is the secondary. The right table is the main turntable by default. The main turntable handles horizontal aiming while the secondary turntable handles vertical. The minus button (-), previously used to switch between horizontal and vertical, now temporarily halts aiming to aid in turntable repositioning.
Both the green and blue buttons on the main turntable act as primary fire, while the red button still functions as jump. All three buttons on the secondary turntable will trigger alternate fire, so the user needs only to hit (“boop”) the general area and not search for a specific button (since their hand would normally be on the base unit controls).
The primary and secondary turntable can be switched by holding the green button on the desired turntable and the euphoria button on the base unit for 3 seconds. The microcontroller’s LED will flash to let the user know that the turntable selection has been saved. Turntable selection is saved to memory (EEPROM) and will persistent between disconnects until the user overwrites it.
Base Unit Controls
The rest of the controls are on the turntable base unit, and are the same between all configurations.
Movement
Moving the joystick moves Lucio. This is mapped to the keyboard (WASD) for simplicity, and acts like an 8-position directional pad. Unfortunately there is no analog control unless I emulate a different type of USB device, but it seems to work great as-is.
Effect Dial
Spinning the effect dial “up” (clockwise) will trigger Lucio’s “amp it up” ability. Spinning the effect dial “down” (counter-clockwise) will trigger a reload on Lucio’s primary weapon (“amp it …down”).
The threshold for both of these abilities is configurable. They’re currently set to trigger at 1/3rd of a revolution. This tracker resets after a short inactivity period to keep things responsive.
Crossfade Slider
The crossfade slider functions exactly how you would expect it to: moving it to the left puts Lucio in “heal” song, and sliding it to the right puts Lucio in “speed” song. This matches the crossfade direction on the in-game UI.
For this to work properly, the user needs to set Lucio’s character-specific option for “Hold to Crossfade” to ON. Since the controller does not communicate with the game, it has no way of knowing what Lucio’s “song” is set to unless it sets it itself. The good news is that once this option is set it works perfectly, even between deaths.
Ultimate
The big black button next to the analog stick is the “euphoria” button. This is the equivalent of Guitar Hero “star power”, and in DJ Hero this gives you a power up score multiplier.
It’s large size and apt name make it perfect for triggering Lucio’s ultimate ability.
Emotes
Lastly, the plus (+) button presses ‘c’ for the emote wheel. Just in-case you need to send a quick thanks or taunt the enemy with your awesome DJ skills.
All-in-all, these controls seem to work pretty well! I’m right handed so I use the turntable on the right-hand side. On my left hand I use my middle finger to control the joystick, my index for the ultimate, and my thumb for the crossfade slider. My right hand controls the turntable and will occasionally dart to the effect dial. In dual turntable mode, I use the side of my left hand to nudge the vertical aim.
I’d say the most difficult part to get used to is the Etch-A-Sketch aiming system, but it seems to work well-enough.
How It Works
The controller uses a Teensy LC acting as a combination keyboard / mouse HID device. The microcontroller communications to the DJ Hero turntable over I²C, translates the user controls to keyboard / mouse movement using my custom firmware, and sends the control data to the PC where it’s read by the game. As mentioned above, the board uses a generic HID driver and it requires no configuration from the user.
Hardware Setup
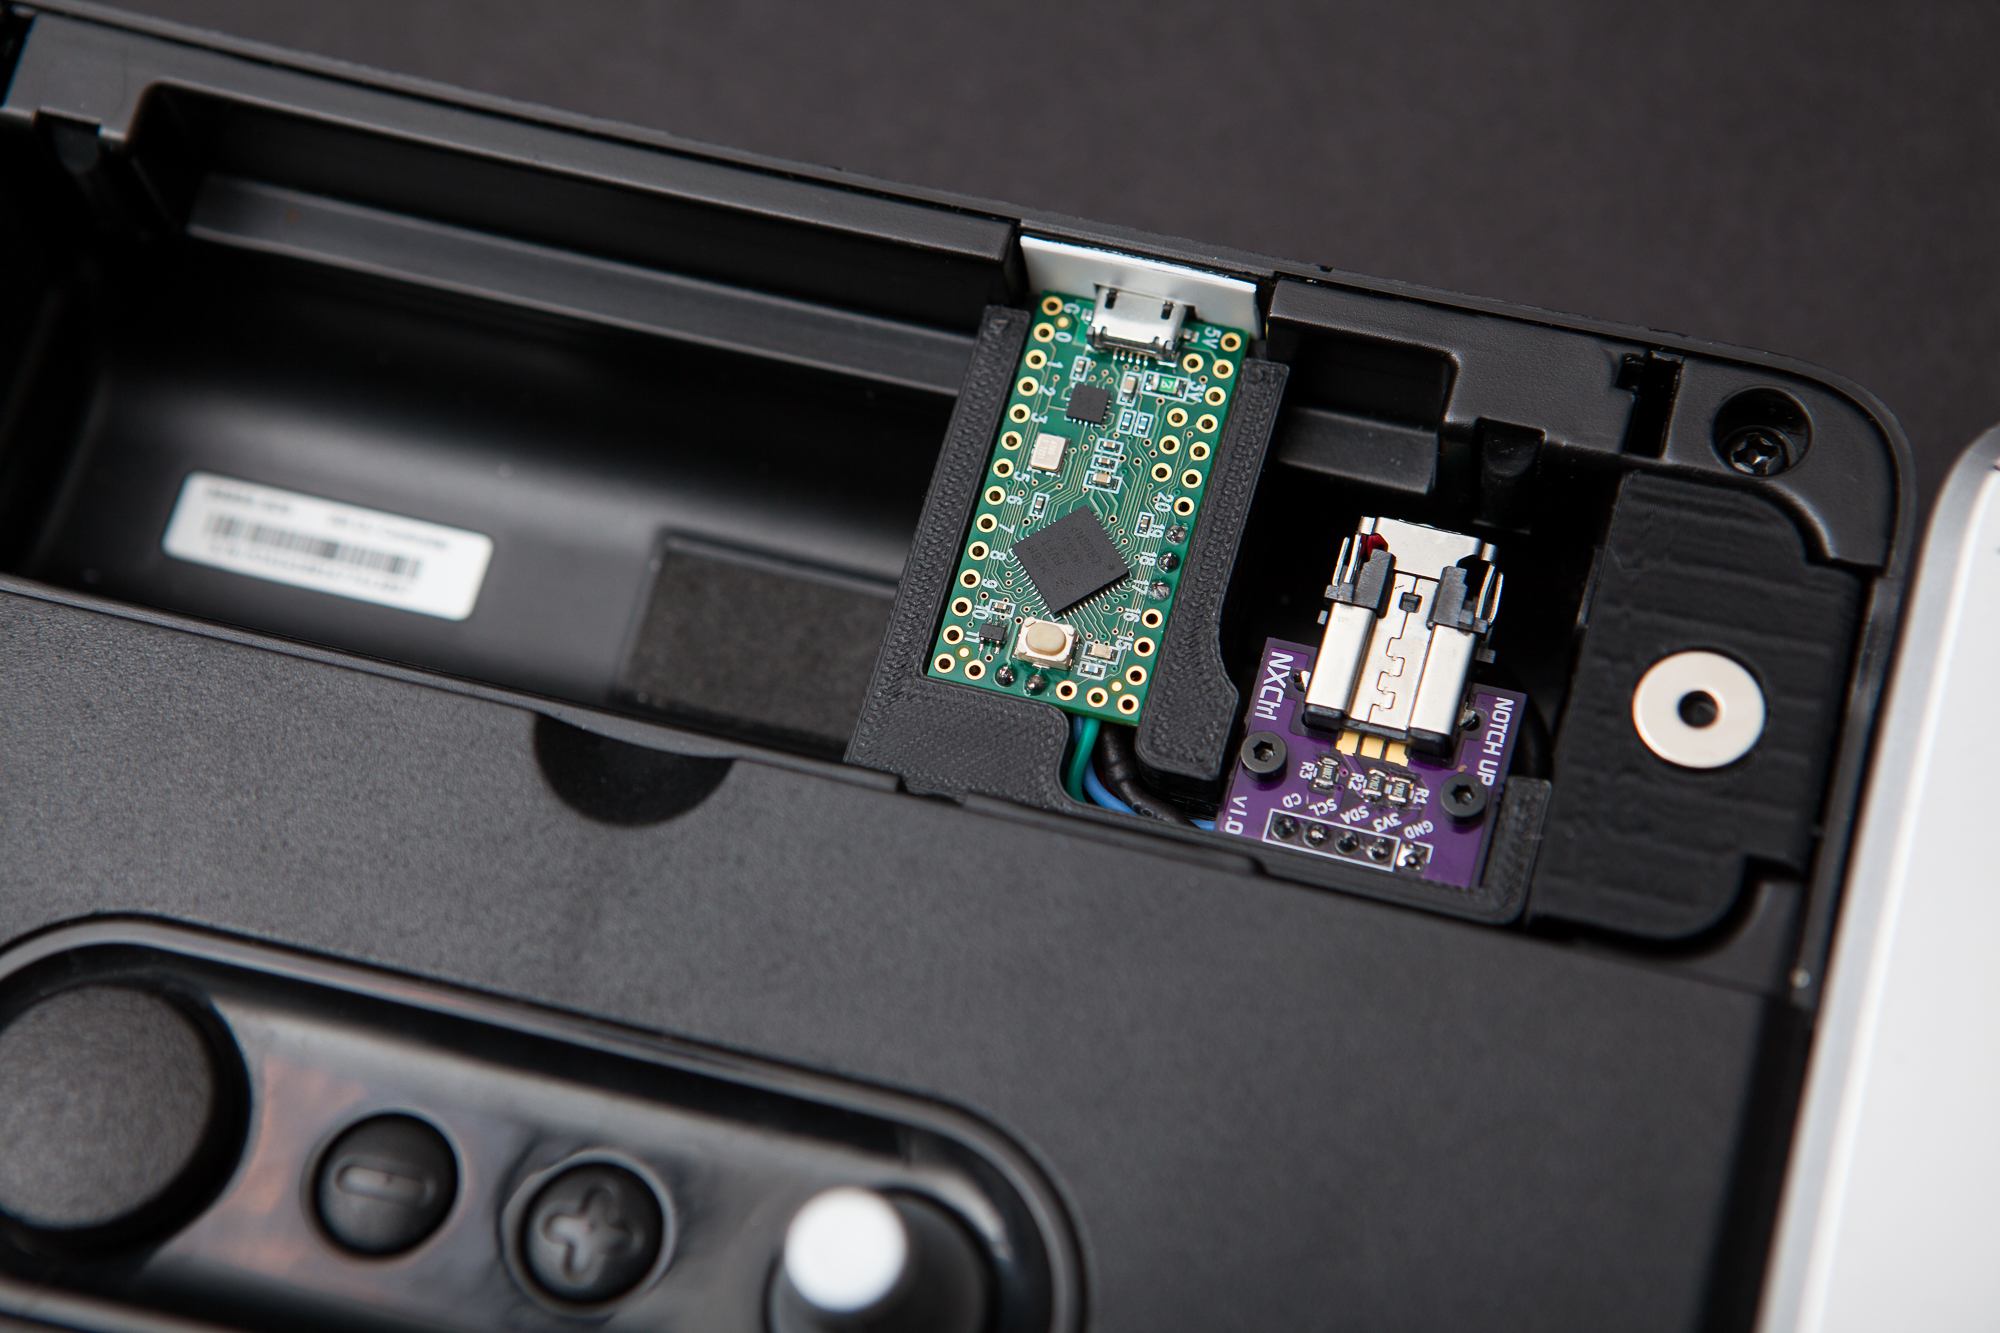
The hardware setup is very simple. I’m using a pre-built microcontroller in the form of a Teensy LC, purchased from Amazon for $15 USD. The Teensy is a souped-up version its cousin the Arduino Pro Micro. It’s 32 bit rather than 8 bit, runs at 48 MHz rather than 16 MHz, and has two I²C buses rather than one among a myriad of other features. In this case, I’m using it mostly because it functions at 3.3V rather than the Pro Micro’s 5V, which makes it easier to interface with the DJ Hero turntable.
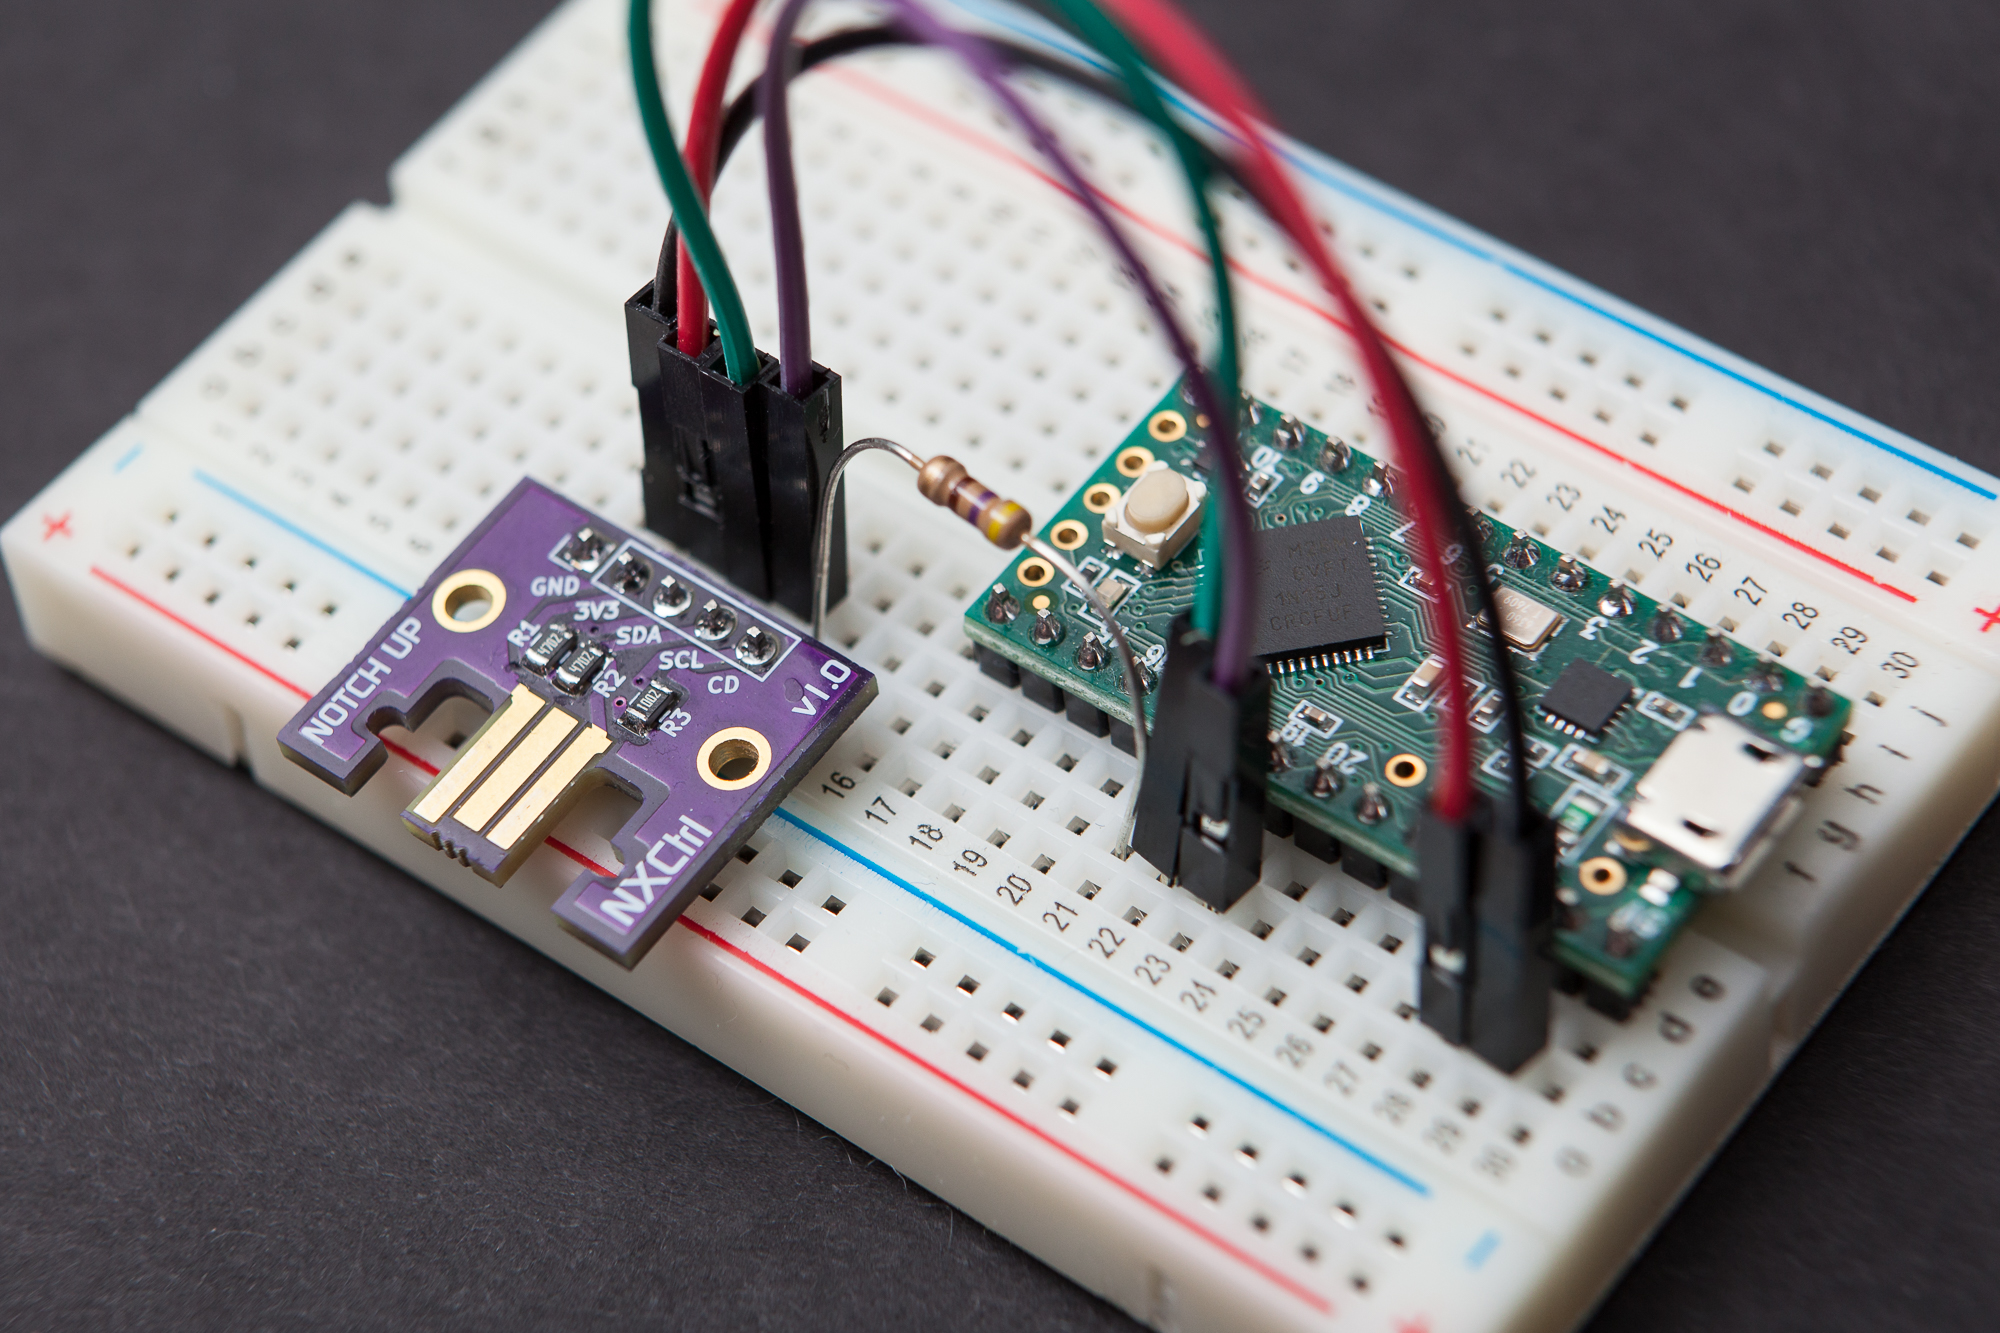
The Teensy is connected directly to my NintendoExtensionCtrl (NXC) breakout board, which plugs into the turntable’s extension connector. The breakout itself has two weak I²C pull-up resistors (47 kΩ) and a pull-down resistor for the controller detect loopback (10 kΩ). The microcontroller is powered over USB, and no other external components are required. I did end up using a 470 Ω series resistor on the controller detect line just to protect the microcontroller in case of a programming error, but it could just as easily be omitted.
Although I’ve only tested with a Teensy LC and an Arduino Pro Micro, the code also supports the entire “Teensy” lineup as well as the Arduino Leonardo. Pin definitions change depending on the board selected. For the Teensy LC, I’m using pins 19 (SCL), 18 (SDA), and 17 (CD) as well as the built-in LED on pin 13.
Data Interface
As I said above, the turntable acts as a generic two-wire I²C slave device so getting the microcontroller to talk to it was a piece of cake. Thankfully others had already done most of the reverse-engineering, I just had to build an implementation.
After plugging in the turntable, the microcontroller senses that the detect pin on the breakout has been pulled ‘high’ due to the loopback connection. Once this reading has stabilized, the microcontroller initializes the turntable with two register writes over I²C: ‘0x55’ to register ‘0xF0’, and ‘0x00’ to register ‘0xFB’. This sets the device to unencrypted communication mode and data reading can commence.
For each update, the microcontroller requests 6 bytes of data starting at the ‘0x00’ register. These 6 bytes contain all of the control data for the turntable’s surfaces:
| Bit | ||||||||
| Byte | 7 | 6 | 5 | 4 | 3 | 2 | 1 | 0 |
| 0 | RTT<4:3> | SX<5:0> | ||||||
| 1 | RTT<2:1> | SY<5:0> | ||||||
| 2 | RTT<0> | ED<4:3> | CS<3:0> | RTT<5> | ||||
| 3 | ED<2:0> | LTT<4:0> | ||||||
| 4 | 0 | 0 | LBR | B– | 0 | B+ | RBR | LTT<5> |
| 5 | LBB | 0 | RBG | BE | LBG | RBB | 0 | 0 |
- 6 bits each for joystick X and Y (SX / SY)
- 6 bits each for left and right turntable speed (signed for direction) (LTT / RTT)
- 5 bits for the effect dial (ED)
- 4 bits for the crossfade slider (CS)
- 9 bits for the buttons (L/R GRB, euphoria, +/-)
The remaining 6 bits are zero’d. The table above (courtesy of WiiBrew) shows these control bits and their arrangement in the 6-byte packet.
To make it easy to interface with the turntable, I’ve built a library called Nintendo Extension Ctrl that handles the communication and data transformations. You can download it through the Arduino IDE’s library manager or find it on GitHub.
Software
Once I had the code to talk to the turntable and get the control inputs, I had to write the software to convert those generic inputs into Lucio-specific controls.
I’m using mostly built-in Arduino / Teensyduino libraries to keep things simple. The only external library required is the NintendoExtensionCtrl library for handling the DJ Hero communication.
In its main loop, the Teensy checks if the controller is connected. If it is, it polls it for new control data at a frequency of 250 Hz. For each new control data update, the program checks how many turntables are connected (0 / 1 / 2) using the library function, and then parts out the controls to their respective Mouse or Keyboard functions.
Both the aim (mouse XY) and movement (keyboard WASD) sets have dedicated functions which process the raw control data, while most of the buttons are a direct conversion to their HID counterparts. The only special case is the effect dial, which has a dedicated class to handle its accumulated total and its sub-byte rollovers.
Although it’s unnecessary in the controller’s final form (embedded in the DJ Hero controller itself), the program also handles disconnects and automatic reconnects. It also includes storage for the user’s main turntable selection in the EEPROM, and a config parser that checks for button hold duration for changing the horizontal turntable in dual turntable mode.
I’m not going to write a long explanatory post about the source code for this project like I did for the McCree Hammershot, mostly because it should be fairly straight-forward. But if you’re interested in the nitty-gritty details, you can find the entire commented source code on GitHub along with the commit and pull request history.
Programming was the most time-intensive part of this project, just because I’m a perfectionist and I enjoy trying to make things bulletproof (“trying” being the operative word). I’m my worst critic, so believe me when I tell you it works pretty well!
Packaging
After I had everything setup and working on a breadboard, it was time to figure-out how to get things nice and integrated into the DJ Hero controller body.
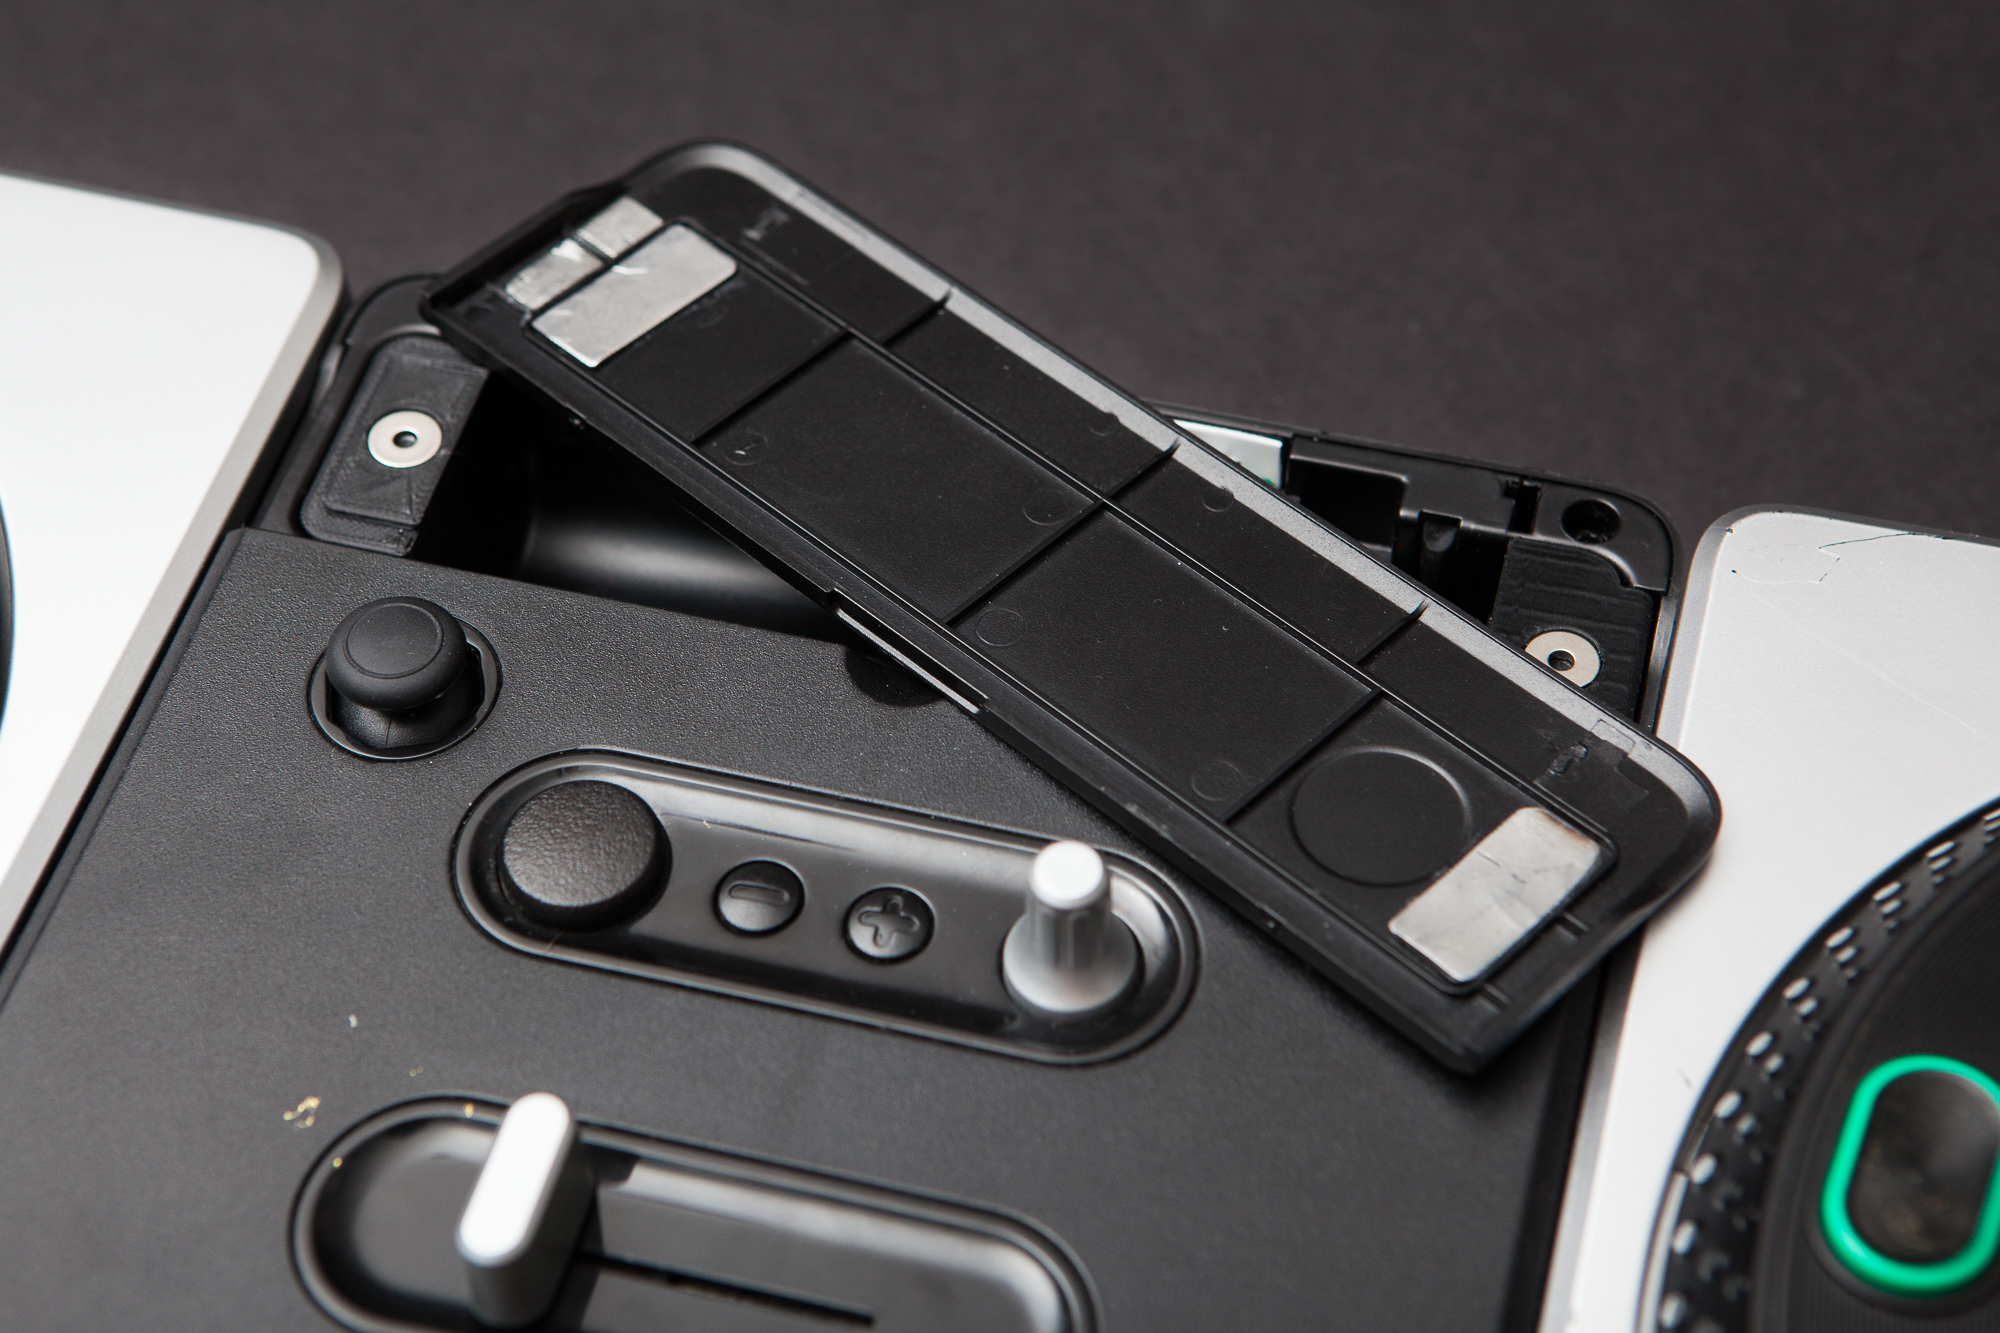
On the Wii version of the controller, there’s a nice bathtub cutout under a cover for the Wiimote to sit in. This is going to be where everything for this mod lives: it has plenty of space, is close to the back edge of the case, and gives me access to the Wii extension connector to talk to the controller.
Cover Woes
Before anything else, I had to fix the cover itself. The cover is an injection molded plastic piece that attaches to the base unit using two tiny molded plastic hinges. These tiny hinges are quite flimsy, and frequently break on these controllers. Of the two controllers I purchased, one had only 1 of the 2 hinges intact and the other had no cover at all (but one plastic hinge broken off inside).
Since I don’t need to fit a Wii remote, I have plenty of space for alternate mounting ideas. What I eventually came up with was a magnetic mount, using two small neodymium magnets in 3D printed mounts with corresponding sheet metal glued to the cover.
Magnet Mounts
The magnet mounts are just glorified blocks of plastic with a small cutout for the magnet, but they went through several iterations before I was happy. The left side is a tapered block, but the right side of the bathtub has a bunch of complex geometry for reasons I don’t quite understand, which made fitting the mount a challenge.
I taped down the mounts using some more of that double-sided tape from the ambilight project, so I can always pull them out later if need-be. The magnets themselves are 3/8″ diameter x 0.06″ thick neodymium magnets, purchased at Home Depot. They’re held in place using a small dab of cyanoacrylate glue.
Strike Plates
For the plates on the cover I’m using some scrap 0.0359″ (20 GA) mild steel sheet I had lying around from an earlier project.
After making some rough templates with paper, I cut the sheet metal to size with a pair of straight shears. The backs of these plates were roughened up with 100 grit sandpaper, cleaned with acetone, and then clear coated with a flat clear enamel to prevent rust. The cover was similarly roughened with 100 grit sandpaper and then the two parts were joined with a tiny amount of my favorite cyanoacrylate glue.
The right side of the cover ended up using 3 pieces of sheet metal because of the ribbing in the plastic. I couldn’t move the mount further inward otherwise it would interfere with the connection pigtail, so this was the best I could do. I also had to shorten two of the tall plastic ribs near the end to get the the magnet close enough to provide sufficient holding strength.
With the magnetic latch in place, the cover is held down perfectly. It stays put even when shaking the controller upside-down, but can be pulled off easily for maintenance. Success!
Microcontroller Mount
The last bit of packaging was the mount for the microcontroller. I wanted something that held it securely in place and allowed access to the USB port from the outside of the case.
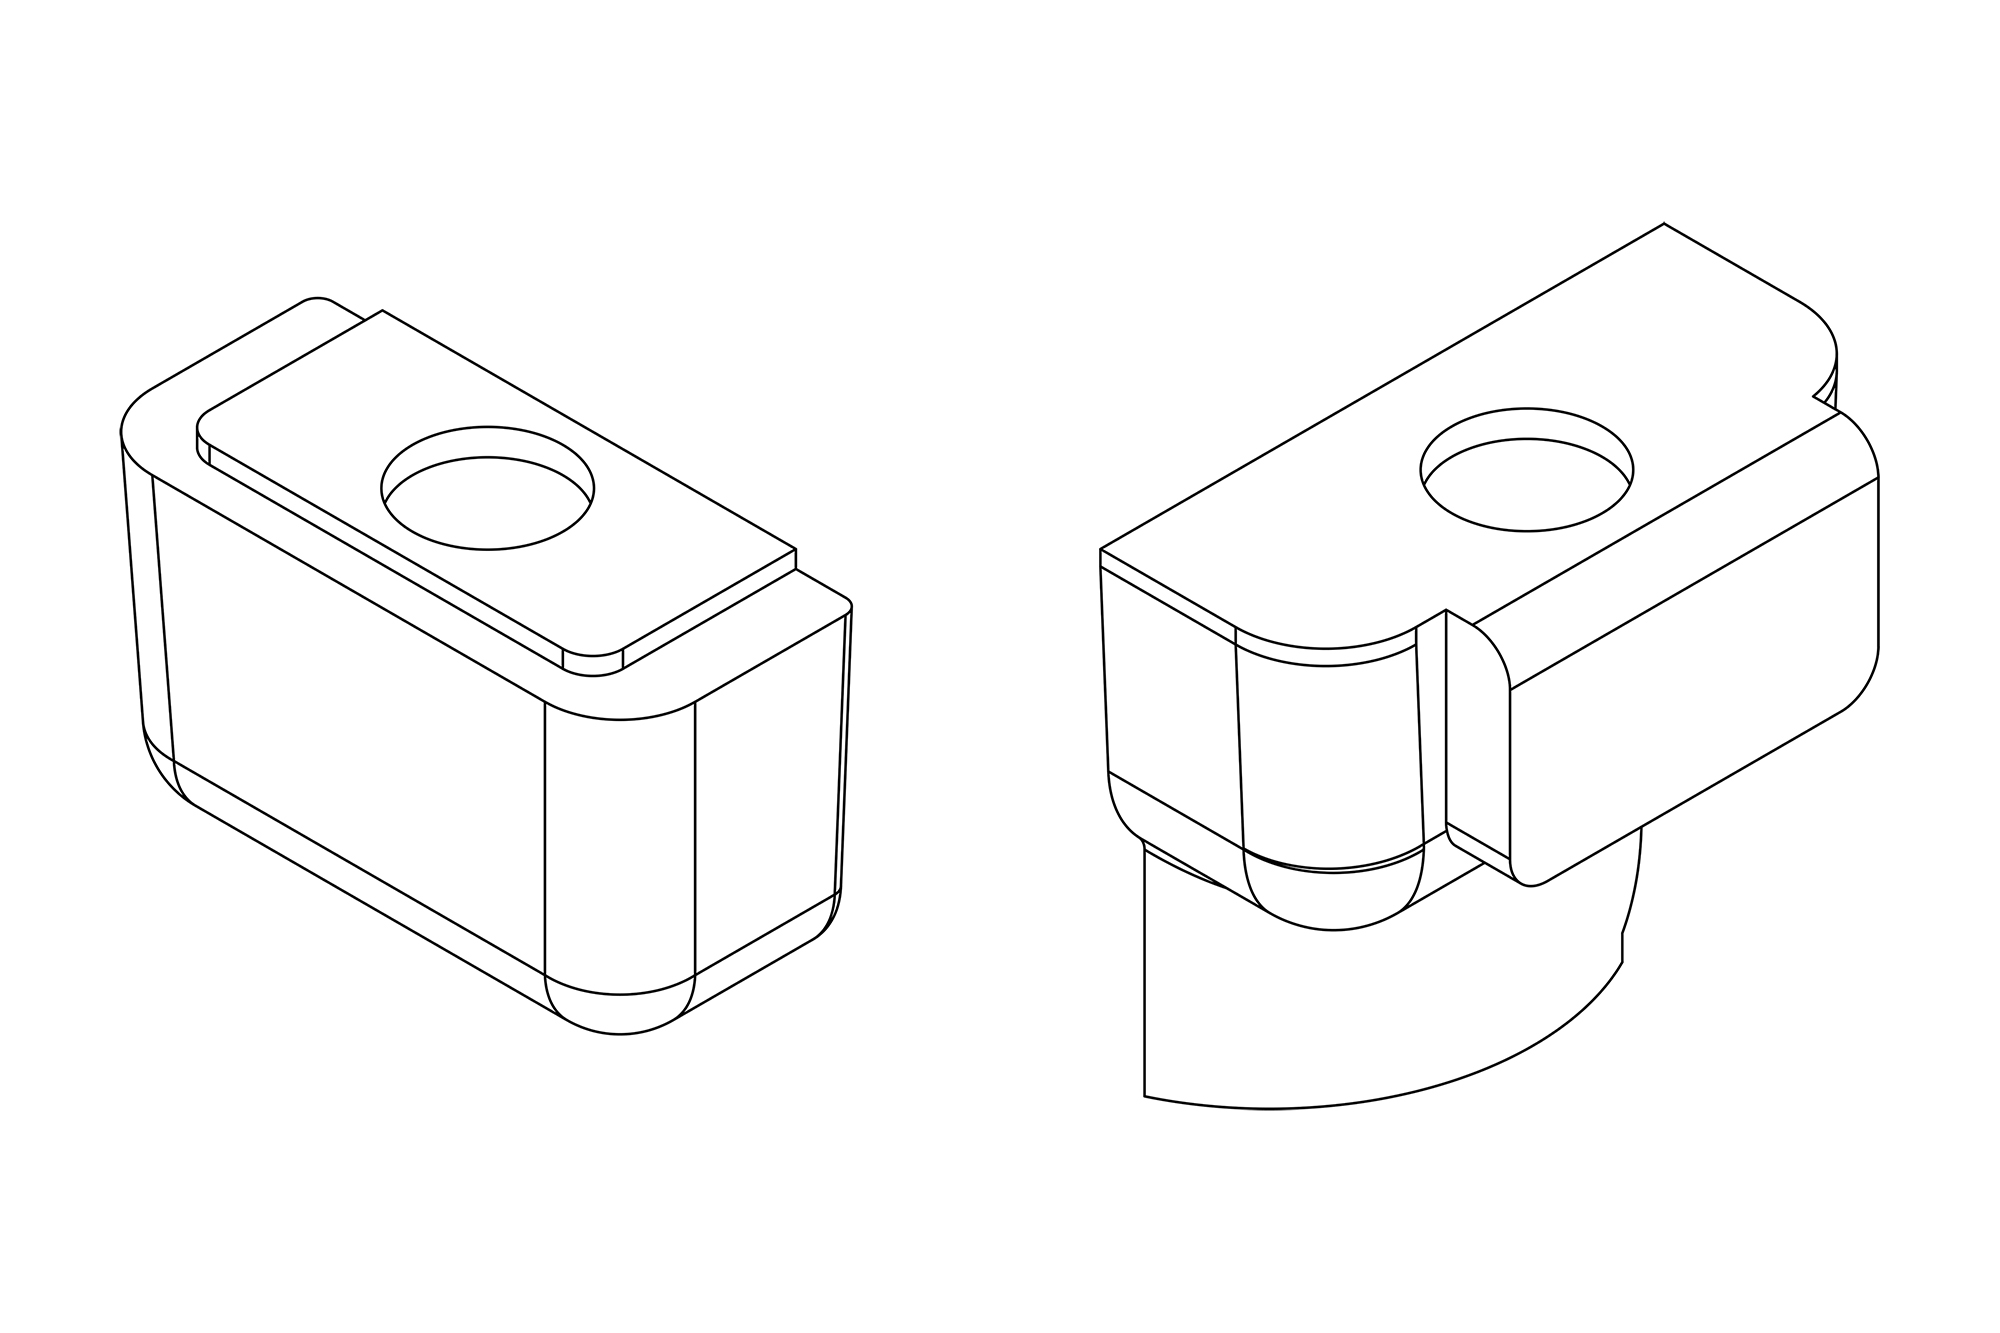
Basic Design
The design I settled on has a rectangular cutout for the microcontroller, a “shelf” for the breakout board to sit on, and a wire trough to hide the wires that connect them together. The mount is a near press-fit into the case to prevent the pigtail from pulling it out of position, although it’s held down with a few small strips of adhesive tape for good measure.

To accommodate the pigtail’s wire, the area under the breakout board is cantilevered so the cable has space to twist where it wants to. The microcontroller is held down with (again) strips of adhesive tape since it does not have mounting holes on the PCB, while the the breakout board is held down with two M2-6 bolts which self-tap into the plastic. The two are connected with some short pieces of 30 AWG stranded wire.
Notching
Conveniently, the base station already has a notch in its side that looked perfect for mounting a USB port. The base station is made of two plastic shells bolted together. For this notch, the interior shell (with the “bathtub” etc.) is cut out in the shape of this notch, and the outside shell is a wall only 2 mm thick. The notch is just wider than the microcontroller, which gives me enough room for a mount.
I 3D printed a mockup mount to align the microcontroller at the right height and centered in the notch. Using a piece of painter’s tape on the notch itself, I traced the outline of the USB port to see where I needed to cut. Then I disassembled the two shells, drilled out the opening, and squared it off using a set of needle files.
I sized the microcontroller’s mounting bracket so that it will drop straight down into the mount without having to angle the USB port into the opening. Because of this the microcontroller would slide forward slightly when trying to disconnect the cable, so I cut a small shim out of 0.030″ polystyrene sheet I had on hand and taped it into place. The shim also acts like a nice retaining bracket, preventing the USB port from pulling up and becoming inaccessible from outside of the case.
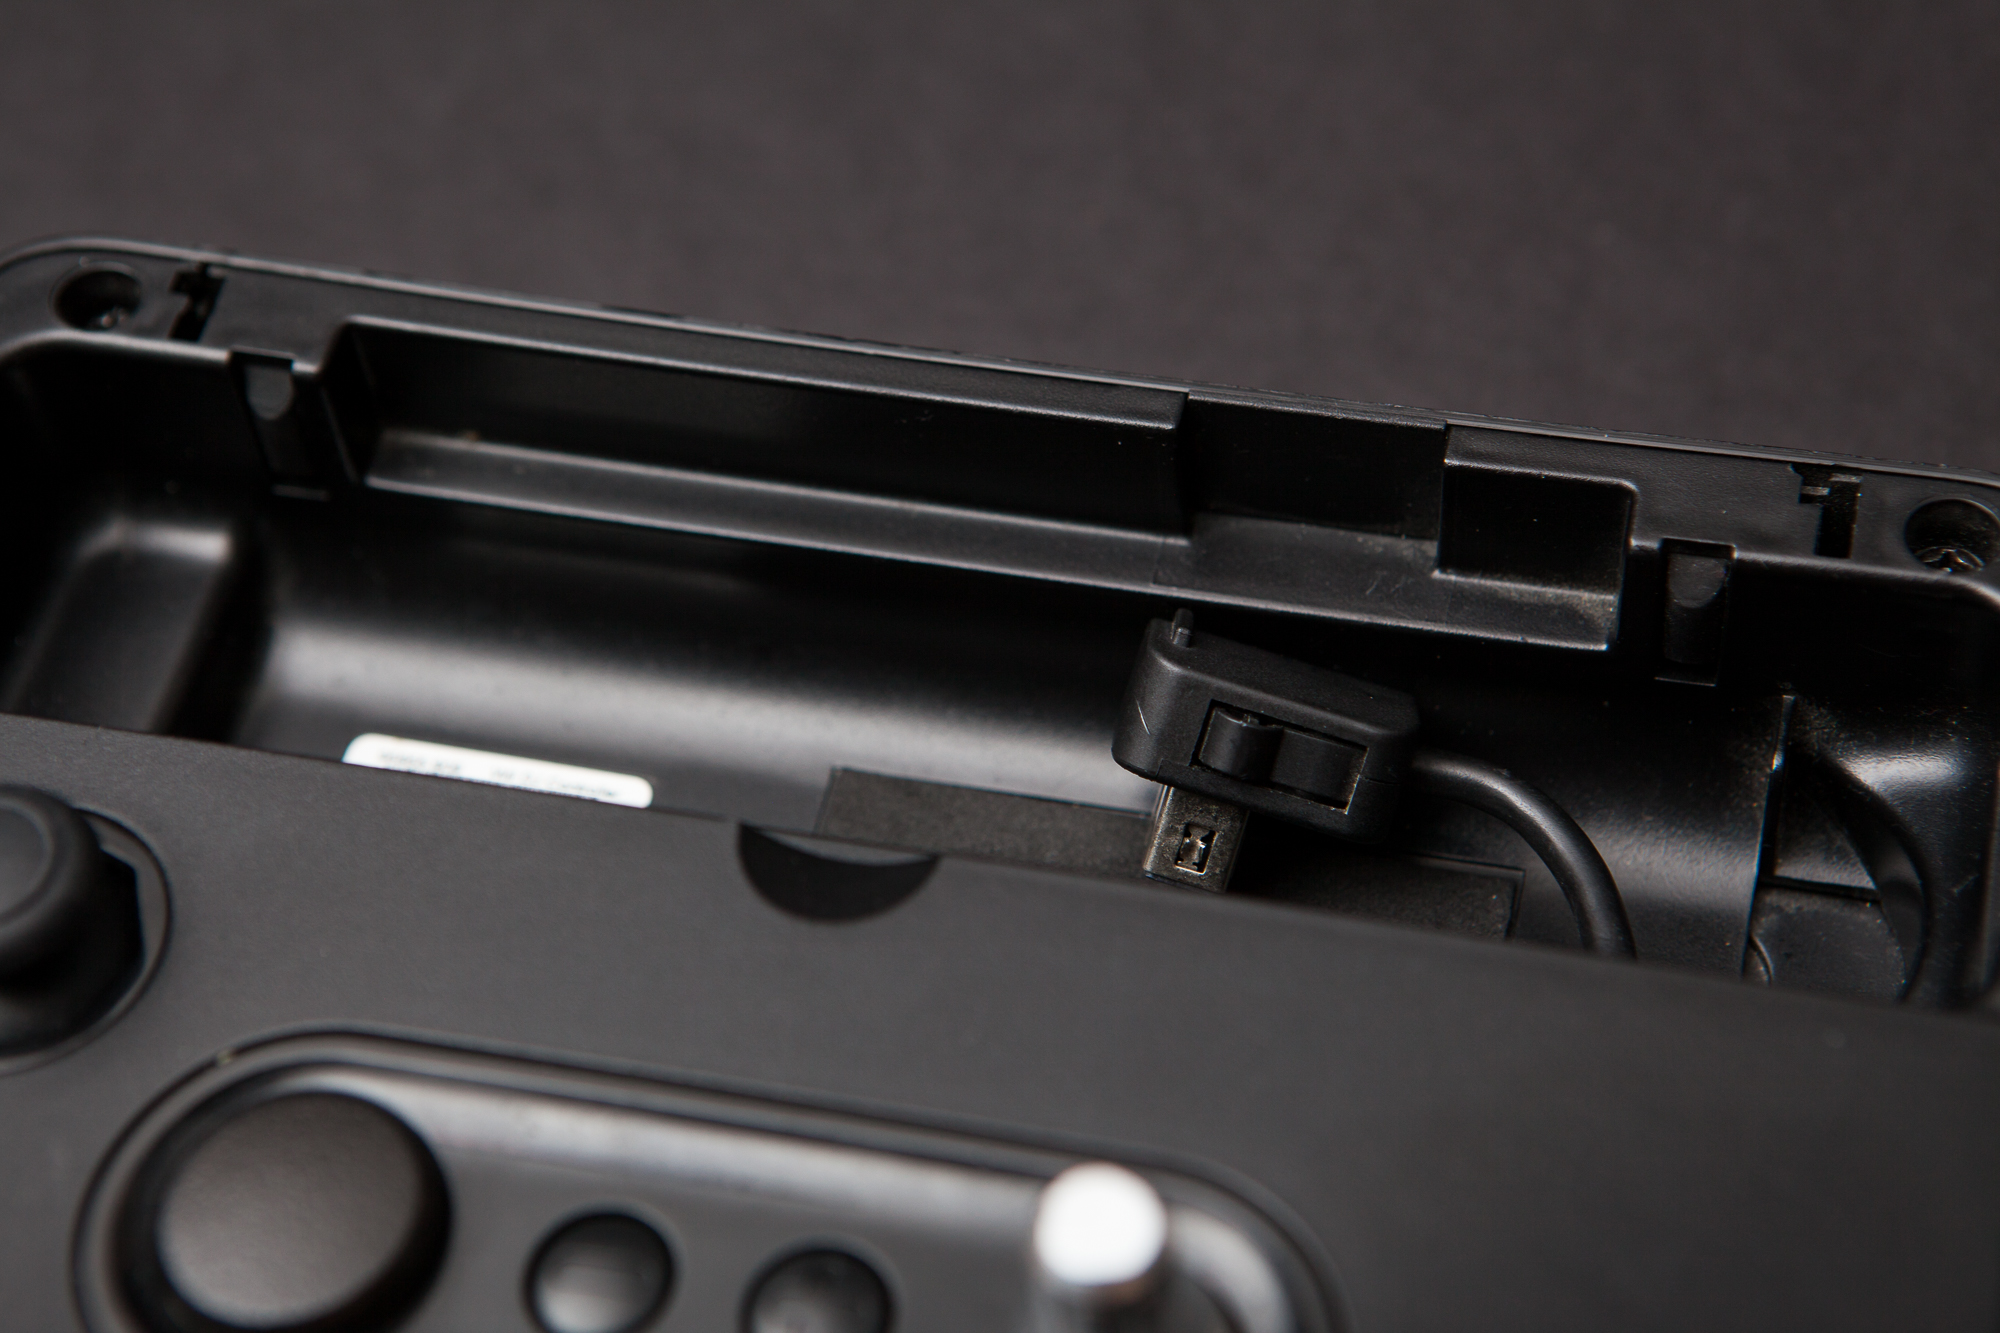
The Pigtail Problem
For all iterations of this mount, the big issue was how to mount the breakout board so it connected easily to the turntable’s pigtail connector. The connector itself is bulky and really hates to be pushed down below the cover (even in its regular use with the Wiimote), as the cable comes out the bottom of the plug rather than the side for some inexplicable reason.
Moving the breakout board mount a few centimeters to the left didn’t seem to work, as the cable kept wanting to twist to the right. The final version has the connector 90° to its original position behind the Wiimote at roughly the same height, which seems to be the best I can do.
Although it was the best position I could find for it, the connector still kept giving me grief. With the microcontroller mount taped down in its final position, the pigtail’s cable kept trying to push the mount out of the case. Eventually I got sick of fighting the cable and ditched the pigtail’s plastic housing altogether. It has three small Phillips screws on the front, and once those were undone the two pieces slid right off. With the plug’s housing gone the cable is free to point off to the side, and now it’s a perfect fit!
Decals
With everything nicely packaged inside of the base unit, the controller is done! Except that, you know, it looks exactly like a boring old regular DJ Hero controller… So I decided to add a bit of flash in the form of vinyl decals!
I ordered two small white vinyl “Lucio Logo” stickers from Etsy for $2 each. Unfortunately I couldn’t apply these directly, as the silver “DJ Hero” logo would show through on the edges. So I needed to make a background as well. For that I picked up a short roll of Oracal 631 matte black vinyl and a compass cutter. Then it was time to get to work!
To start, I measured the size of the turntable’s spindle and created a mockup in Illustrator. I gave the shapes thin black outlines and placed the dimensions in text. This was going to be my cutting template.
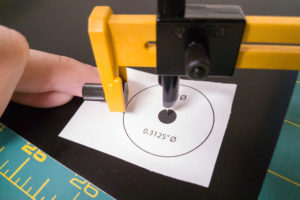
I used the template to set the size of the compass and then cut out a series of circles from the black vinyl roll. The smallest circle possible for the cutting tool was slightly too big for the inner circle, so I used a craft knife to cut out the center of my template. I laid the template on top of the vinyl and colored in the hole using a silver marker, then again used my craft knife to cut it out. Voilà! A nice vinyl background for the decal.
For applying the decal itself, I created a mockup of the sticker + background in Illustrator using the photo from the listing. I then printed out a 1:1 copy to use for placement. After peeling the transfer paper off of the decal, I then taped it down directly above its printed counterpart (adhesive up). I then aligned one of those black background circles I had cut out previously and squeegee’d the two together.
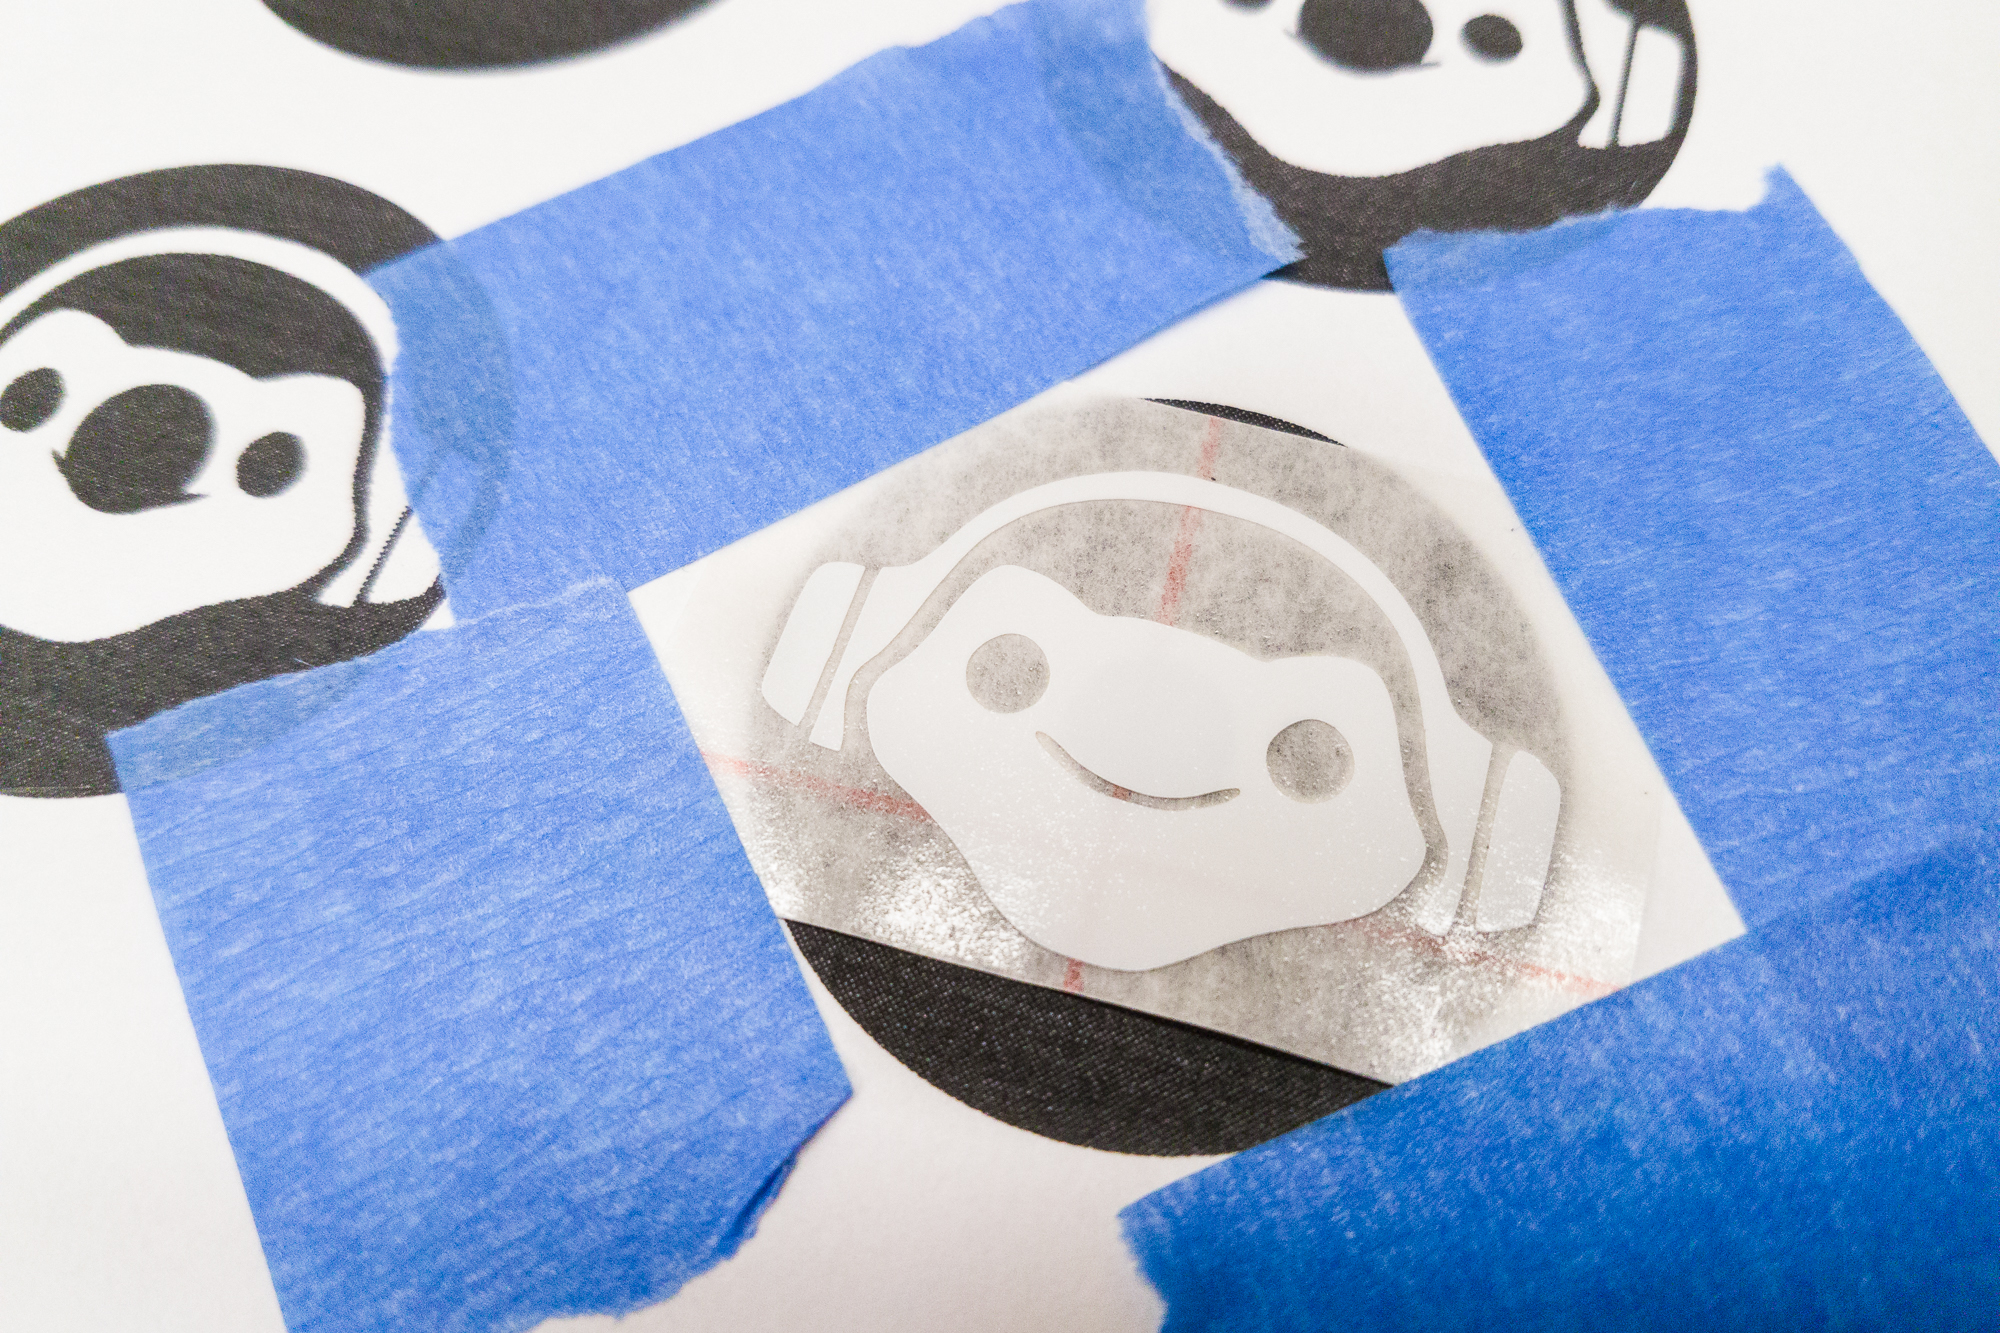
Through the pre-existing hole in the back of the black vinyl, I used my craft knife to remove the parts of the decal covering the spindle center. With the sticker sandwich complete, I peeled the completed decal off of the transfer paper, pulled off the backing on the black circle, and applied it to the turntable.
I decided to match the decals on the left and right, aligning them with the turntable buttons on the left-hand side. This was so it didn’t matter which turntable I used on which side, and I can always swap them if there’s an issue.
How Well Does It Work?
All of this is well and good, but it doesn’t mean much if the controller doesn’t actually play all that well. Once I had the decals in place, I buttoned up the controller and shot some video to see how well it performed in action. I had done plenty of testing while it was being programmed, but mostly in the practice range. Now it was time to try it out in the horrors of Quick Play.
If you’d like to draw your own conclusions (or if you think this whole thing is fake!), here’s a full game played on Rialto.
The Good
All-in-all, the controller works pretty well! The game is definitely playable, in that I can successfully use all of Lucio’s abilities, play the game, and (sometimes) win while feeling like I’m contributing to my team. If it weren’t for the fact that I usually aim on a horizontal plane, you might not even know I’m using a turntable!
Easily the most satisfying part of the controller is twisting the effect dial to trigger the “amp it up” ability. It just feels so intuitive, like you’re actually turning up the volume on Lucio’s songs. Turning the dial down to reload feels the same, though it’s always a little odd that you’re using a dial to reload.
A close second for most satisfying is the crossfade slider. Something about having the movement 1:1 with the in-game animation just feels so amazing. Shout-out to Blizzard for the “Hold to Crossfade” option that makes this possible!
The joystick movement and the other buttons also work great, but they’re nothing to write home about; they just feel like your typical controller.
The Bad
As is expected, the controller’s biggest difficulty is with aiming.
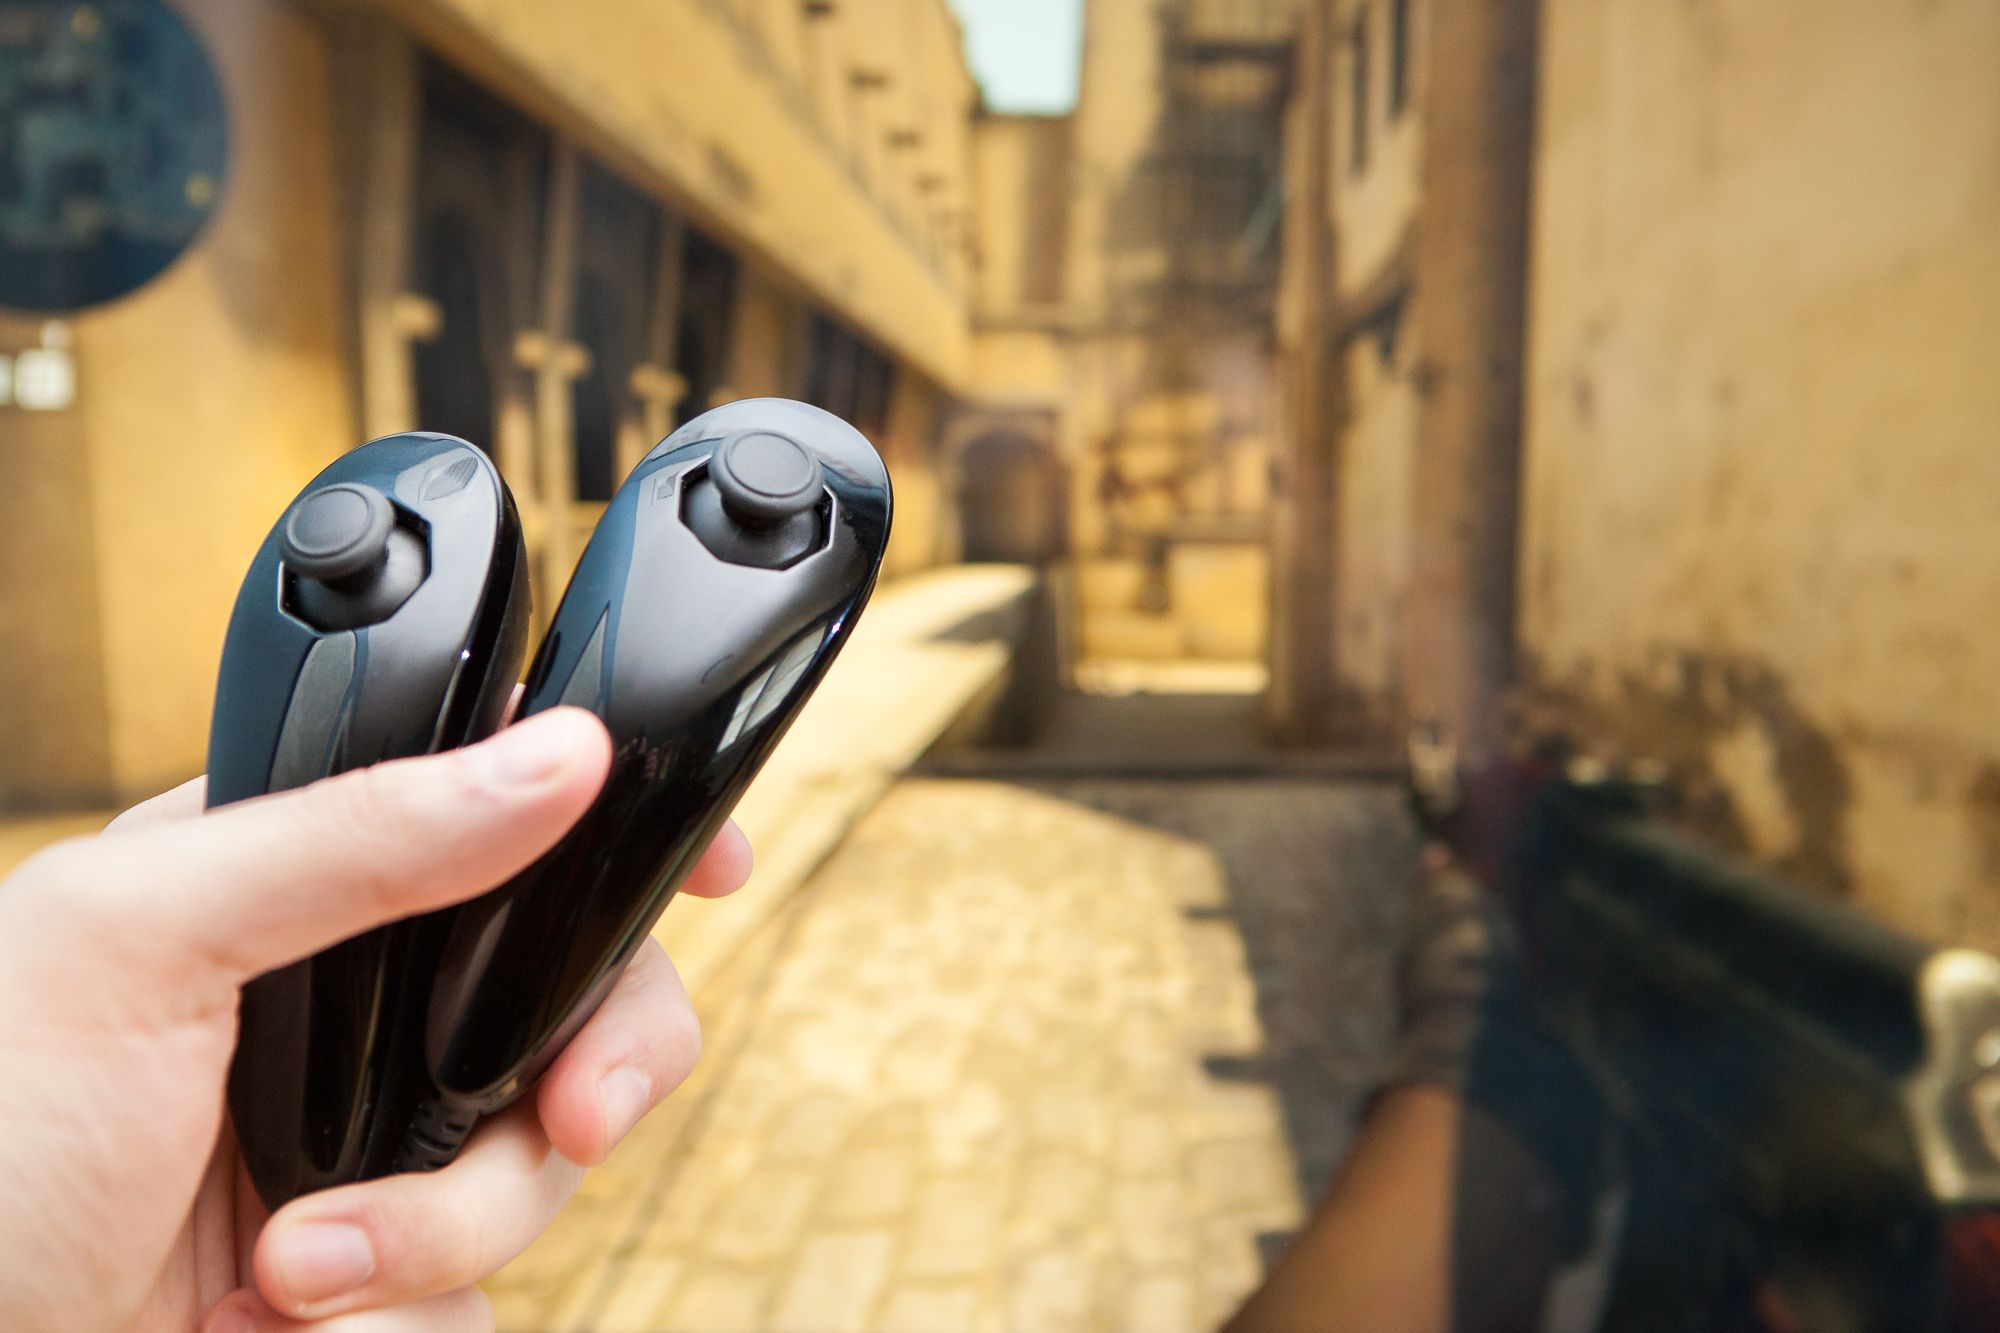
For one, the user is always limited to only one axis at a time – typically the horizontal. Usually this means I set my reticle at head level and go to town, but Overwatch is not exactly a level game. Fighting on ramps is awkward, and I often find myself jumping to try to hit characters slightly above me. This also means that characters with vertical movement are basically impossible to deal with solo (looking at you, Pharah). In the two-turntable configuration I can move my left hand off of the joystick to try to Etch-A-Sketch aim, but it’s awkward and in a fast-paced game like Overwatch standing still is usually a death sentence.
Even ignoring the vertical component, the aiming itself is not terribly accurate. The turntable uses an optical encoder with relatively low resolution, which makes it difficult to aim precisely. I could tweak the sensitivity numbers, but any adjustment to those to improve the aiming accuracy will make it harder to navigate. And even if you do improve the accuracy, you’re still stuck aiming on a horizontal plane.
I do mean it when I say the controller works great, and I never expected to get mouse-quality aiming with what is essentially a DJ themed Etch-A-Sketch. Still, the aiming is a significant shortcoming.
The Ugly
Okay, I’ll say it. The spindle as a “nose” on the Lucio stickers looks a little weird. What can you do.
Conclusion
And with that, it’s done! The controller is plug and play and works great.
Looking at the completed version, I’m not sure I’d change anything – either in modifications to the complete version or changes to the way I built it. There’s definitely room in the case for adding batteries and wireless capability, although given the controller’s size I’m not sure it would be that useful. A more complicated status LED / display might be nice as well, although I like the simplicity of the bare microcontroller.
As for lessons learned, I’d say that this was one of those projects where I don’t think I actually learned much while doing it, it was mostly just applying my preexisting skills to something novel. I definitely learned a fair bit about C++ classes, inheritance, and permissions while doing the DJ portion of the NintendoExtensionCtrl library though, so at least that counts for something!
I will say that I spent far more time on this project than I wanted to. This was originally a spinoff of a spinoff project, and I’ve still yet to get back to the original one. Although I’m happy with the way this turned out and the documentation feels thorough, I think I need to spend less time documenting things and more time building them. Easier said than done!
Until next time.
Parts List
Per usual, I’ve linked the parts throughout the post as they’re used. But since it’s usually handy to have everything in one place, here’s a complete list. Be aware that some of these are Amazon Affiliate links that help fund the content on this site. Thank you for your support!
Lucio Conversion
- DJ Hero Turntable (Wii version)
- Teensy LC Microcontroller (Amazon)
- NXC Breakout Board
- 470 Ω resistor, 1/4 W
- 30 AWG stranded wire
- M2-6 Bolts (x2)
- 3D printed mounts
- Double-sided tape
- 0.030″ polystyrene sheet (shim)
Note that the NXC breakout boards are an in-house creation and aren’t purchasable at the time being. You can substitute another Wii breakout board like the Nunchuky, though be aware that the mounting holes won’t line up. You’ll need to add pull-up resistors to SCL/SDA, a pull-down resistor for the controller detect, and solder a wire to the controller detect pad.
Decals
- Lucio logo vinyl cutouts
- Oracal 631 matte black vinyl
- OLFA Compass cutter
I’m not going to link the specific seller I purchased the decals from because they took nearly a month to ship my order. You should be able to find the decals easily enough on Etsy or a similar site.
Magnetic Cover
- 3/8″ diameter x 0.06″ thick neodymium magnets
- Cyanoacrylate glue
- 3D printed mounts
- Double-sided tape
- 0.0359″ (20 GA) mild steel sheet
Why Wii?
Everyone I talk to about this project has the same question: why use the Wii version of the DJ Hero turntable? Why not the Xbox 360 version or the PS3 version? Three reasons, in order:
1: Analog Stick
All three consoles share the same general controls with one exception: the analog stick.
Both the Xbox 360 and PS3 versions of the controller function as standalone units, and under the flip cover at the top you can find your typical navigation controls: a directional pad, start/select, and ABXY ( △○×□ ). The Wii version uses the Wiimote for its wireless capability, plugging into the expansion port like most other “accessory” controllers.
To accommodate the Wiimote, the Wii turntable is significantly wider than its counterparts. For whatever reason, the good people at Activision decided to make use of that additional real-estate by adding a joystick to the Wii version. (I assume it has something to do with navigating the Wii OS when the IR sensor is blocked, as the Guitar Hero guitar also has a joystick while the 360 and Ps3 guitars do not. But that’s just a guess.)
Even though I’m using it as a directional pad, a joystick is more ergonomic and faster to use. Which gives the Wii controller a big advantage over the competition.
2: Interfacing / I²C
I’ve spent a fair bit of time following instructions when replicating other people’s projects, and it really grinds my gears how finicky some people make things. Personally, I really like building stuff that’s plug-and-play. In this case quite literally.
The Xbox 360 turntable uses a proprietary wireless protocol and the PS3 turntable uses Bluetooth. In both cases, I would have to make use of existing drivers and write some wrapper software that re-bundles the inputs to do what I want. This is a pain, and it would require some hackery to get a passable result.
In contrast, the Wii turntable uses none other than I²C, which is a piece of cake to deal with and I can do everything on a microcontroller. The end user can plug it in and play without having to install any drivers or mess with their game’s files.
3: Extension Library
The third reason, and the real reason I went with the Wii turntable, was that I was already working with Wii extension controllers for another project. I had borrowed one of these turntables to test the implementation in my library, and the idea for the Lucio controller came to me. The rest, as they say, is history.
All-in-all, I like the all-in-one solution with an analog stick that the Wii turntable gives me. If I had to do it all again, I think I’d still make the same decision.