A few weeks ago, a friend of mine introduced me to a new rhythm game. Unlike previous titles such as Guitar Hero or Rock Band that use multiple discrete buttons in order to match different notes, this game used a virtual wheel – an analog input to slide, spin, and tap along with the beat. To top it off the game featured an electronic music tracklist and was a blast to play.
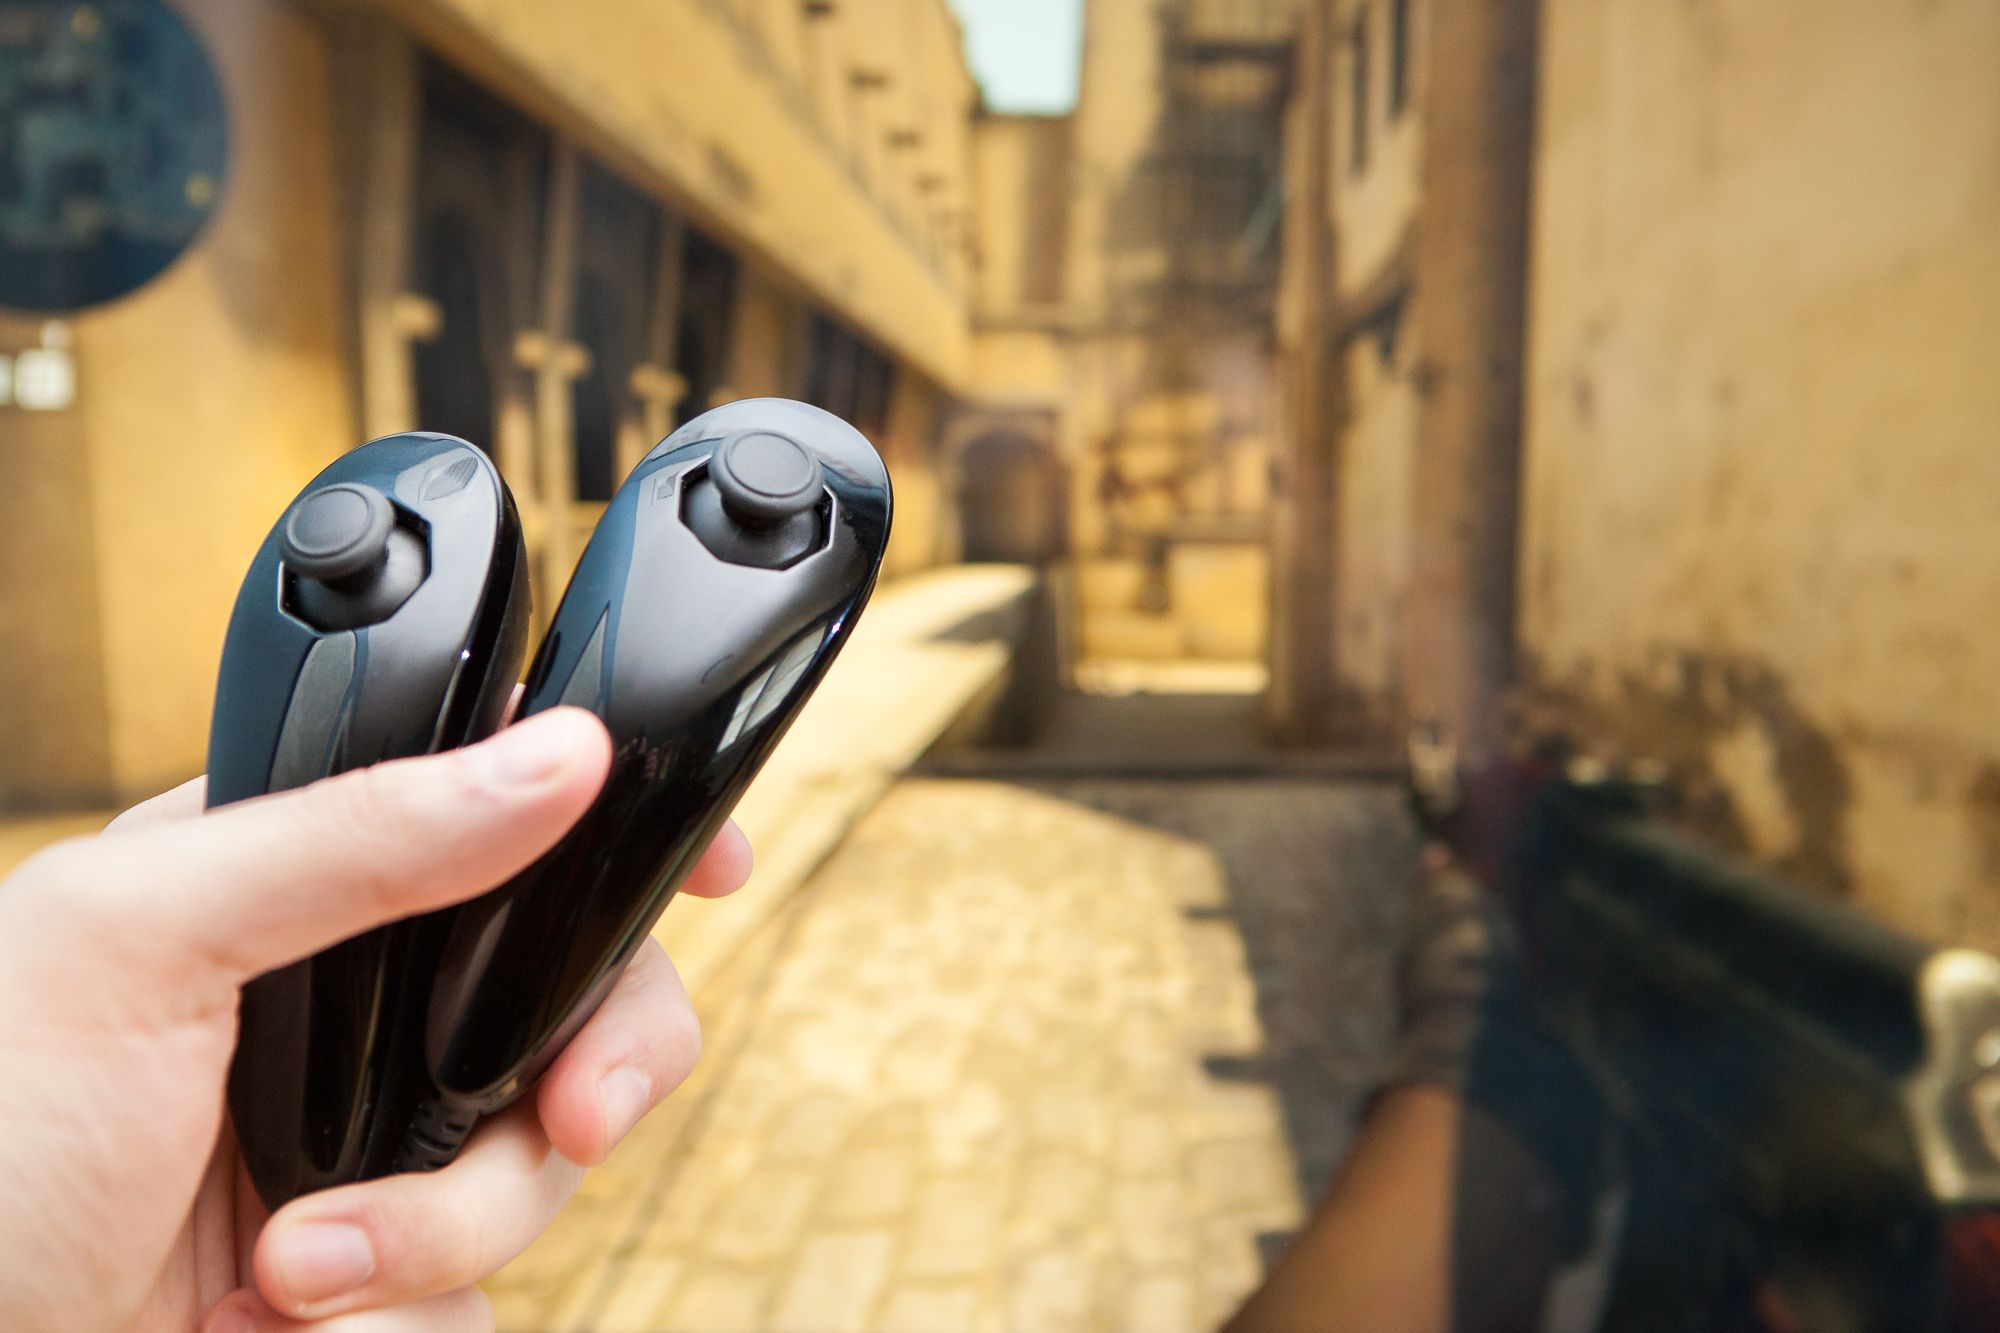
The game is called Spin Rhythm XD, and it was designed to be played with a DJ MIDI controller. Having no such professional DJ-ing equipment handy I decided to do the next best thing: convert my old plastic Wii DJ Hero turntable into a controller for Spin Rhythm XD!
The Video
Because some things are just better in video form, here’s a quick YouTube overview of the controller – how it works, how it plays, and how mediocre I am at the game regardless.
If you’d like to know more, keep reading!
The Game
Spin Rhythm XD is a new take on the rhythm game genre, combining the accessibility of Guitar Hero with the analog finesse of osu!. As the developers describe it, Spin Rhythm is “an inter-dimensional electronic music rhythm game with fluid, analogue controls and hand-crafted levels. Spin, tap, flick and flow through the juiciest electronic music in the galaxy.”
Spin Rhythm XD was released in “alpha” on October 22nd, 2019 through Steam Early Access. At the time of writing, Spin Rhythm XD is still in active development. There are many features yet to come including weekly leaderboards, Twitch/Discord integration, multiplayer, and a single player “tour” mode where users play through a story and unlock more tracks.
But even in its “alpha” state, the game feels incredibly polished and satisfying. So let’s see if we can’t add this DJ Hero controller into the mix.
Controller Setup
DJ Hero was a rhythm game released in the late 2000’s by Activision, capitalizing off of the immense success of the Guitar Hero franchise. The game was well received critically but has long since been forgotten, and the plastic controllers that were bundled with it have sat in people’s closets ever since.
The game was released for three consoles: the Xbox 360, the Playstation 3, and the Wii – each with their own version of the turntable controller. Of these three, the Xbox 360 variant is typically considered to be the most versatile because of Microsoft’s driver support for the Xbox 360 hardware on Windows. But rather than building a PC program to try and interpret and reconfigure the outputs from the driver, for this project I’m going to use the Wii version of the turntable connected to a small embedded microcontroller.
There are a few reasons for this, but the main one is that the end result is much easier to just hook up and use. Once modified, this controller is plug and play with the game’s default settings. No driver or other software is required on the PC.
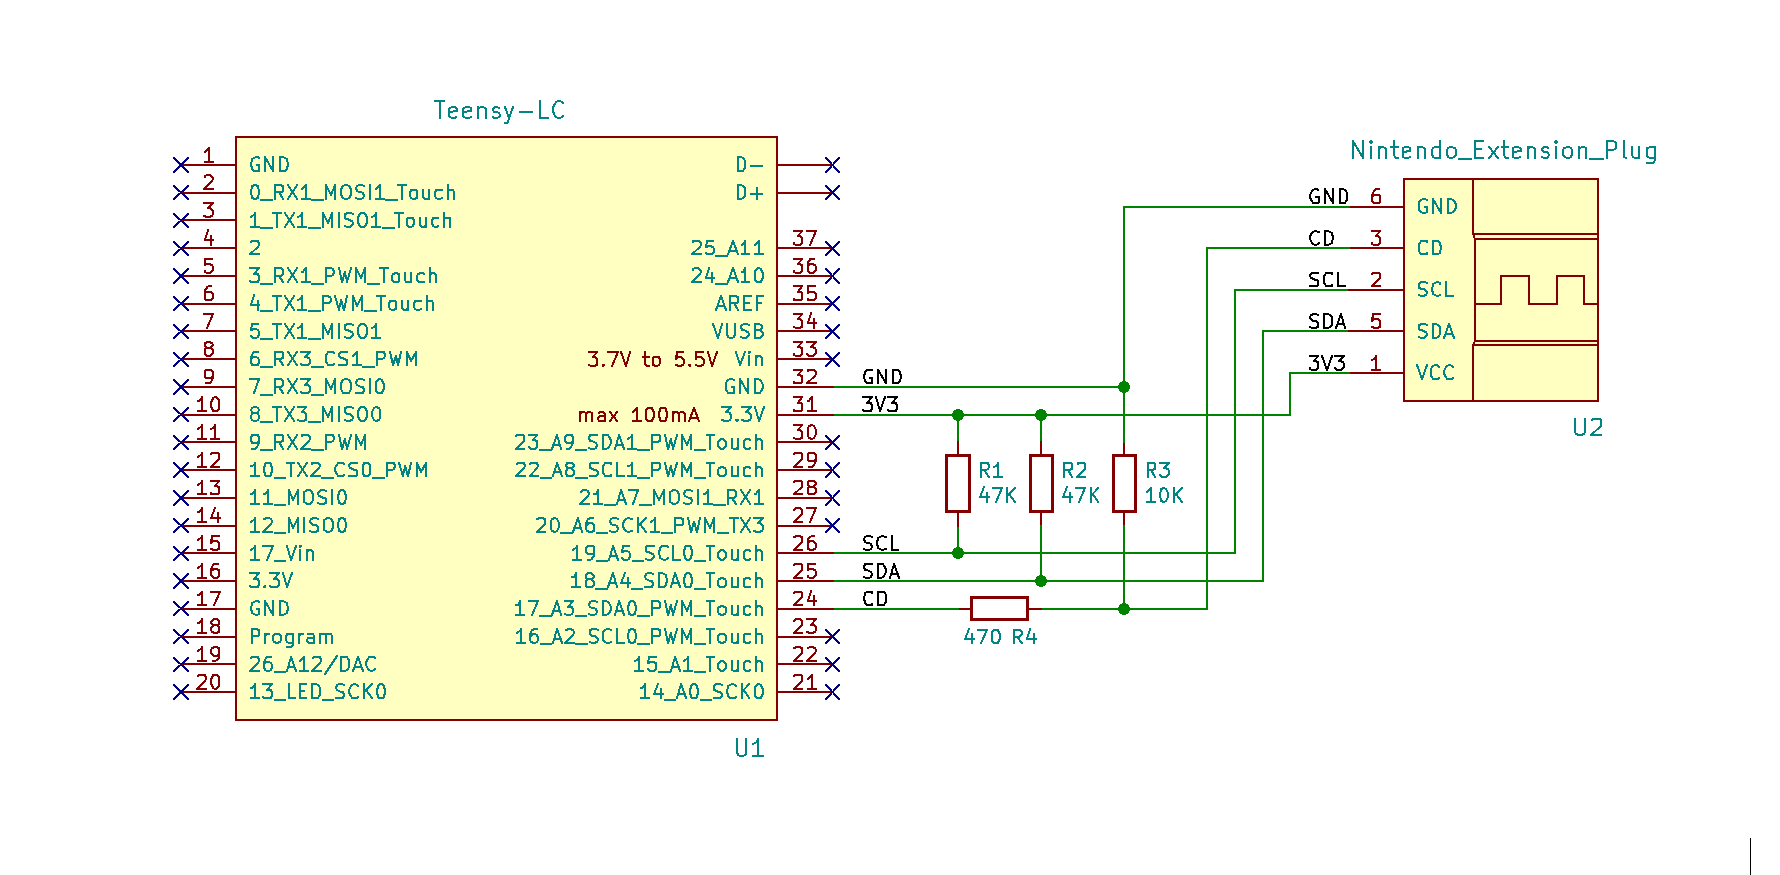
The Wii version of the DJ Hero controller has a connector that attaches to the bottom of the Wiimote just like a Nunchuk. This connection is none other than plain-old I²C data, which can be spoken by any run-of-the-mill microcontroller.
Hardware
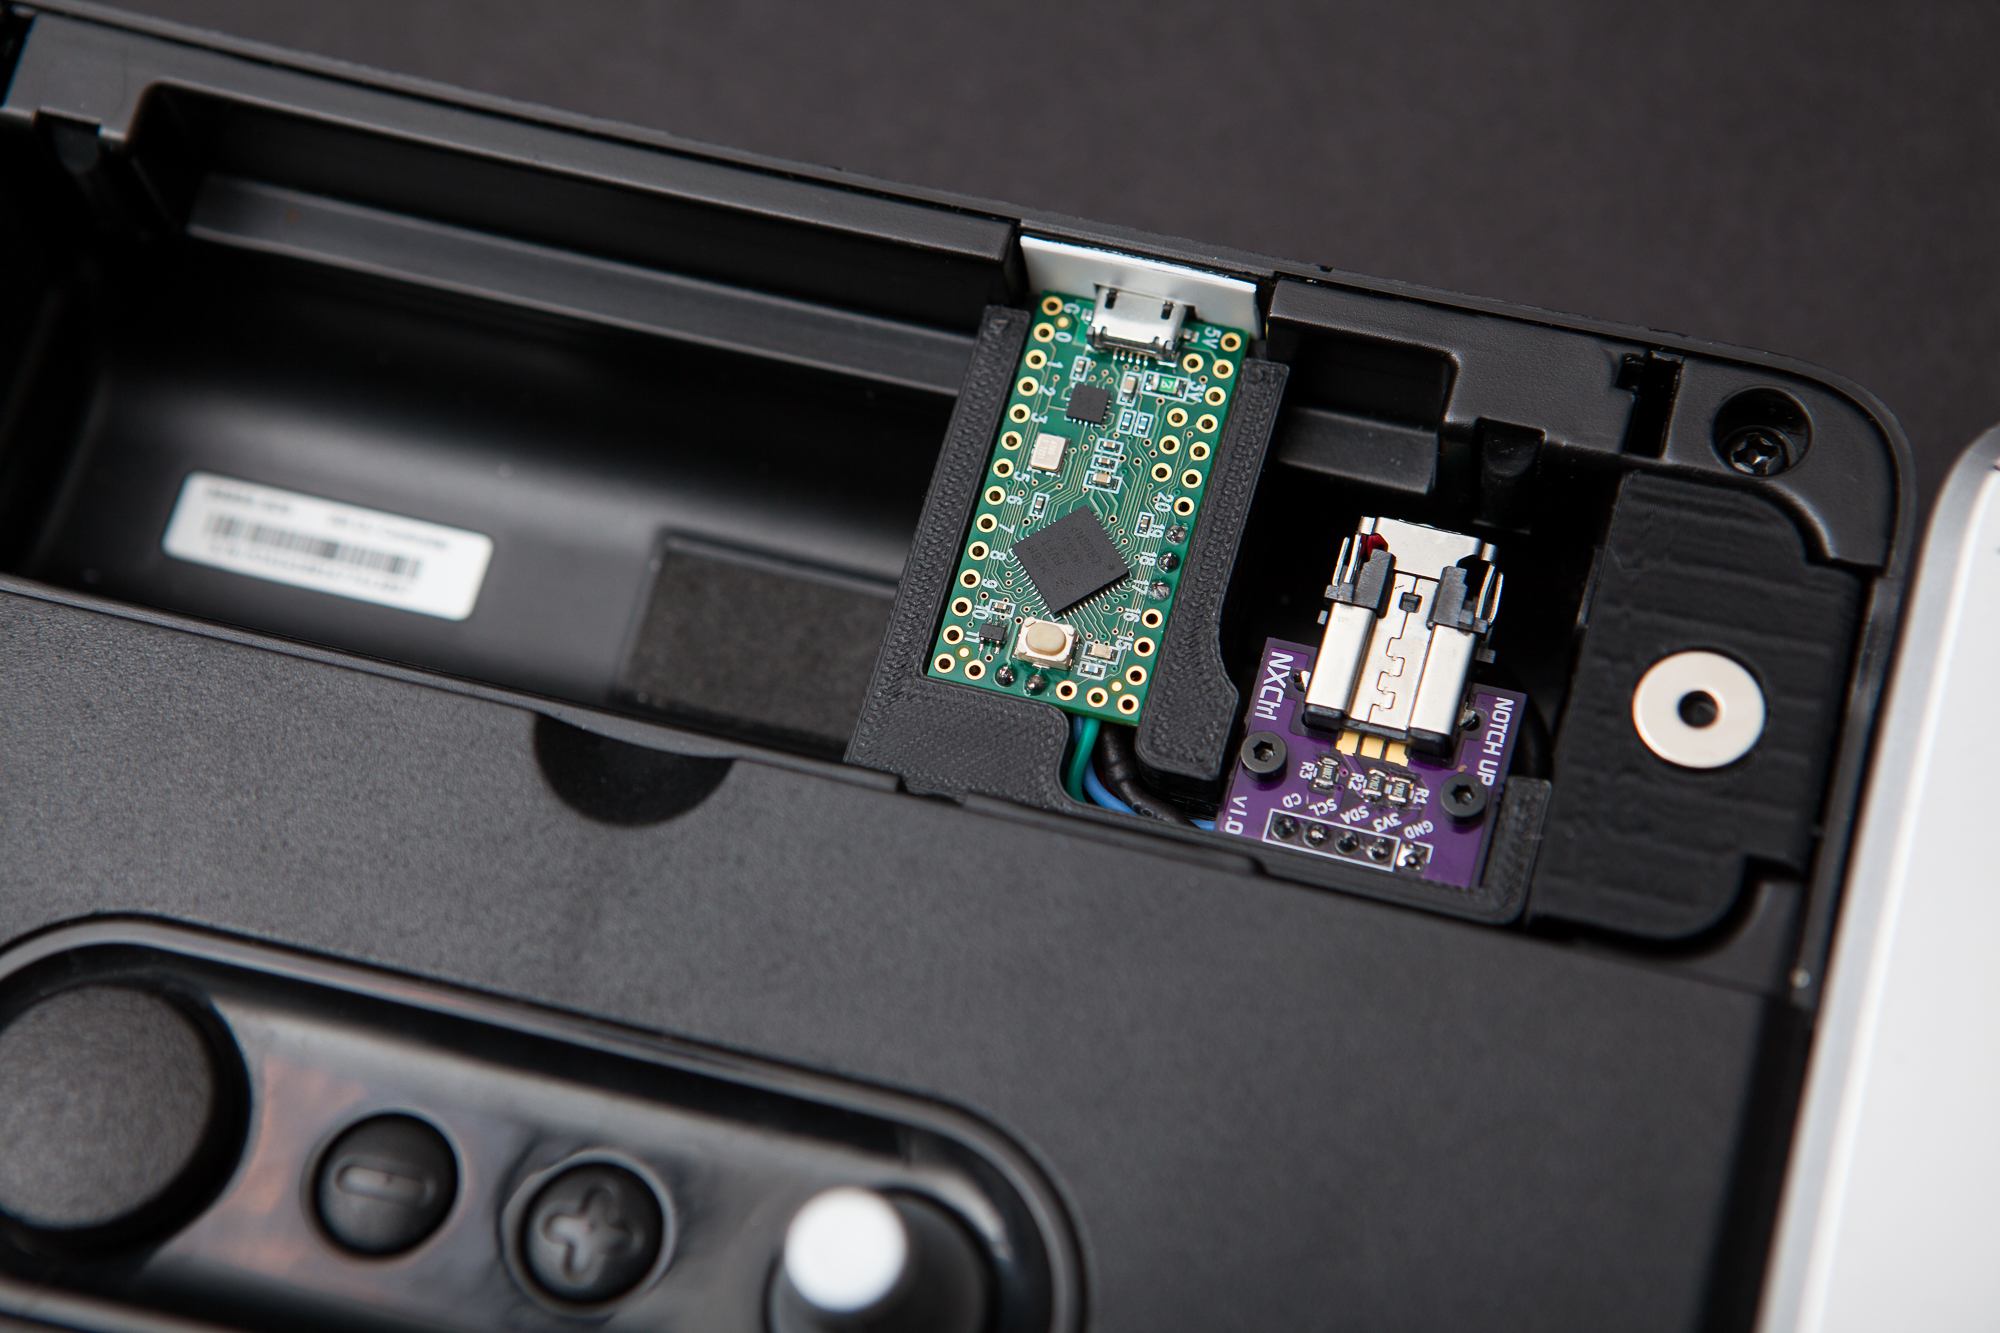
The microcontroller of choice for this project is a Teensy LC running at 3.3V. This is attached to a custom breakout board I designed which has 47K Ω pull-ups for the I²C lines, a pull-down for the controller’s “detect” pin, and fingers to connect to the DJ Hero controller’s Wiimote connector. Both the microcontroller and the breakout board are attached to a 3D printed mount that sits inside of the Wiimote cavity in the controller, with the micro USB port exiting through a small hole in the back.
If this looks familiar, it’s because it’s the same hardware setup I designed and built for the DJ Hero Lucio project a little over a year ago! In fact, this whole project started because I realized it would be trivial to convert the Lucio controller to work with Spin Rhythm. A handful of hours reprogramming, a quick firmware flash, and here we are.
Speaking of reprogramming…
Software
The firmware on the microcontroller was forked from the DJ Hero Lucio codebase. Control-wise, Spin Rhythm XD is a much simpler game than Overwatch so I was able to pare down the codebase to the essentials.
Like with the Lucio controller, the Teensy is acting as a USB-HID device emulating a keyboard and mouse, using the USB libraries integrated with Teensyduino. The DJ Hero communication is done by my own library, NintendoExtensionCtrl, which was built to decode the data from the “extension controllers” which connect to the Wiimote (Nunchuk, Classic Controller, etc.) of which the DJ Hero turntable is a part.
Not including the dependencies and the helper class definitions, the main code to convert the inputs to Spin Rhythm XD is only around 100 lines long. The source code is available to download on GitHub and is open source, licensed under GPLv3.
Style
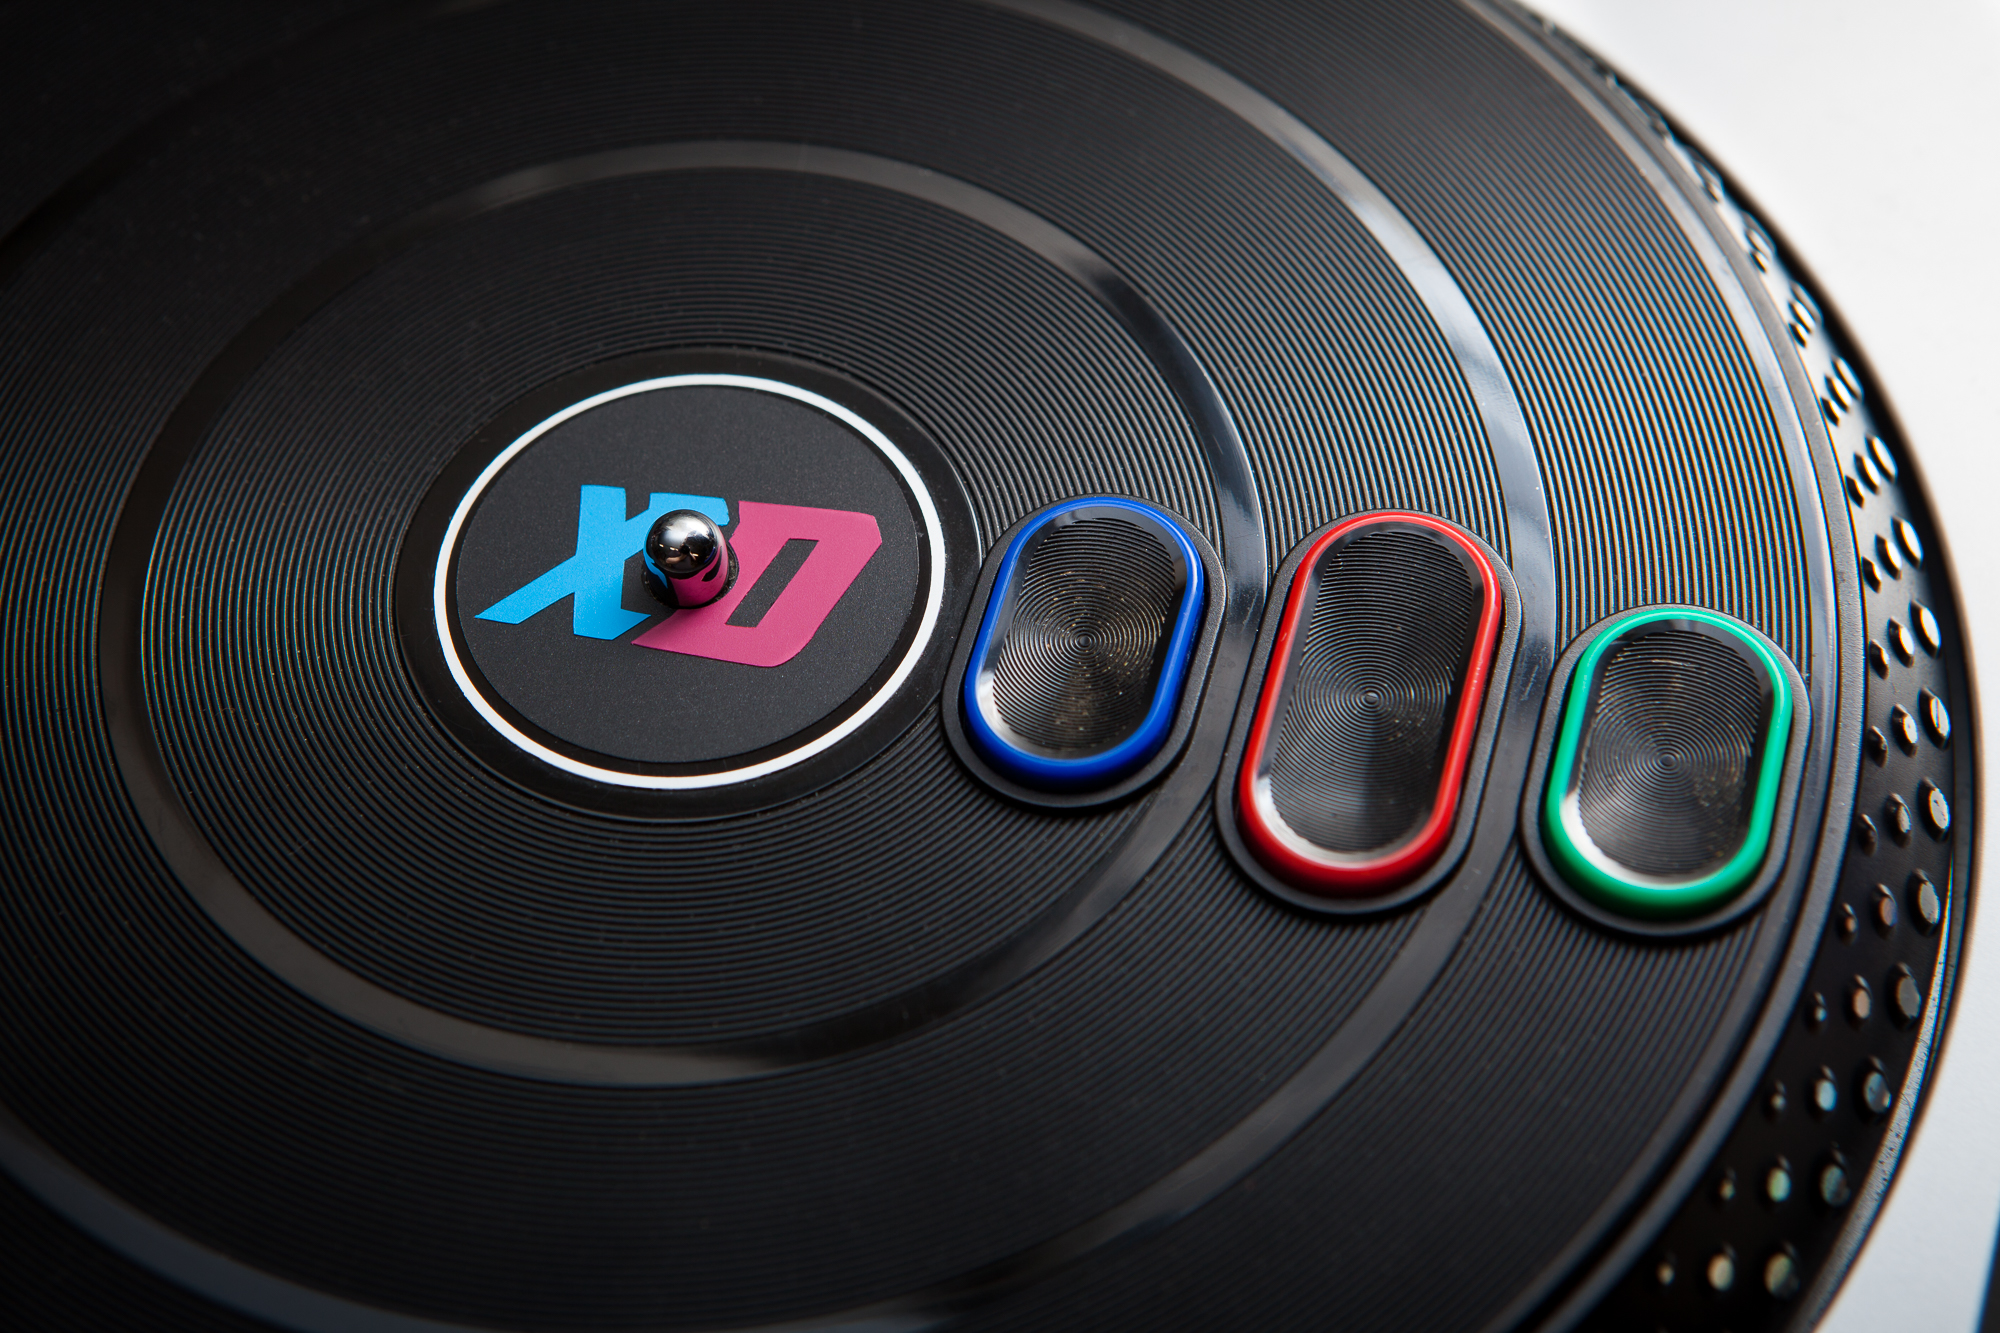
As with the DJ Hero Lucio mod, this project didn’t feel complete without a little flair to make it fit in with the Spin Rhythm XD universe. So I replaced the “Lucio” logo spindle decals with the Spin Rhythm “XD”!
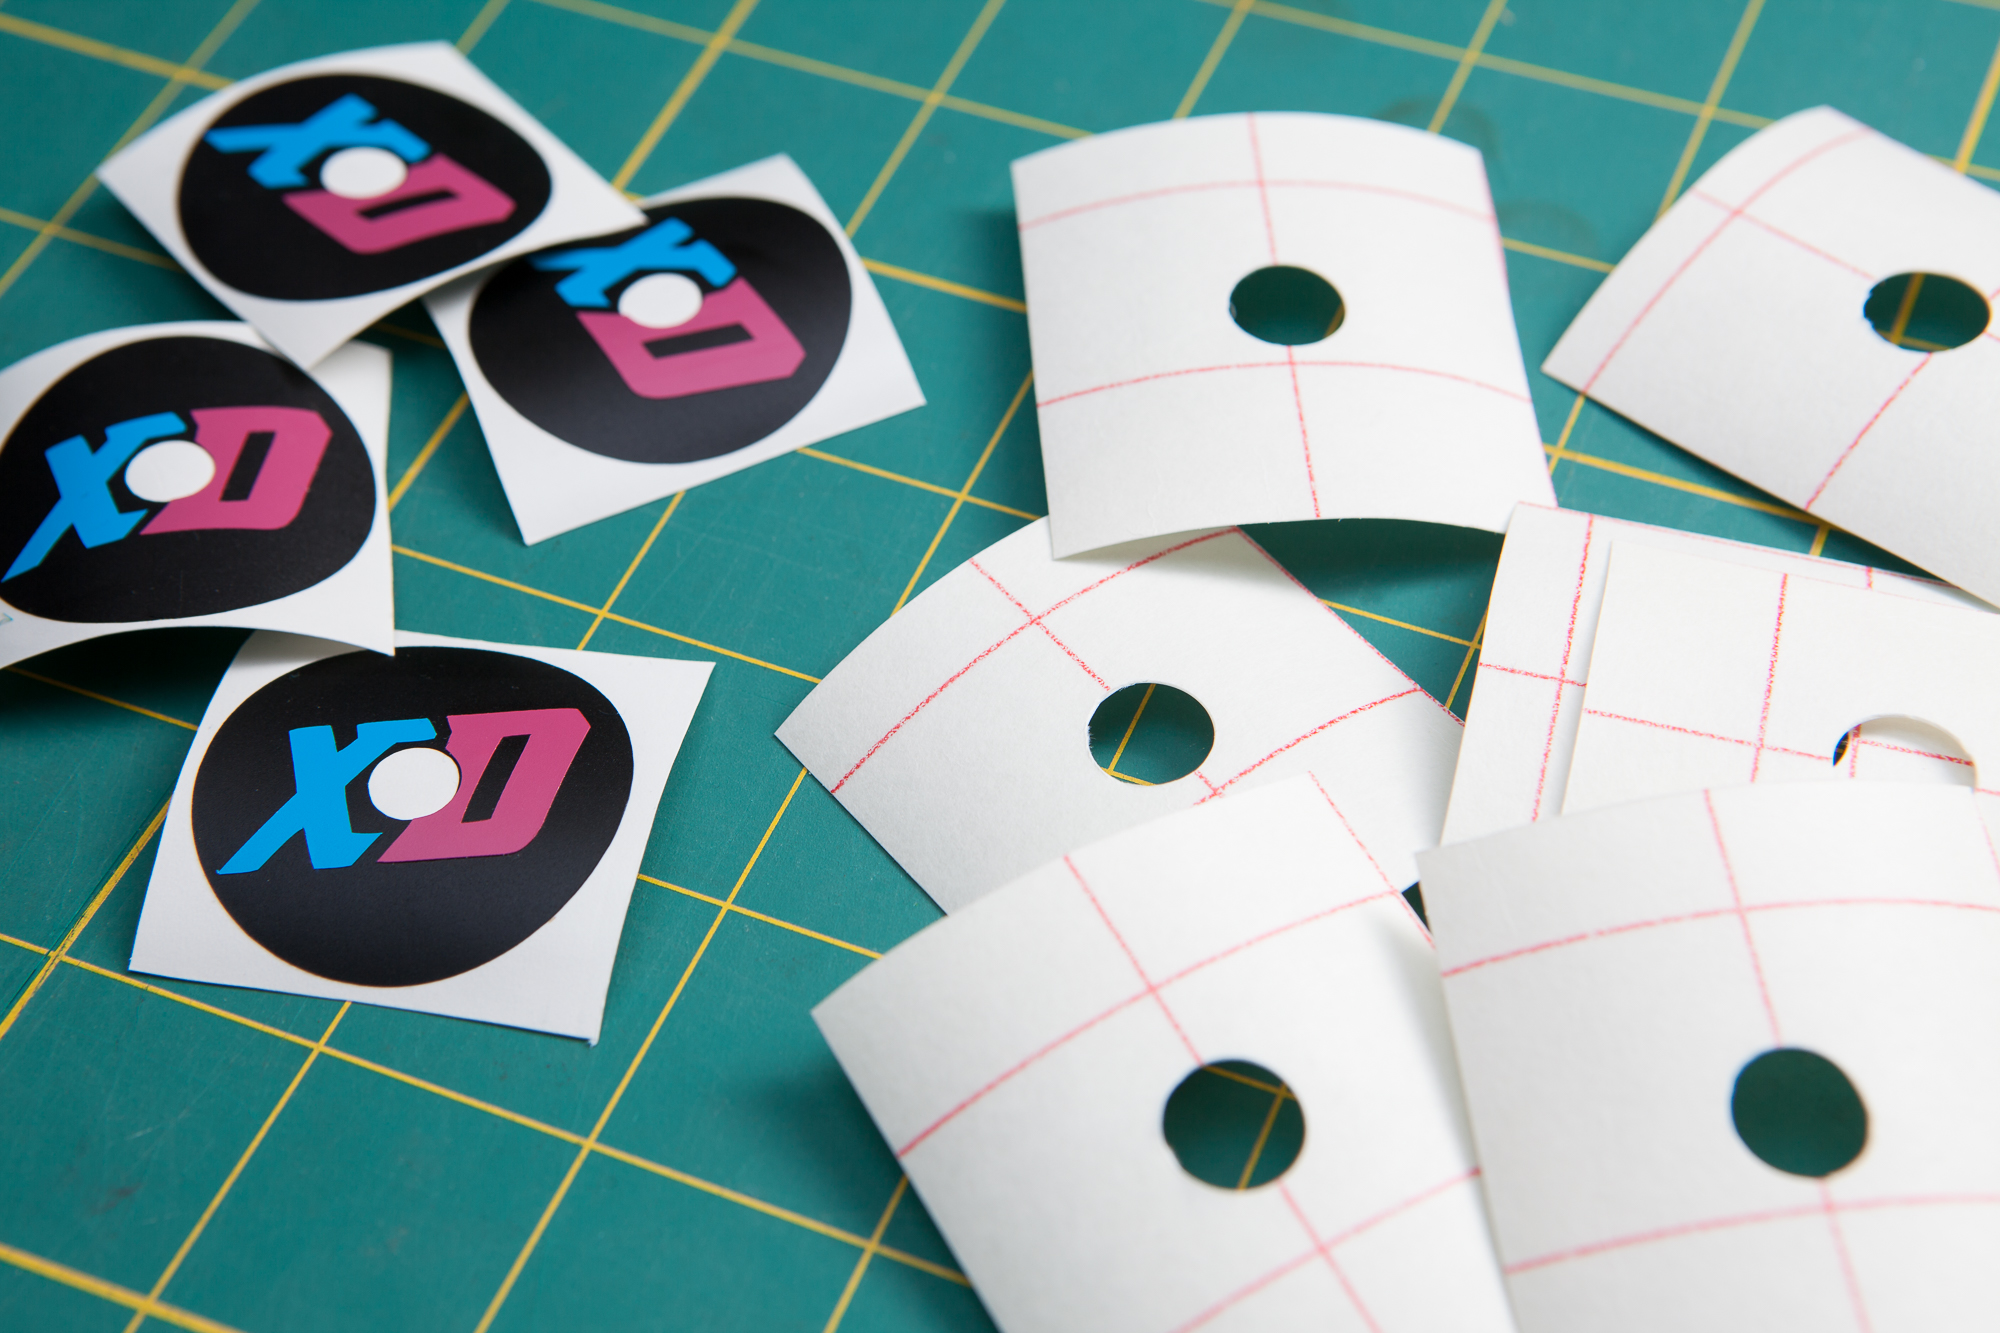
These decals were made from 3 different colors of adhesive vinyl on my Silhouette Cameo 3. I used cyan and magenta to match the two “note” colors in the game. The logo itself is available in vector format in the Spin Rhythm press kit. I isolated the “XD”, changed the outlines to a solid, and sized it for the turntable spindle using the background design I had created for the Lucio controller. Each letter received an alignment key in the shape of the spindle hole. The letters were combined on a piece of vinyl backing (‘D’ first, then ‘X’), then the combination was transferred to a piece of black vinyl cut out to work as a background. For the final step, I used a compass cutter to cut a hole in the center of the transfer paper, so the whole decal can be applied to the turntable with the transfer paper still attached.
After scraping off the “Lucio” decals (RIP), I applied the XD decals to each turntable with the buttons on the right. This is opposite of the way both the Lucio and the DJ Hero text were aligned. This change was because the turntable is most comfortable to play with the buttons on the outside, and I’m right-handed! So decal is “right-side-up” when the turntable is in the normal playing position.
And I’ve got to tell you, the result looks great! It’s not 1:1 with the Spin Rhythm logo since it’s solid lettering, but it really does look the part.
Control Demonstrations
In its current state, Spin Rhythm XD has four main controls:
- Spin Wheel – moving the note wheel left and right to match the colors on the “highway”. Also used to complete “spinners” where you have to jog the wheel quickly in one direction.
- Grab Wheel – by default, the control to “spin” the wheel will not spin the wheel all the time. You need to hold a button (this button!) for the wheel to “engage” and spin. Releasing this button lets the wheel coast until it stops.
- Tap Wheel – this control, along with “grab”, will “pulse” the wheel. This is used to trigger the red and blue notes, both the single “match” notes and the longer “slides”.
- Beat – the “beat” input is used to hit a special type of note, a green bar that stretches across the note highway. This note can be matched regardless of the spinner’s position.
We’re going to map to all of these with the DJ Hero turntable, and then add a few extra controls to handle menu navigation and song selection.
Moving the Wheel, Single
Predictably, on the DJ Hero controller this input is done by moving the turntable!
The DJ Hero‘s turntable uses an optical encoder with approximately 900 “ticks” per rotation. On each data update the microcontroller reads the encoder’s positional change, maps that to a number of pixels to move, and sends it to the PC as a horizontal mouse movement.
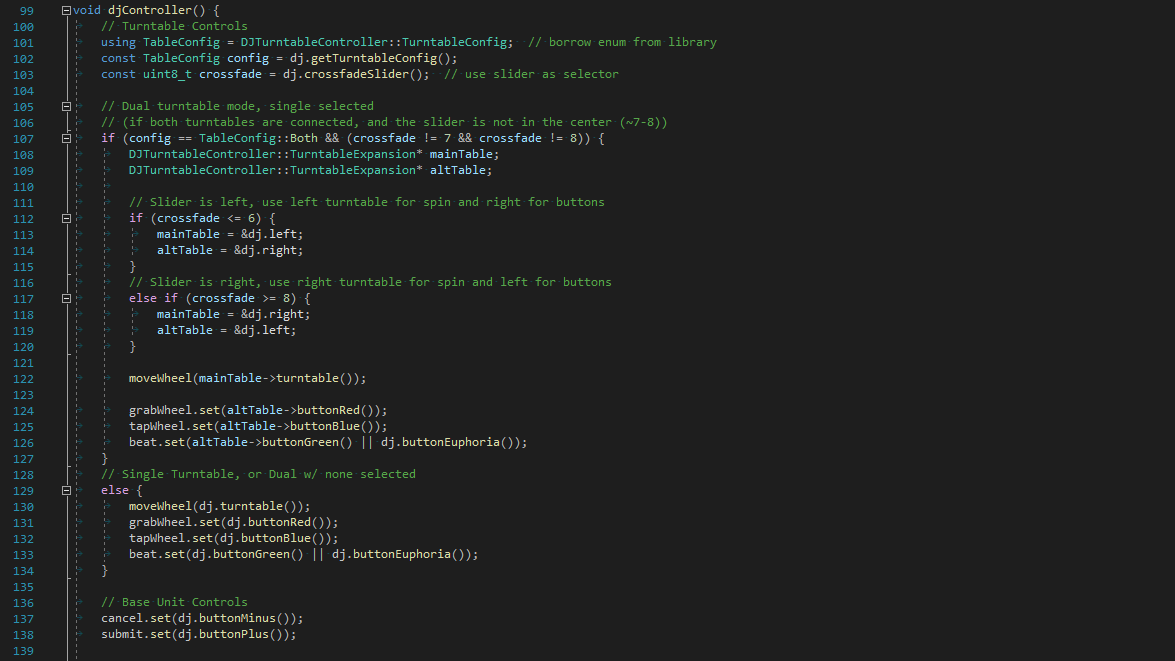
Moving the Wheel, Dual
The DJ Hero controller was designed to allow you to connect the turntable to either side of the base to accommodate both left and right-handed players. But because there are two available ports, you can also connect two turntables and use the controller in a “dual” configuration. This Spin Rhythm XD conversion supports a two-turntable setup as well.
In dual turntable mode, the “crossfade slider” selects which turntable is active. If the slider is in the center, both turntables are active and their inputs will fight each-other (e.g. spinning left on one turntable will counteract spinning right on the other). If the slider is moved in either direction, the controller acts in an “exclusive” mode where one turntable will control wheel movement, while the other will have its buttons control note activation.
For example, if the slider is to the left only the left turntable’s movement will register, and only the right turntable’s buttons will work. If the slider is to the right the reverse: only the right turntable’s movement will register, and only the left turntable’s buttons will work. This is so that one turntable can be spun aggressively without worrying about the slip ring’s brushes losing contact and spamming the button inputs as they’re wont to do.
Hitting Notes
One of the standard features of a MIDI DJ controller is a turntable / jog wheel with a capacitive touch surface, which can detect whether the player is touching the input or not. Spin Rhythm detects this touch state and uses it to set the wheel “grab”input. This means that “tapping” the physical wheel also, predictably, triggers the “tap” input in the game.
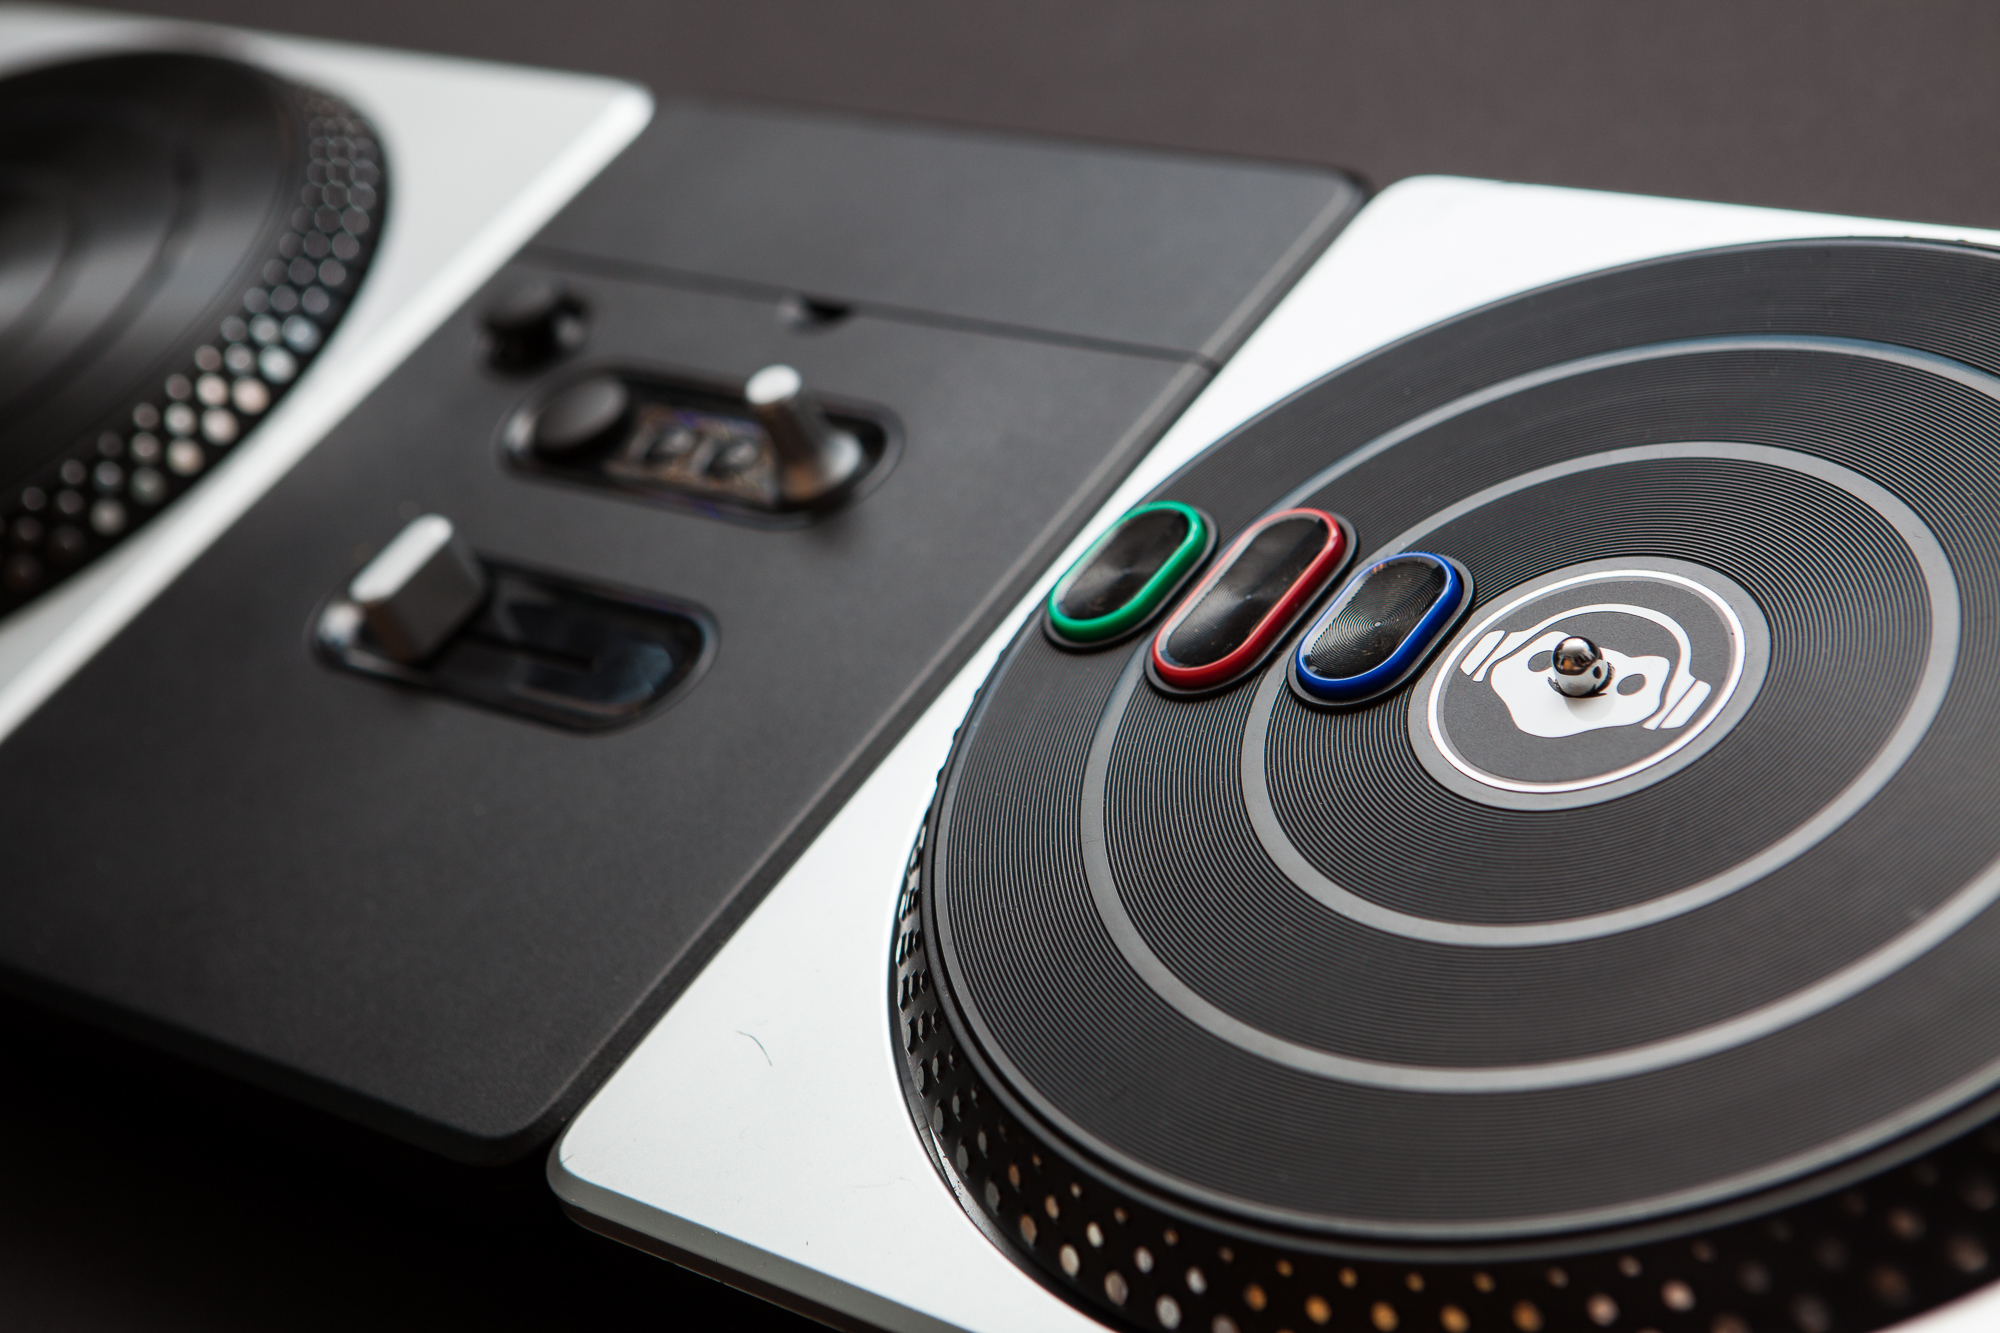
Our DJ Hero turntable is not quite so lucky. In place of a capacitive touch surface, it instead has three buttons in a line on the turntable face. From inside to outside, they are: blue, red, and green.
The middle and largest button, red, is mapped to “grab wheel” (LMB). This takes the place of the standard capacitive touch input.
There is an option in the game settings called “Hold Mouse Click to Move” which is enabled by default. With the Dj Hero turntable I find it more comfortable to play with this option off, which is why these demos were recorded without holding down the button (although the controller can be used either way). If the option is disabled, the red button functions identically to the blue one.
The inside button, blue, is mapped to “tap wheel” (RMB). Regardless of the “Hold” setting mentioned above, either the red or the blue button can be pressed to hit notes in the game.
The outside button, green, is mapped to “beat” (spacebar), as-is the so-called “euphoria” button on the DJ Hero base unit. This allows the player to dedicate each hand to a different note type if they wish.
Menu Navigation
Playing the game is nice, but being able to get to the game is still important. When you start up Spin Rhythm XD you need to select a game mode, pick a track, and choose a difficulty. Oh, and go back if you mess up.
That’s three controls:
- Select – up/down menu navigation
- Submit – choosing what you have selected
- Cancel – going back if you make a mistake
Typically for modern PC games all of these are done with clickable items on the GUI. Thankfully the developers of Spin Rhythm are forward-thinking and have these inputs not only available to click with the mouse, but also mapped to keyboard keys! This makes it possible to trigger them from the DJ Hero controller without interfering with the mouse (i.e. wheel spinning) controls.
Menu Selection
The analog joystick on the turntable is mapped to W-A-S-D, the typical “movement” keys for a video game (and in this case, menu navigation)!
- W – move up in the menu
- A – move left in the menu
- S – move right in the menu
- D – move down in the menu
Holding the joystick in a given direction will also “hold down” the virtual keyboard key, allowing for both single (push + release) and continuous (push + hold) inputs.
Also mapped to menu navigation is the “effect dial.” In DJ Hero this is used kind-of like the Guitar Hero “whammy bar” – to add flavor to the track. Since the track selection screen is styled like a circle, I thought it would be cool to spin an input to navigate it.
- Spin Clockwise – move down in the menu
- Spin Counter-Clockwise – move up in the menu
With the analog joystick next to it it’s hard to argue that this is “useful”, but I wanted to implement every control on the board that I could. I originally wanted this to trigger a “spinner” left or right, but there is no accessibility option to match that prompt without moving the “spin wheel” control itself. I thought about building a macro to grab the wheel, move it quickly, then grab it again to stop the movement – but that is just asking for trouble.
Menu Submit / Cancel
Conveniently, the developers also mapped “spacebar” to “menu select”, which means the large “euphoria” button directly next to the joystick also functions as a “submit” button! How convenient.
There are also two small buttons next to the large “euphoria” button that are the equivalents of “Start and “Select” on the Wii: ‘+’ and ‘-‘. These are mapped to “menu submit” (return) and “menu cancel” (esc), respectively. As an added bonus, the icons match their purpose! The ‘-‘ button removes/cancels while the ‘+’ button adds/submits. And with the menu animations laid out left to right their relative positions match as well!
Gameplay Tests
All of the controls are mapped and working, so now it’s time to play the game and put this baby to the test. My song of choice for testing is “Highscore” by Panda Eyes & Teminite. Not for any particular scientific reason, I just like the song. I’ve been practicing on keyboard and mouse, but this was my first real try with the DJ Hero turntable. I set up a camera, plugged in the turntable, and got to work.
After an hour of playing I’m happy to say that I was able to “full combo” the song (read: hit every note without missing) on easy, normal, and hard difficulties, and beat my high score with a keyboard and mouse! Not too shabby for a plastic spinner.
While I had the camera set up I also tried out a few songs I had no practice with, and I was able to full-combo “New Game” by Nitro on hard as well. Unfortunately I’ve never been terribly good at the game, so I wasn’t able to complete any songs on “expert” difficulty. Although in fairness I can’t complete songs on “expert” with keyboard and mouse, either.
Controller Pros
All things considered the controller works pretty well! It’s low latency, responsive, and accurate enough to go blow-for-blow against a keyboard and mouse. At least at the lower difficulty levels.
The control mapping I came up with also seems intuitive and a good natural fit for the DJ Hero controller. This is greatly helped by the fortuitous color matching between the in-game notes and the turntable buttons. Although even the menu navigation using the joystick, “euphoria”, and “+/-” buttons feels natural. It’s always nice when you can integrate some sort of menu navigation into “altctrl” projects, so you’re able to both play and navigate the game without resorting to using a keyboard and mouse between rounds.
Controller Cons
Although it plays fairly well, there are predictably a few shortcomings – the most significant of which is the lack of a capacitive touch input on the turntable’s face. Because you need to keep your fingers on the buttons at all times, fast spins tend to be “flicks” rather than full rotations. This can be problematic as you need to build up momentum for that initial movement, and it makes successive spins in the same direction awkward.
The static buttons also force you to alternate directions for colors in order to keep the buttons in a comfortable location on the turntable while playing. You can use the fast “spins” to re-align the controller to a more comfortable position (see @ 1:40 – 1:45 in the “Highscore” video), although that’s dependent on your fortune to have a “spin” come up at the right time. Certain songs like “Checkpoint” by Nitro Fun & Hyper Potions also have sections that build by using alternating colors in the same direction, which force you to move the buttons out of a comfortable alignment until the next spin.
This raises an important question: “if the static buttons on the turntable face are such an issue, why didn’t you remap those functions to buttons on the controller’s base?” Answer: because of the slip rings.
In the original DJ Hero game the player was never meant to aggressively “spin” the turntable at speed, and the slip rings that provide the electrical connection to the turntable surface aren’t built to handle the stress. Spinning the turntable aggressively will make the brushes on the slip ring lose contact, causing the optical encoder to spit out random numbers and “pressing” the buttons on the face. This is why I didn’t map the grab/tap buttons to the base unit so the player could play without the turntable buttons – spinning aggressively can cause issues with the controller hardware. Instead the control scheme matches what you would intuitively expect, and works within the limits of the hardware.
The wheel movement is also a little delayed, I’m assuming because of the optical encoder and the slave hardware inside of the turntable. I’m almost certain that lag isn’t on my end, although in fairness I haven’t compared the I²C data against the USB packets directly. This makes the turntable feel a bit “floaty”, although because this is a rhythm game and the delay is consistent it isn’t actually an issue. I only that it was in fact delayed when I was editing the video.
Update 2/21/20: I’ve looked at the I²C and USB data lines with a logic analyzer, and this “delay” is actually latency built into the game and is not a problem with the controller. See the “Latency Tests” section at the bottom of the page.
Last but not least, the buttons on the DJ Hero controller are comparatively quite stiff and have a large travel distance. This isn’t a problem on the lower difficulty levels with the “tap” notes far apart and easily anticipated, but may be an issue on higher difficulties.
Conclusion and Final Thoughts
Spin Rhythm itself is very much still a game in progress. Just as I was filming the control demonstrations and putting the finishing touches on this article using version 1.0.35 of the game, the developers released an update that changed the menu appearance, introduced a new difficulty level (“XD”), and added “scratch zone” input areas to all of the levels among other things (1.0.36). With a game that’s still so young, it’s hard to say how this controller will hold up for the future. I’ll definitely have to revisit this once the game hits full release.
But “full combos” and “S-ranks” aside, for a proof of concept I think this works quite well. The lack of a capacitive touch surface means that it’s definitely not on the same level as a “proper” DJ MIDI controller, but the rest of the inputs are solid. The turntable (mouse) is responsive, buttons are low latency (~4 ms or less depending on USB frame timing), and everything feels great. Well, as great as it can for a plastic controller that’s 10 years old.
Although I’m glad I built it, to be honest this wasn’t that interesting of a project in-and-of itself. It’s almost entirely a rehash of the DJ Hero Lucio project – just with different control mappings at the end. I’m using the same turntable, the same custom hardware, the same library, and (mostly) the same firmware. I’m glad that everything has held up but I didn’t learn much by doing this. I think it’s time to redirect my energy towards some of the newer and more exciting projects for 2020.
On a more positive note, this was the second recent project which I was able to complete in just weeks rather than months. Here’s hoping I can keep up that momentum through the rest of the year.
Until next time!
Parts List
Per usual I’ve linked some of the parts throughout the post as they’re mentioned, although since this builds off of a previous project not everything was brought up. So for thoroughness, here is the complete parts list if you’d like to build your own.
Please be aware that some of these are Amazon Affiliate links that help fund the content on this site. Thank you for your support!
Adapter
- DJ Hero Turntable (Wii version)
- Teensy LC Microcontroller (Amazon)
- NXC Breakout Board
- 470 Ω resistor, 1/4 W
- 30 AWG stranded wire
- M2-6 Bolts (x2)
- 3D printed mounts
- Double-sided tape
- 0.030″ polystyrene sheet (shim)
Decals
- Silhouette Cameo 3 Vinyl Cutter
- Silhouette “dark pink” vinyl
- Oracal 631 matte black vinyl
- Oracal 631 light blue vinyl
- OLFA compass cutter
Note that the NXC breakout boards are an in-house creation and aren’t currently available to purchase. You can substitute another Wii breakout board like the Nunchuky, though be aware that the mounting holes on the 3D printed mount won’t line up. You will also need to add weak pull-up resistors to the SCL and SDA pins, and either set a flag in the code to disable the “controller detect” pin or solder a wire with a pull-down to that contact finger.
Latency Tests
While I was putting the final touches on this post and the associated video, I noticed that in the footage I filmed of the turntable in front of the monitor (@ 0:50), the movement of the “wheel” in the game is delayed by about 4 frames (~133 ms) compared to the turntable itself. This was concerning, so I decided to test the controller’s latency using a logic analyzer. Fair warning: this is going to get technical.
I connected the logic analyzer to the I²C lines going to the turntable, the USB D+ and D- lines going to the PC, and an I/O pin on the microcontroller that I set to latch whenever an update finished processing.
With updates at 250 Hz, here’s the timing breakdown for version 1.0.0 of the firmware:
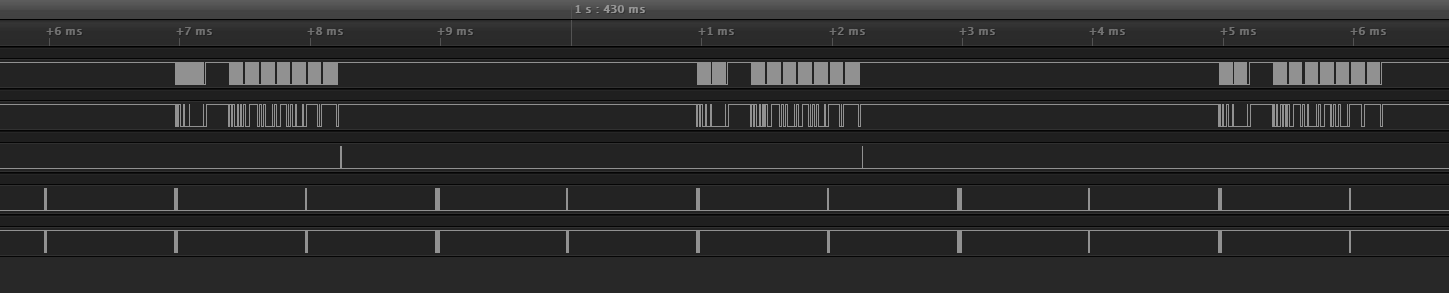
- Turntable polling rate: 4000 us
- I²C transfer time (100 kHz): 1260 µs
- Processing time: 17 µs
- USB SOF Interval: 1000 µs
The bInterval of the USB mouse descriptor is set to ‘1’ (ms between updates). Depending on how the phase of the USB host aligns with the I²C update schedule, this can introduce anywhere from 0 to 1000 µs of latency (+ a little bit for the packet transmission time).
The minimal latency assumes that the user changed an input immediately before the I²C update began, and the USB SOF packet coincides with the end of the processing period. With the v1.0.0 settings this is 1.27 ms (I²C transfer time + processing time).
The average latency assumes that both the user changing inputs and the USB SOF timing will be evenly distributed throughout their available periods. That’s 4000 µs between updates divided by two (2000 µs), plus the I²C transfer time, the processing time, and half of the USB bInterval rate (1000 µs / 2 = 500 µs), which gives us 3.78 ms.
The absolute max latency assumes that the user is changing inputs immediately after the last frame of data starts I²C transmission, and that the USB SOF packet occurs as late as possible. 4000 µs between updates plus the I²C transfer time, the processing time, and the full bInterval gives us 6.27 ms.
- Minimum latency: 1.27 ms
- Average latency: 3.78 ms
- Absolute max latency: 6.27 ms
Despite appearances and “1000 Hz” marketing gibberish, these numbers are quite good and match what I expected. In context, this means that if you had instantaneous reaction time (you don’t) and a 144 Hz monitor, even at the max latency period you would be able to change a control and have it register before the next frame appeared on your monitor.
The most significant source of latency is the turntable update rate (250 Hz), followed closely by the I²C transfer time. Both of these can be reduced by upping the I²C bus clock speed, although in my testing this seemed to produce reliability issues with the buttons. And increasing the polling rate changes the “feel” of the controller significantly, and in my opinion for the worse.
The takeaway here is that the large amount of lag (100 ms +) that I saw is not due to an issue with the controller. Testing again with my camera and my non-DJ Hero mouse, it appears that this latency is part of the game itself. I’ll do some more digging and then possibly submit a bug report for the developers.
Update: It looks like the latency I was experiencing was due to Unity’s v-sync implementation. Disabling v-sync lowers the delay down to 30 ms and the game is much more responsive. Hooray!