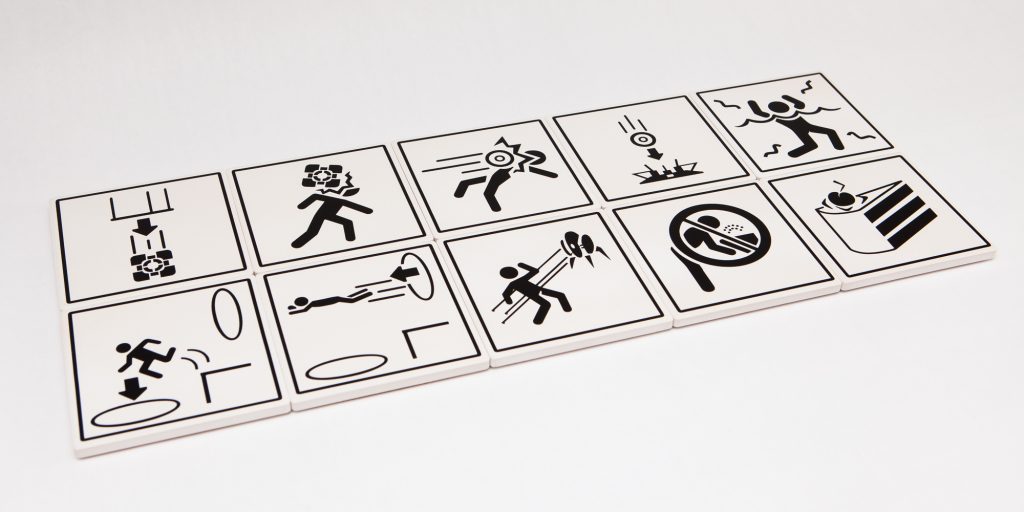
At the start of every test chamber in the video game Portal is a large sign with information about the test ahead. It includes the chamber number, the test subject’s progression, and icons indicating what features the test includes – everything from toxic water to cube dispensers, deadly turrets, and, of course, cake.
These square test icons are instantly recognizable to any fan of the series, and I thought they would work great as a set of Portal-themed coasters.
This isn’t a particularly original project – the minds over at ThinkGeek designed and sold a version of these coasters back in the day. But now that ThinkGeek is defunct and Portal is nearly 20 years old, it’s time for someone else to take the helm and create the totally-possible.
Extracting the Icons
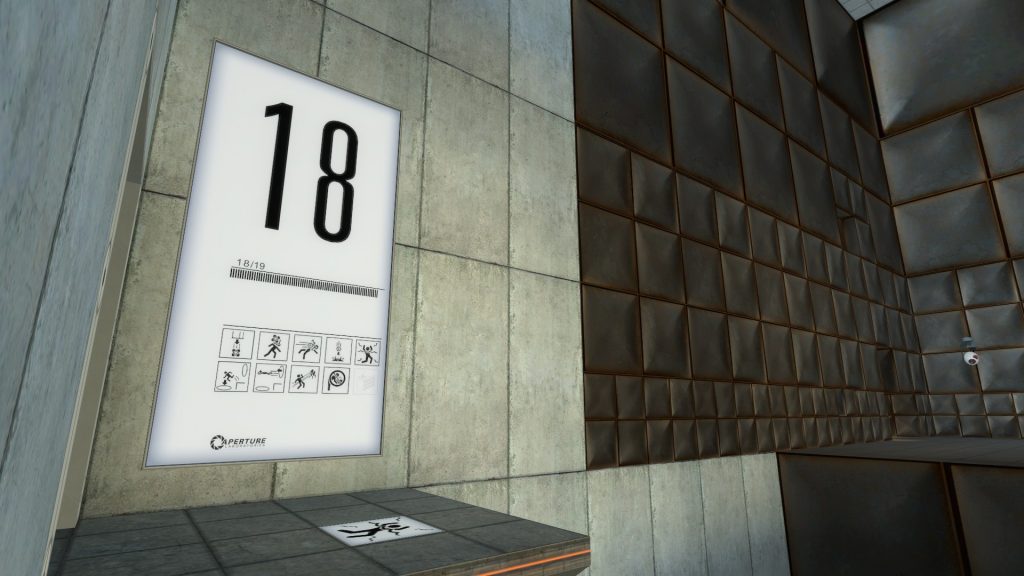
I installed Portal through Steam and booted it up. You can find the chamber information signs at the start of every test chamber, including Test Chamber 00 where Chell first wakes up. The test icons are either black if they’re present in the current test or light gray if they’re not. The panel with the most complete set of icons is Test Chamber 18, only missing cake.
After enabling cheats (sv_cheats 1), you can use the console command impulse 200 to holster the portal gun and cl_drawhud 0 to hide the crosshair. This gives us a clean camera view with which we can take screenshots. Using noclip to fly around and fov {angle} to narrow the camera view (lower is tighter / less distortion) it’s possible to get a high-quality screenshot of the test chamber icons for reference.
That being said, I’m going to go a step further. As long as I have the game files on my PC, I can extract the original texture files used for the in-game signage. The texture files are the highest-quality version of these icons, and therefore the highest quality reference to work off of.
The game directory contains several vpk (“Valve Pack“) packages:
hl2/hl2_misc_dir.vpkhl2/hl2_sound_misc_dir.vpkhl2/hl2_sound_vo_english_dir.vpkhl2/hl2_textures_dir.vpkplatform/platform_misc_dir.vpkportal/portal_pak_dir.vpk
The textures for the icons are located in the portal/portal_pak_dir package, which can be opened and explored using the open source program Source 2 Viewer.
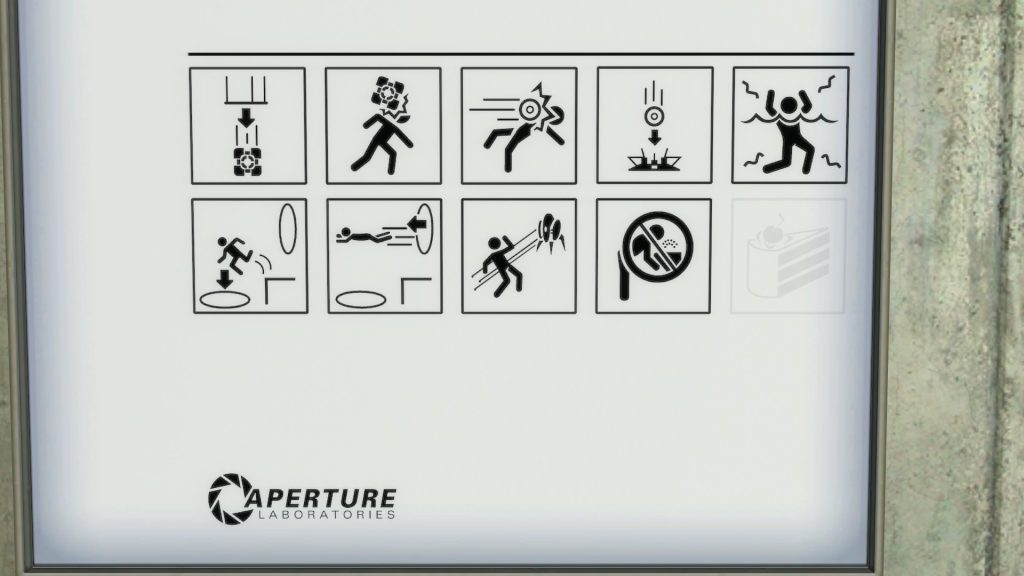
The 3D models (.mdl files) for the wall panels at the start of each test chamber are located in models/props_animsigns. Using the SourceIO plugin for Blender, I opened one of the models and took note of the linked texture for the test icons: awe_total.vtf, which is located in materials/models/props_animsigns. The alpha layer of the .vtf (Valve Texture Format) file contains all of the icon textures, as well as the chamber numbers and the Aperture Laboratories logo. In the original game texture, each icon is approximately 330 pixels square.
I then used VTFEdit Reloaded to open up the texture file and export it in TARGA (TGA) format. Finally, the alpha channel containing the black and white icons was separated in Photoshop, inverted, and exported as a basic PNG.
Naming Conventions
There are also lower resolution versions of each icon texture in the materials/signage folder, each prefixed with signage_overlay:
signage_overlay_boxdispenser.vtfsignage_overlay_boxhurt.vtfsignage_overlay_cake.vtfsignage_overlay_catcher.vtfsignage_overlay_energyball.vtfsignage_overlay_fling1.vtfsignage_overlay_fling2.vtfsignage_overlay_fountain.vtfsignage_overlay_toxic.vtfsignage_overlay_turret.vtf
These are the textures used for various floor tiles throughout the game (you can see a “toxic” tile in the screenshot of Test Chamber 18 above). They are also of lower resolution (128×128). However this does give us the official Valve names for each icon:
| Box Dispenser | Box Hurt | Energy Ball | Catcher | Toxic |
| Fling 1 | Fling 2 | Turret | Fountain | Cake |
Vectorizing the Icons


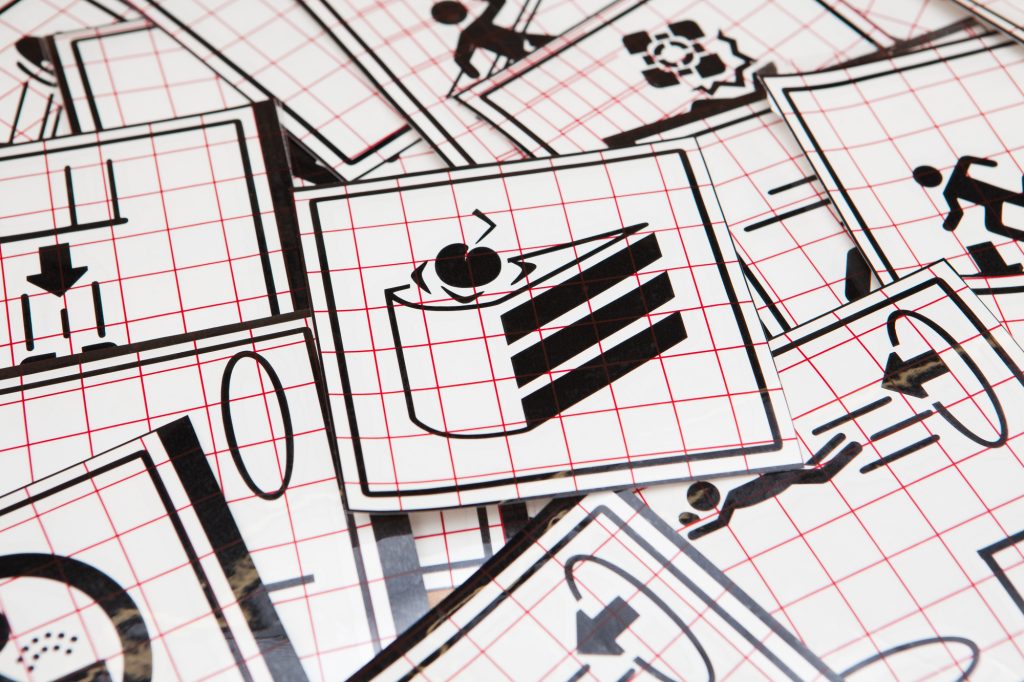
Using Adobe Illustrator, I traced over the icons by hand to convert them from the low resolution video game rasters into high quality vectors.
This serves two purposes. First, it makes it so that the icons are scalable to any size without showing how “pixelated” they are. Whether they are 1×1″, 4×4″, 8×8′, 16×16 yards, 32×32 miles… at any size or viewing distance or strange American unit they will still look good. Second, it provides a smooth line for the knife to trace when cutting these out of vinyl, which is going to be the next step in the process.
Once all of the icons were vectorized, I resized them to fit on a 4×4″ square coaster. The actual coasters I purchased are roughly 3.9″ square, and I gave the icons a 1/8″ margin all around so they’d have a little breathing room.
Making the Coasters
With all 10 icons now vectorized and sized, it’s time to make the donuts coasters.
Using my Silhouette Cameo 3, I cut the icons out of Oracal 651 permanent black vinyl, leaving a box around the perimeter sized to the coasters to use as an alignment tool. I then weeded the vinyl, applied transfer tape, and secured the designs to my workbench. After peeling off the backing, I carefully aligned the square cutout with the edge of the bare coaster and pressed firmly to join the two. Then the coasters were flipped over, squegee’d a few times to ensure that the vinyl stuck, and the transfer tape removed.
To finish them off, I applied a few light coats of flat acrylic clear coat to help protect the designs and then added the included 2 mm adhesive cork backing.
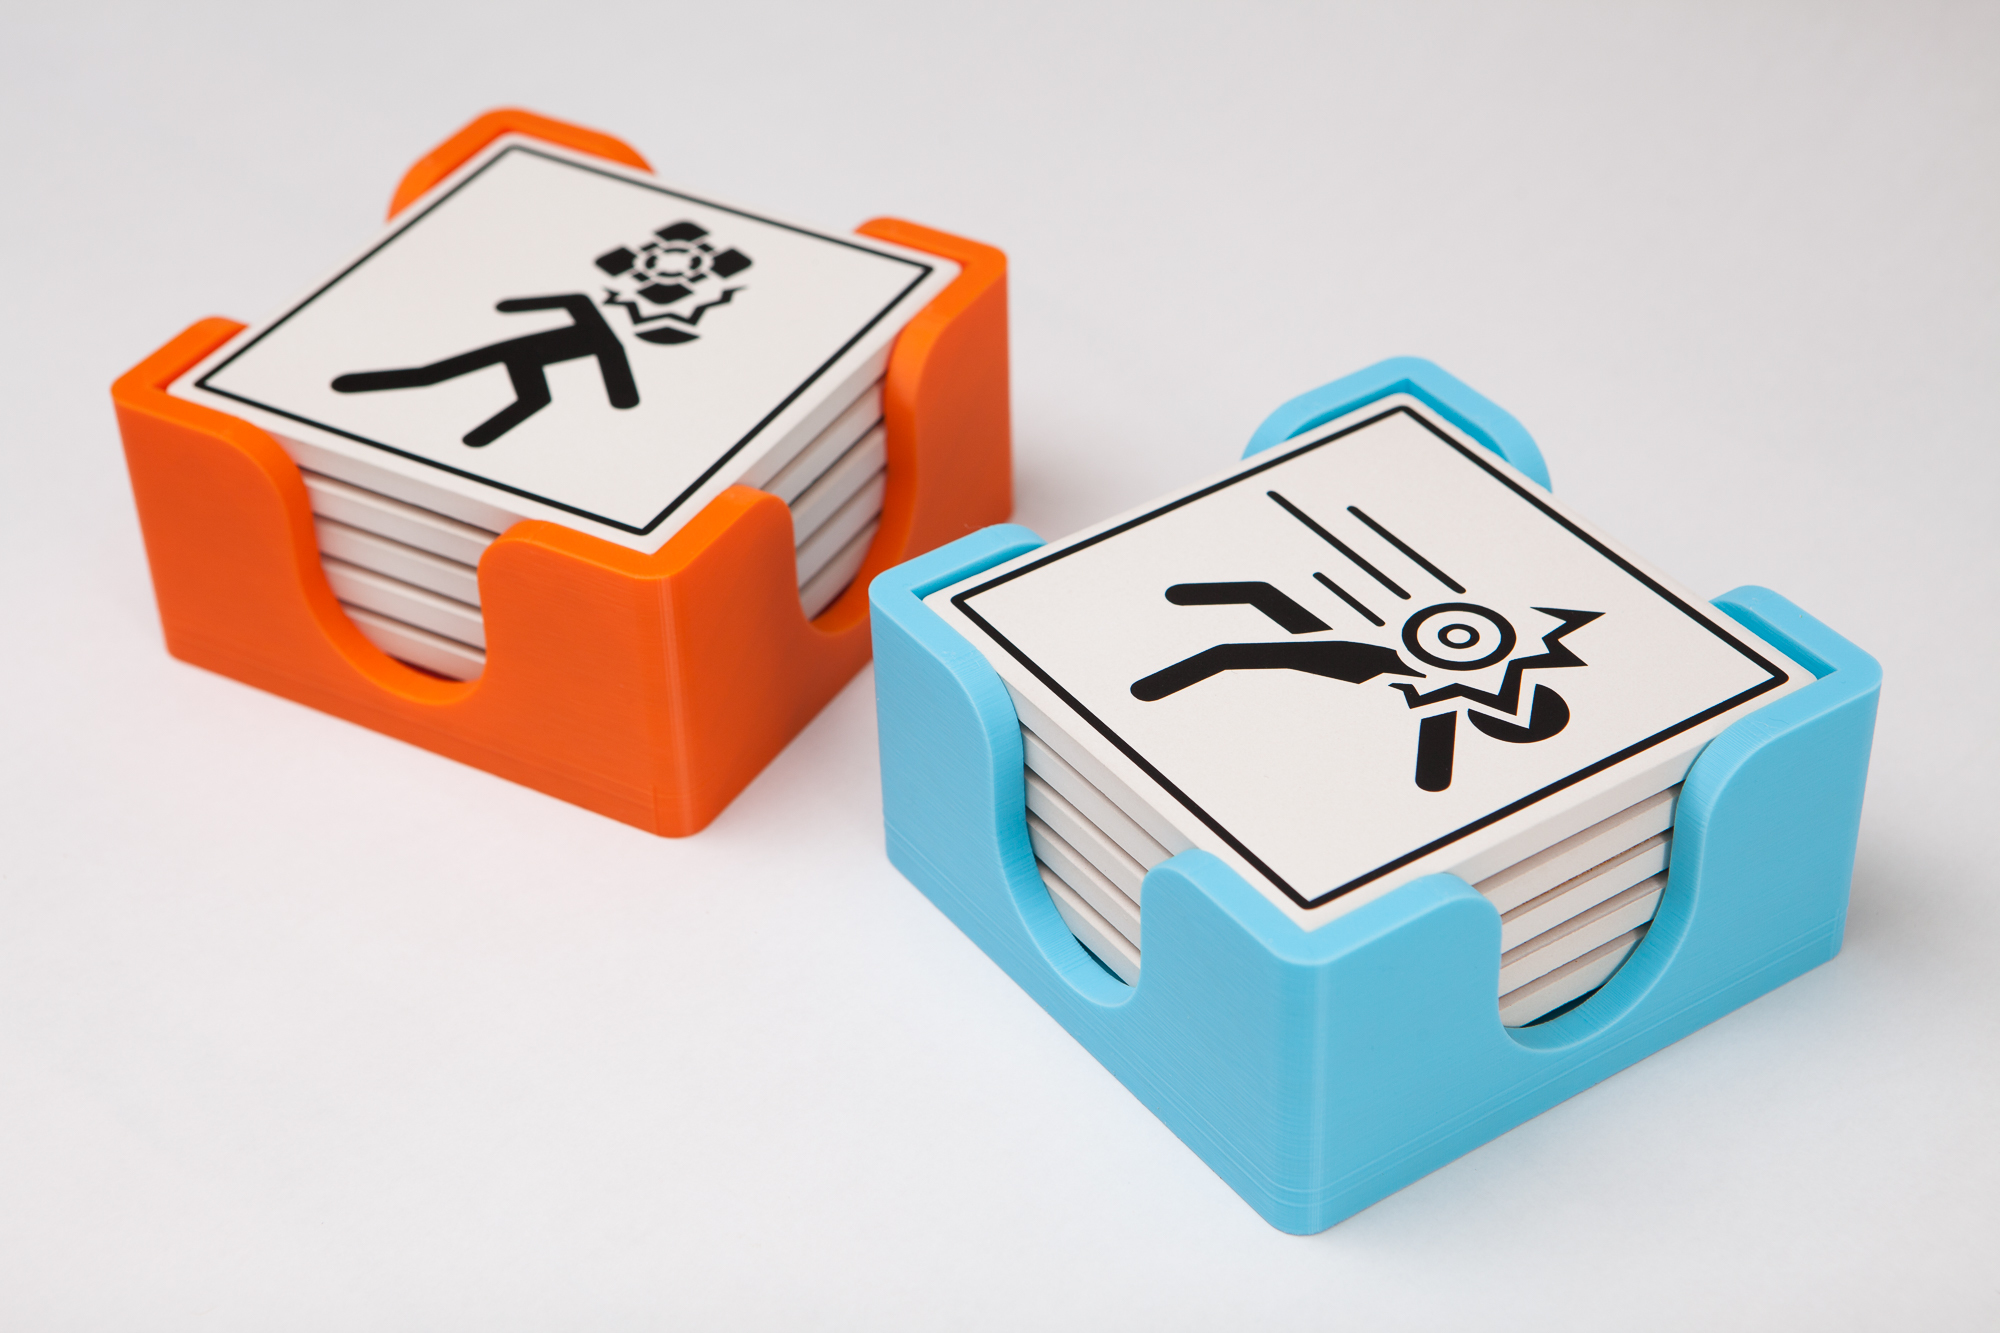
And Holders, Too
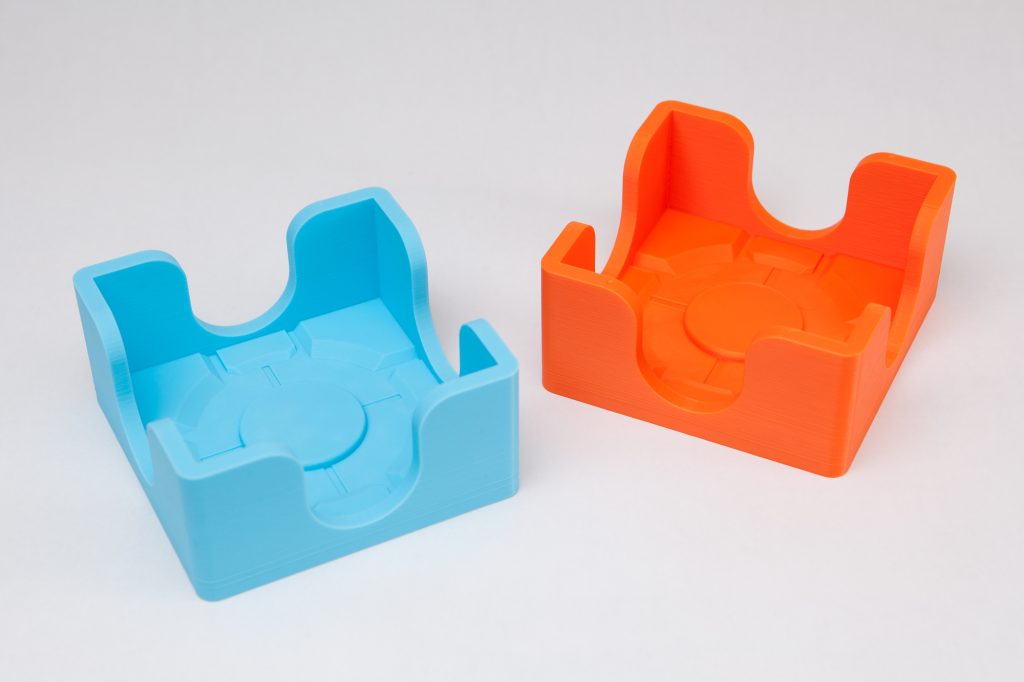
I had some leftover filament from another project, so I thought it would be fun to design some simple Portal-themed coaster holders as well. Each holder fits 5 coasters so a pair will store the entire set. These were printed out of orange and light blue PLA, adding a splash of color to the project and matching the colors of the portals in the game.
I was a having a bit of trouble with a Benchy hull line on the exterior, caused by the large flat bottom taking a long time to print and pulling the sides inwards as the plastic cools. To combat that, I tried a few things to break up the geometry of the base. I eventually settled on a familiar motif – the Aperture Science Weighted Storage Cube! This splits the base across two Z-heights and adds some channels which act as strain relief. You can still see two hull lines (on the blue holder, especially), but they’re far smaller and less noticeable than they were before. And the holder itself, sans coasters, is much more interesting!
This Was a Triumph
I’m making a note here: huge success.
These coasters were simple to put together and look great. The longest part of the whole project was creating the vectors of the icons, but that went quickly enough with a podcast or two and a cup of Joe. For approximately $35 in materials I now have two 10-coaster sets and matching holders, ready for any variation of the Aperture Science Handheld Moisture Delivery Device.
Now it’s time for testing!
Parts List
Supplies
- Portal on Steam
- 4×4 Square Ceramic Coaster Blanks (10 per set)
- Permanent Matte Black Vinyl
- Vinyl Transfer Tape
- Light Blue PLA 3D Printer Filament
- Orange PLA 3D Printer Filament
- Flat Acrylic Clear Spray Paint
Tools:
Software
- Source 2 Viewer (for opening
.vpkpackages) - SourceIO Plugin for Blender (for opening
.mdlfiles) - VTFEdit Reloaded (for opening
.vtffiles)
Some of these are affiliate links which help to fund the content on this site. As an Amazon Associate I earn from qualifying purchases. Thank you for your support!