Earlier this week I was browsing Reddit and came across this interesting post of someone playing a game of Counter-Strike: Global Offensive (CS:GO) using a Wii Nunchuk to aim. They used a cheap Chinese “Classic Controller to USB” adapter to connect the Nunchuk to their PC, then set up JoyToKey to convert the gamepad inputs into mouse movements.
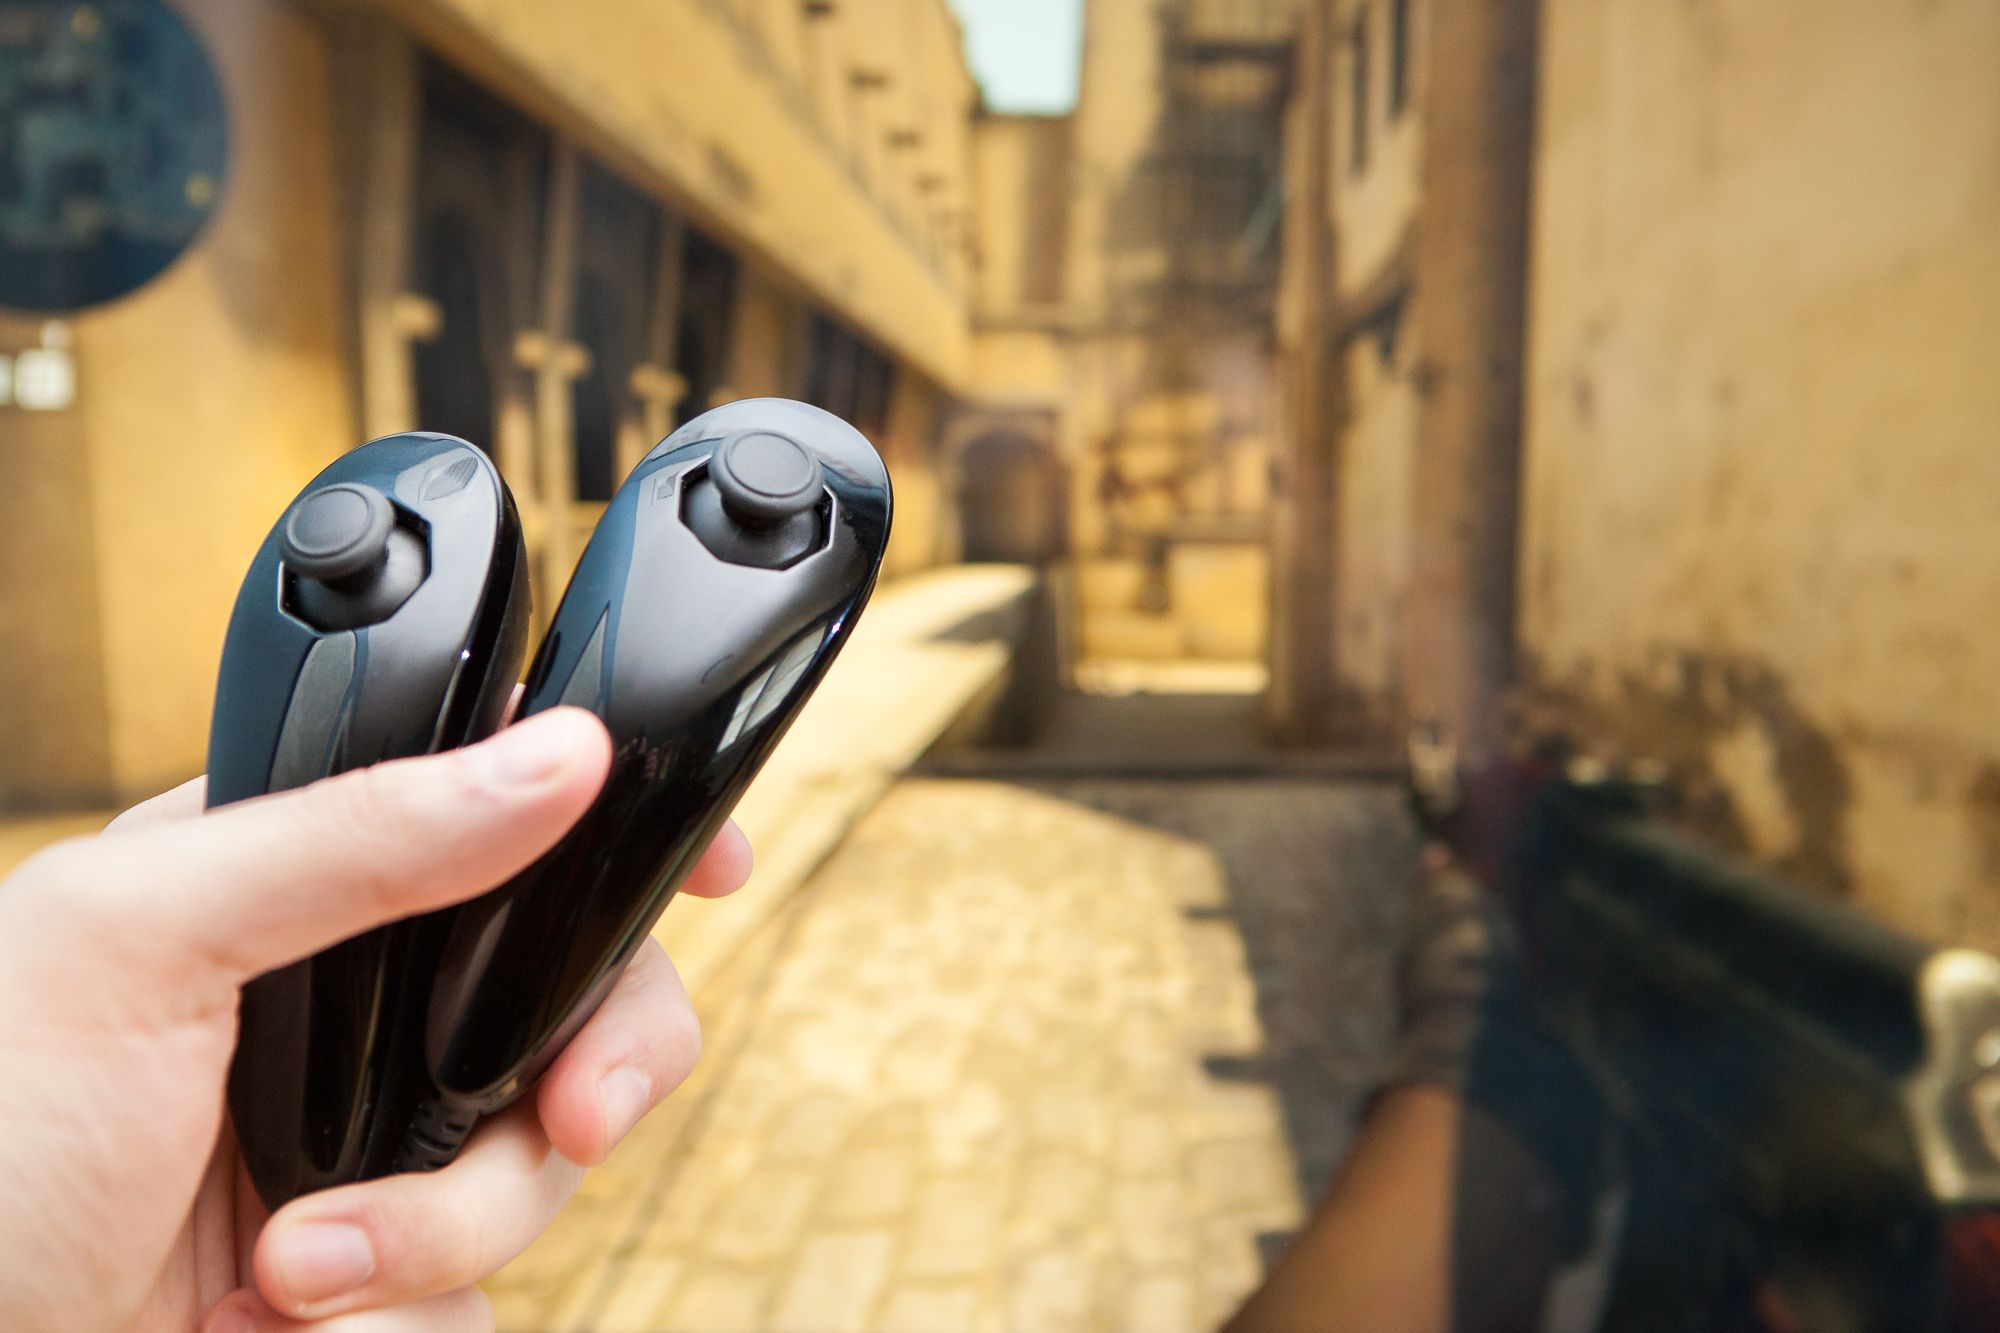
This was pretty interesting, but I thought I could do one better. You see, I’m currently working on my own project that uses two Nunchuks for a custom controller. So when I ran across that Reddit post, I already had a breadboard on my desk with a Teensy LC, two NXC breakout boards, and two Wii Nunchuks wired and ready to go. Destiny was calling…
After about fifteen minutes of programming, here’s the result:
And here’s how I did it:
The Plan
To start, I had to pare down the controls. Normally when playing CS:GO you have a whole host of controls to deal with: you have to handle movement, aiming, firing, reloading, walking, selecting weapons, dropping weapons, buying weapons, jumping, crouching, the list goes on and on…
Each Nunchuk has the following controls surfaces:
- 1 Analog Joystick (XY, 8 bit)
- 2 Buttons (C/Z)
- 3-Axis Accelerometer (XYZ, 10 bit)
Since I was building this quickly I decided outright to ignore the accelerometers. It takes too long to code the kinematics and there’s too much interference from the tactile control surfaces.
The joysticks are much more straight-forward. You would obviously map the two joysticks to ‘move’ and ‘aim’ – necessary controls that are typically mapped respectively to the left and right joysticks on most gamepads for first person shooter (FPS) games.
This leaves the four buttons to handle, well, everything else. In order of priority:
- Right Z: Fire – The big ‘Z’ button on the right Nunchuk handles firing the weapon. It’s a shooting game, you have to be able to shoot. Again mirroring a traditional gamepad where ‘fire’ is the right trigger.
- Left C: Use – The small ‘C’ button on the left Nunchuk is the ‘use’ key. This handles everything from opening the buy menu at the start of the round (for purchasing weapons and equipment), to swapping your gun with one on the ground or defusing the bomb.
- Right C: Switch Weapons – The ‘C’ button on the right Nunchuk switches your weapon. You need to be able to switch weapons if you want to plant the bomb or if you run out of ammo. If you’ve ever played Counter-Strike, you also know that you run at different speeds depending on your equipped weapon, so switching is necessary to get places faster.
- Left Z: Jump – The ‘Z’ button the left Nunchuk jumps. From all of the remaining controls it was a toss-up as to which was most important. Jumping lets you get to places you otherwise wouldn’t be able to, although this is at the expensive of zoom (no AWP-ing!), crouch, or reload. With only four buttons, sacrifices must be made…
I decided right off the bat that I would do this using keyboard and mouse (KBM) commands rather than DirectInput (“Joystick”), just for simplicity. I’ve used a controller with CS:GO in the past and from what I remember it was a little finicky to set up, so I decided to go the easy route and stick to the KBM commands that I knew off the top of my head and I was sure would be plug + play. With keyboard and mouse, here are the final mappings:
Left Nunchuk
Joystick: Movement (WASD)
Button C: Use (E)
Button Z: Jump (Spacebar)
Right Nunchuk
Joystick: Aiming (Mouse XY)
Button C: Switch Weapons (Mouse Scroll Up)
Button Z: Fire (Mouse LMB)
The Hardware
The hardware to get this working is quite simple. I’m using a Teensy LC microcontroller, which runs at the same logic level as the Nunchuks (3.3V) and has two available I²C buses so it can connect to both Nunchuks without a multiplexer. Attached to the Teensy are two Nintendo Extension Control (NXC) breakout boards of my own creation, wired to power (3.3V / GND) and the I²C pins (18/19, 22/23).
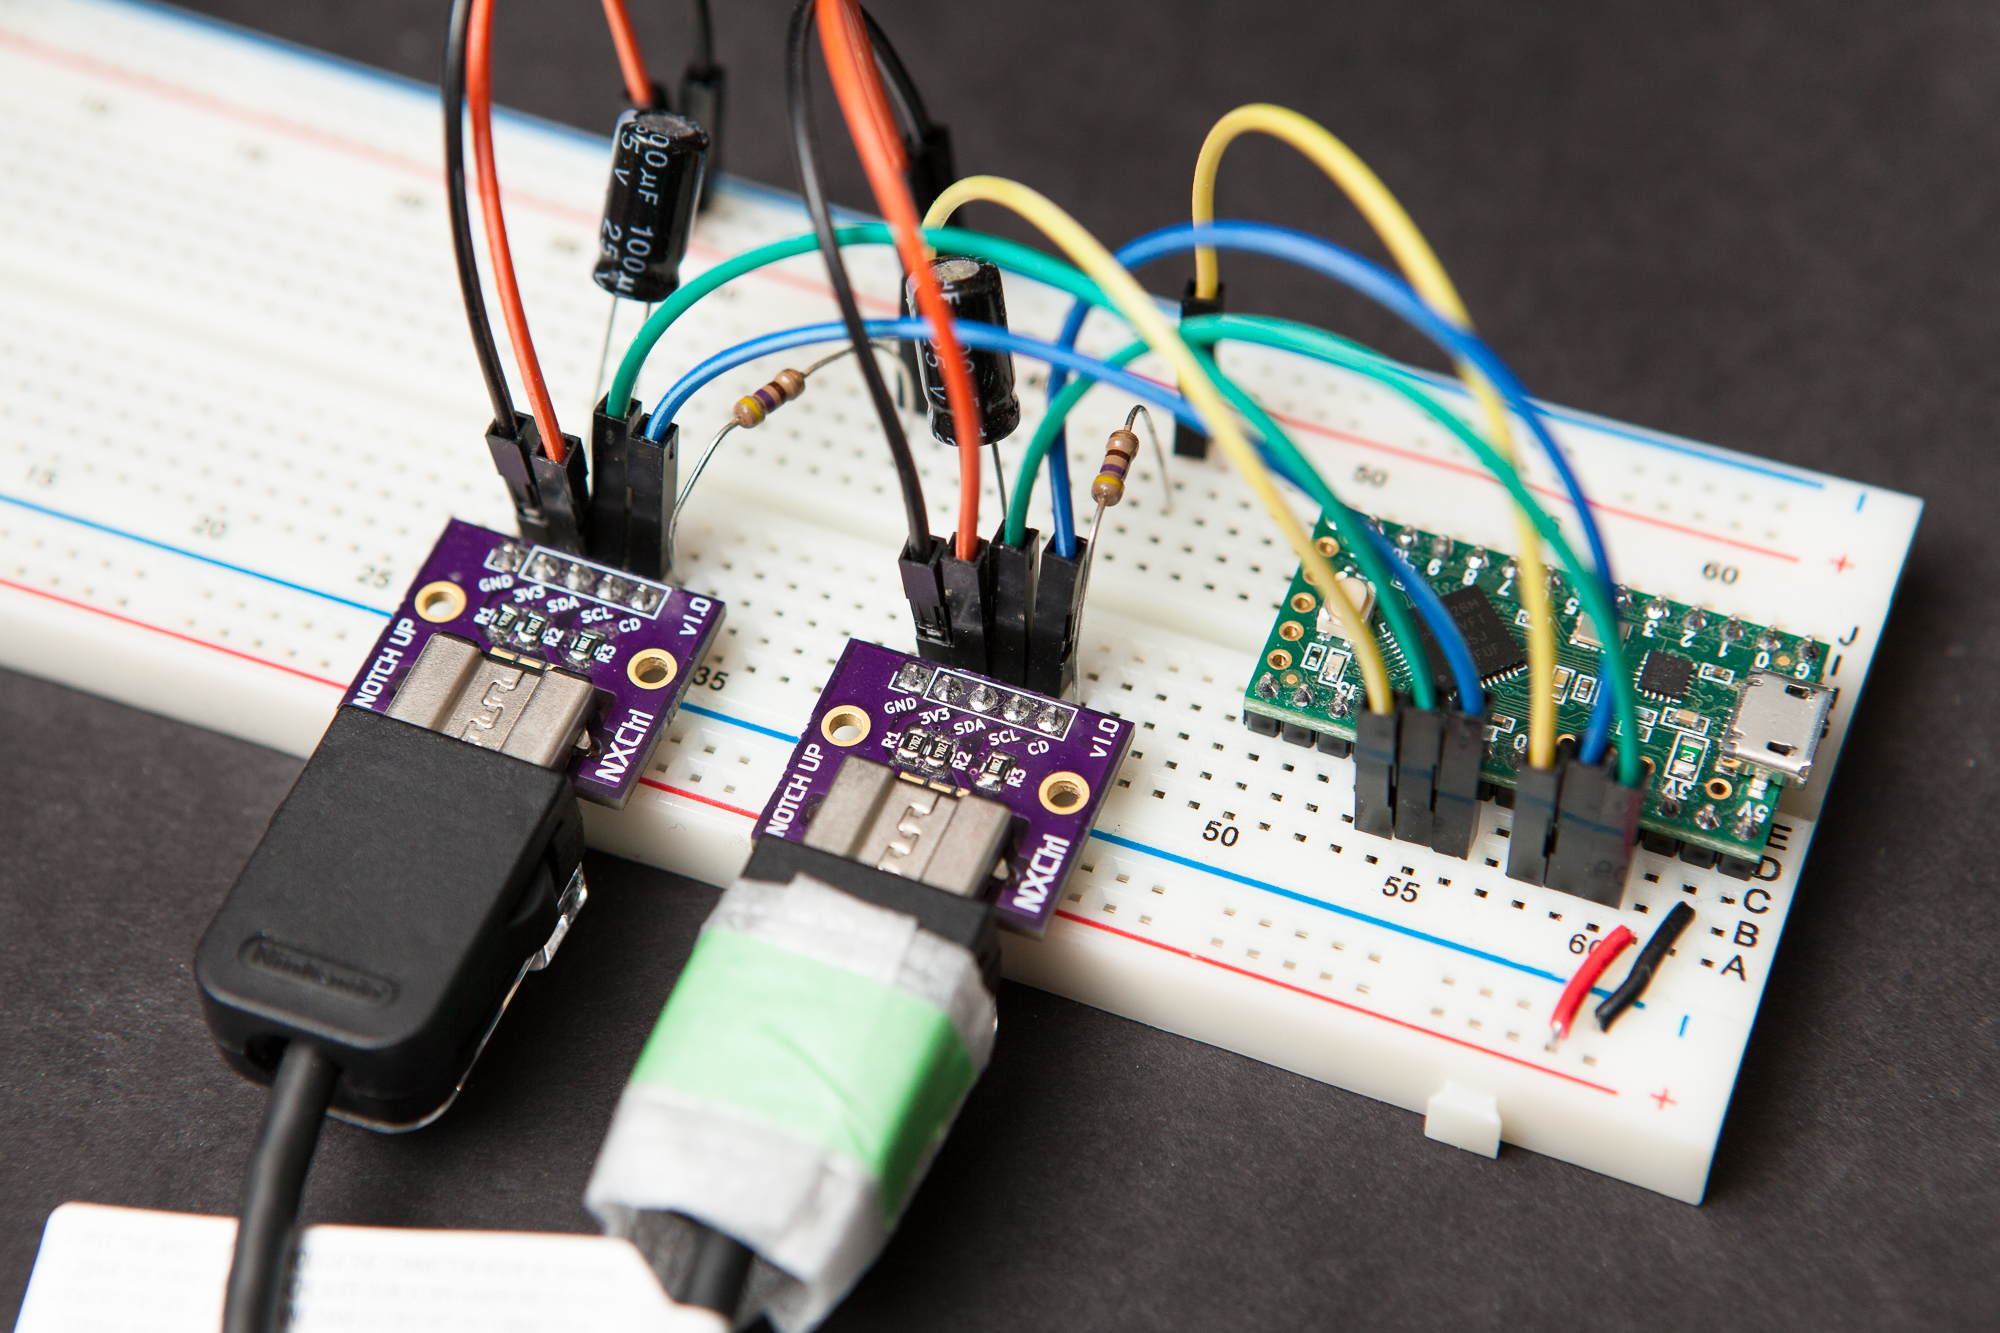
Since I’m using the board for another project I also have some electrolytic caps for the breakout power and additional pins wired to the “controller detect” pins, although these aren’t necessary for this controller to function. In fact, with the simple way this is programmed it doesn’t tolerate hot swapping the controllers anyways – so the additional features of my custom breakout aren’t used. You could just as well use a Nunchucky or another generic Wii breakout board.
The Code
Last but not least, the code to make it all work. I’m using two of my own libraries here:
- NintendoExtensionCtrl to handle the communication with the Nunchuk controllers
- HID Buttons to simplify the handling of the USB commands for the keyboard and mouse
I’m also making use of the built-in Keyboard and Mouse libraries from the Teensyduino software to make the microcontroller act as a composite USB device.
The program should be fairly straight-forward, although it’s a tad bit messy since I wrote it in a hurry. Within the setup function the program initializes the I²C buses, sets them to a faster rate (100 kHz -> 400 kHz), and then loops until both Nunchuks are connected and initialized. It then saves the starting position of the right Nunchuk’s joystick to use for the aiming comparison in the main program loop.
Within the program loop (loop function, per Arduino), the program polls the controllers for new data and assigns the USB outputs based on control surface states. The WASD keys use a comparison with a deadzone in the center of the joystick, while the aiming joystick acts directly on the mouse position – linearly and at a 4th of the max range (~25 pixels per update in each direction). The buttons are 1:1 with their HID counterparts with the exception of the ‘switch weapons’ button, which will only scroll once for each press.
Here is the code, in full:
// Libraries
#include <NintendoExtensionCtrl.h>
#include <HID_Buttons.h>

// Keyboard Buttons
const int JoyCenter = 128;   // 255 / 2
const int JoyDeadzone = 50;  // +/- area around the center to ignore

KeyboardButton moveForward('w');
KeyboardButton moveLeft('a');
KeyboardButton moveBackward('s');
KeyboardButton moveRight('d');

KeyboardButton jump(' ');
KeyboardButton use('e');

// Mouse Buttons
MouseButton fire(MOUSE_LEFT);

// Nunchuks
Nunchuk leftNchuk(Wire);
Nunchuk rightNchuk(Wire1);

// Program Data
uint8_t xCenter = 0;
uint8_t yCenter = 0;
boolean weaponSwitched = false;

void setup() {
    // I2C Init
    leftNchuk.begin();
    rightNchuk.begin();

    leftNchuk.i2c().setClock(400000);
    rightNchuk.i2c().setClock(400000);

    boolean leftConnected = false;
    boolean rightConnected = false;

    while (!(leftConnected && rightConnected)) {
        if (!leftConnected)  { leftConnected  = leftNchuk.connect(); }
        if (!rightConnected) { rightConnected = rightNchuk.connect(); }
    }

    xCenter = rightNchuk.joyX();
    yCenter = rightNchuk.joyY();
}

void loop() {
    boolean leftReady = leftNchuk.update();
    boolean rightReady = rightNchuk.update();

    if (leftReady) {
        // WASD
        uint8_t x = leftNchuk.joyX();
        uint8_t y = leftNchuk.joyY();

        moveLeft.set(x < JoyCenter - JoyDeadzone);
        moveRight.set(x > JoyCenter + JoyDeadzone);

        moveForward.set(y > JoyCenter + JoyDeadzone);
        moveBackward.set(y < JoyCenter - JoyDeadzone);

        // Jump
        jump.set(leftNchuk.buttonZ());

        // Use / Buy
        use.set(leftNchuk.buttonC());

    }

    if (rightReady) {
        // Aiming
        int16_t x = ((int16_t) rightNchuk.joyX() - (int16_t) xCenter) / 4;
        int16_t y = ((int16_t) rightNchuk.joyY() - (int16_t) yCenter) / 4;
        Mouse.move(x, -y);

        // Fire
        fire.set(rightNchuk.buttonZ());

        // Next Weapon
        if (rightNchuk.buttonC()) {
            if (!weaponSwitched) {
                Mouse.move(0, 0, 1);  // Scroll up
            }
            weaponSwitched = true;
        }
        else {
            weaponSwitched = false;
        }
    }
}
The Conclusion
You can see in the title that I’ve marked this as an “experiment”, because this is significantly rougher around the edges than most of the stuff I post on the blog. This is not a fully fledged project with all of the usual trappings, but just a quick and dirty experiment to see what I could do with my resources in half an hour. Using that benchmark I’m quite happy with the result.
Bearing that in mind, there is plenty of room for improvement if I wanted to dedicate some more time to this and make it a fully fledged controller. Some ideas off the top of my head include:
- Accelerometer controls (jump! reload!)
- Nunchuk auto-detect and reconnection
- Exponential mouses aiming
- Joystick auto-ranging
That being said, I’m happy leaving this be as a standalone experiment. My current (and much more detailed) Nunchuk project includes all of those above features and more – for whenever I actually get around to completing it. Keep in touch!