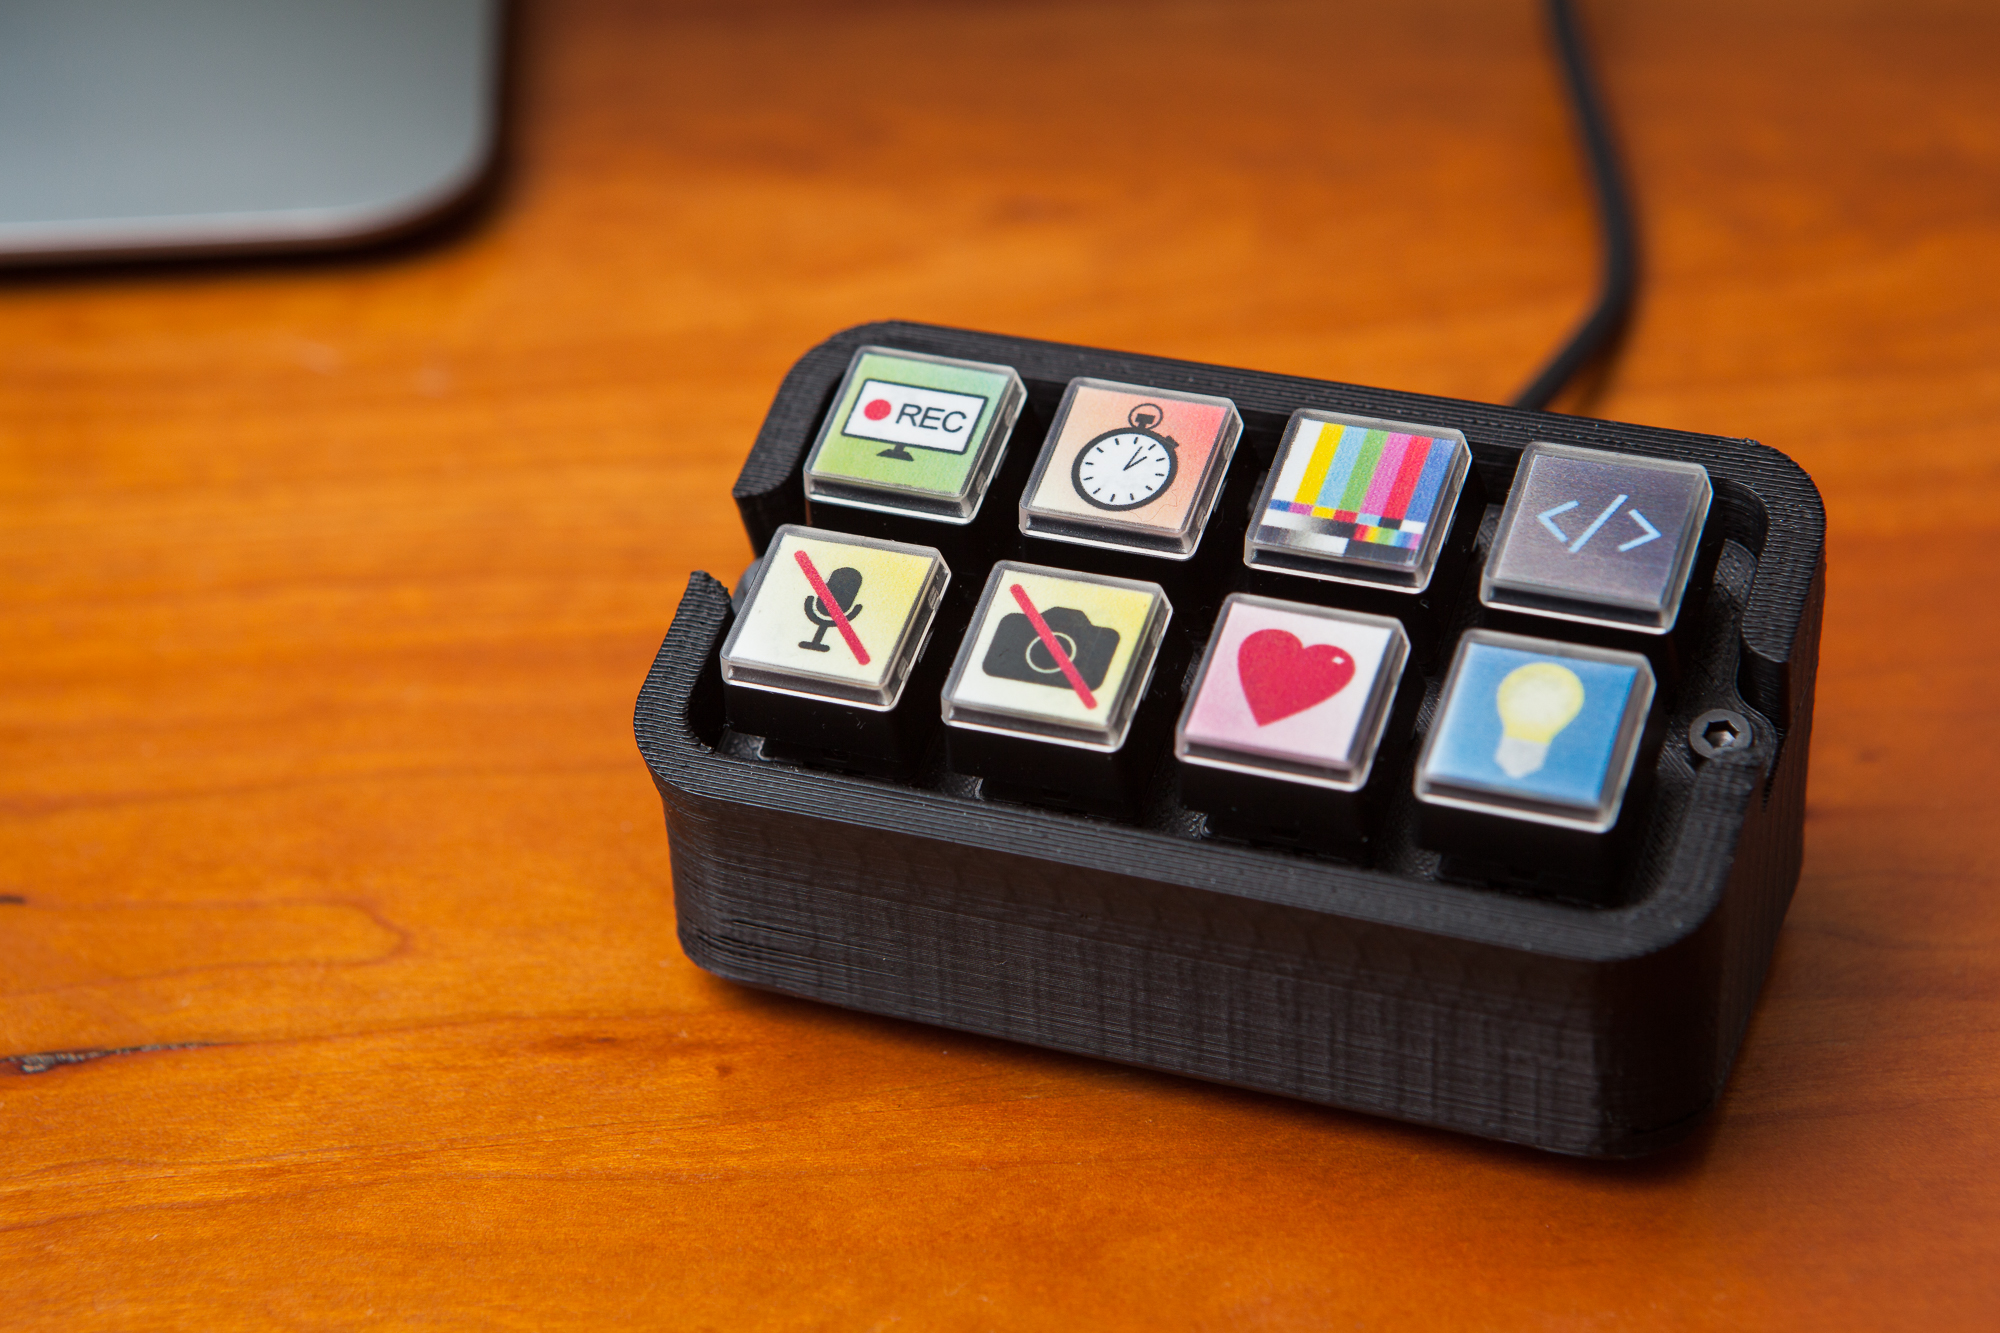
I’ve been doing a little streaming on Twitch, and a lot of streamers I follow have something called an Elgato Stream Deck. The Stream Deck is a small device with 15 buttons, each of which has its own customizable RGB icon. By configuring the bundled software, users can set button icons and macros to control your casting software, send messages in the stream chat, launch programs, and much much more.
Unfortunately the Stream Deck is out of my price range, at a whopping $149.99 retail. Fortunately I think I can make something that replicates the basic functionality for a fraction of that price: what I’m calling a “Stream Cheap”.
Although I’m focusing on using this as a replacement for a Stream Deck, at heart this is really a custom macro keyboard. It could be used as a hotkey board for any program. I’m just using it for OBS and Twitch.
Simplifying
The Stream Deck itself is a fantastic piece of tech. Adafruit did an interesting breakdown on stream, but it’s essentially a mini computer using an Atmel ARM926EJ-S driving a 480×272 resolution LCD. The buttons on top allow the LCD to shine through for the backlight icons, and push down on a touch matrix to trigger button presses.
There was a lot of engineering that went into making the Stream Deck, and I’m going to have to simplify. The #1 rule for this is cheap. I wanted to make something that people could reasonably build at home, at a much lower cost than an off-the-shelf Stream Deck. The fancy ARM processor is going to be replaced with a dirt-cheap AVR, the touch-matrix keys are going to be replaced by basic mechanical switches, and the customizable RGB icons are going to be swapped out for relegendable keycaps.
That’s just the hardware. When I say “basic” functionality, I do mean basic. Much of the power of the Stream Deck is in the bundled software, and I’m not going to spend the time to develop a complete software package to replicate everything. Fortunately though, I can replace the fancy USB communication with hotkeys from an off-the-shelf keyboard library and an Arduino. This is perfect, since most of what I need this device to control is OBS, which already has a great built-in hotkey manager.
Making the Stream Cheap
The obvious tool of choice for building this was a 3D printer: fast, cheap, and with minimal design constraints. This meant that I had a lot of freedom for designing the case so long as I avoided overhangs.
I chose a two-row design, each with four buttons for a total of eight hotkeys. Eight switches seems like just enough to accomplish what I need it to without getting exorbitant. It also keeps the footprint small on my desk.
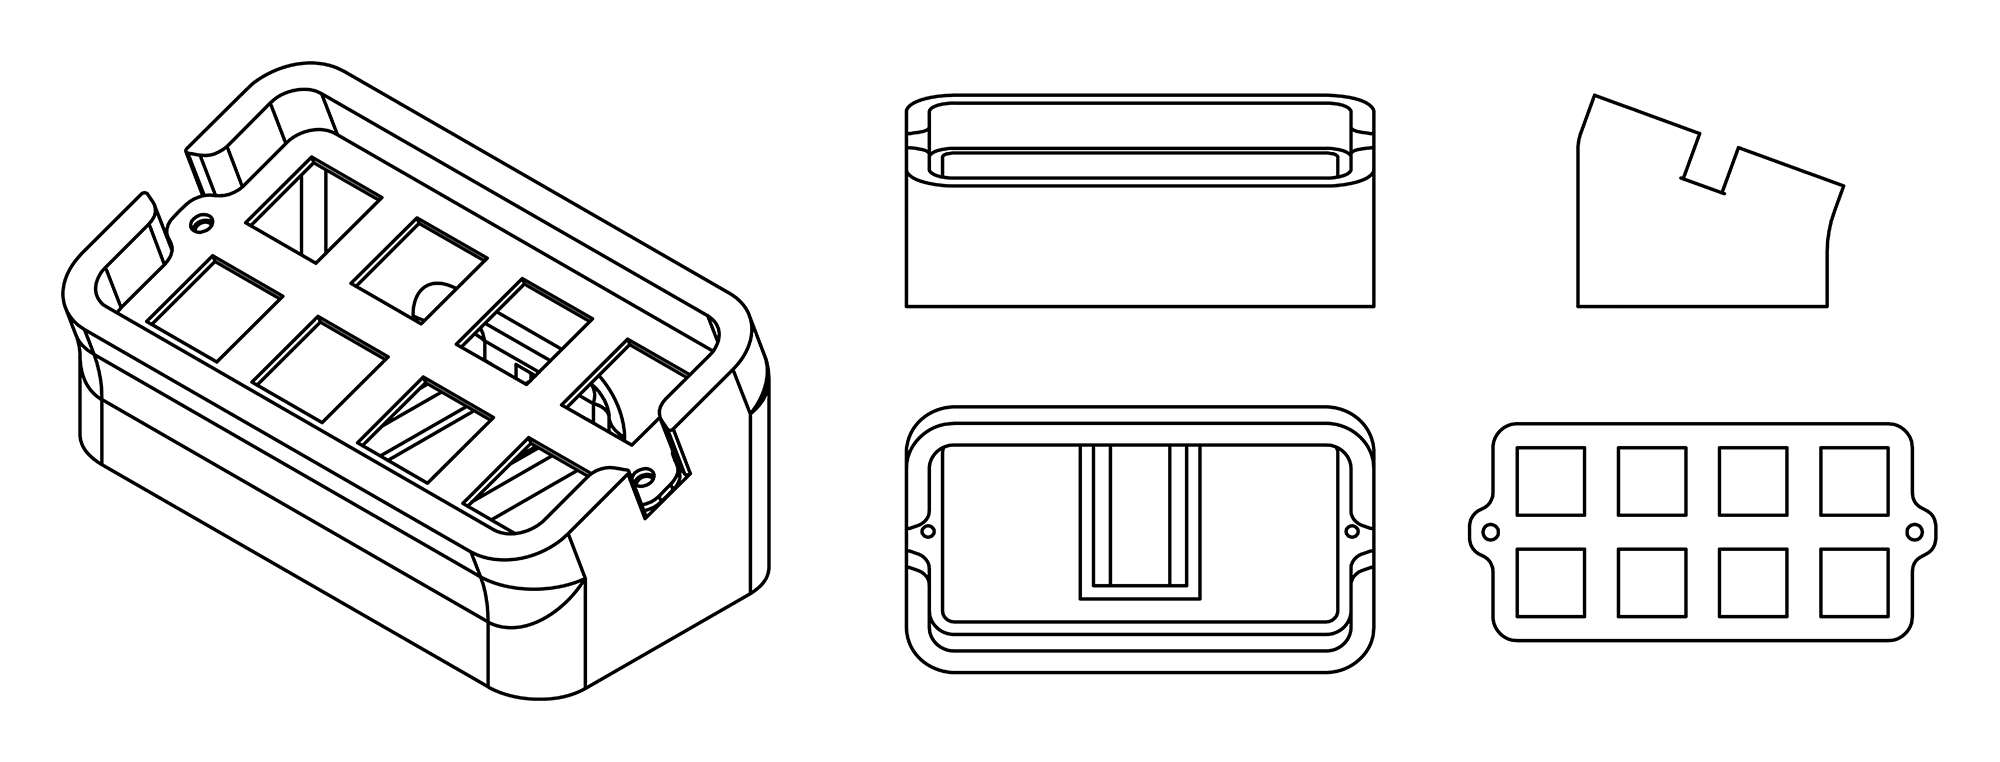
The final design is in two parts with a base and a faceplate. The base is a rounded rectangle that curves up to angle the buttons at 20° for easier viewing. It also accommodates the microcontroller with enough room for the backs of the switches and the requisite wiring.
The faceplate is a flat piece of 0.050″ plastic. Although I ended up 3D printing this for convenience, it could just as easily be laser-cut for a nicer finish.
Switchboard Assembly
After printing both parts of the case out of black ABS, it was time to assemble. I’m using Cherry MX Black switches, which are standard fare for mechanical keyboards and have plenty of keycap options. I picked up 8 from DigiKey for $6.32. These are a press-fit into the faceplate, and are retained with tabs.
With the switches in place I got to soldering. Although keyboards usually use a matrix to keep the number of wires down, I decided that with the limited number of switches I could get away with dedicating wires to each button. This also keeps the complexity down as I don’t have to worry about purchasing and installing diodes for each switch. Each switch got a separate signal wire, with the commons all being connected to a ground line. With eight switches, this makes 9 total wires. (I used 22 AWG wire for this. I could have used a smaller gauge to make packaging easier, but I didn’t have any on hand.)
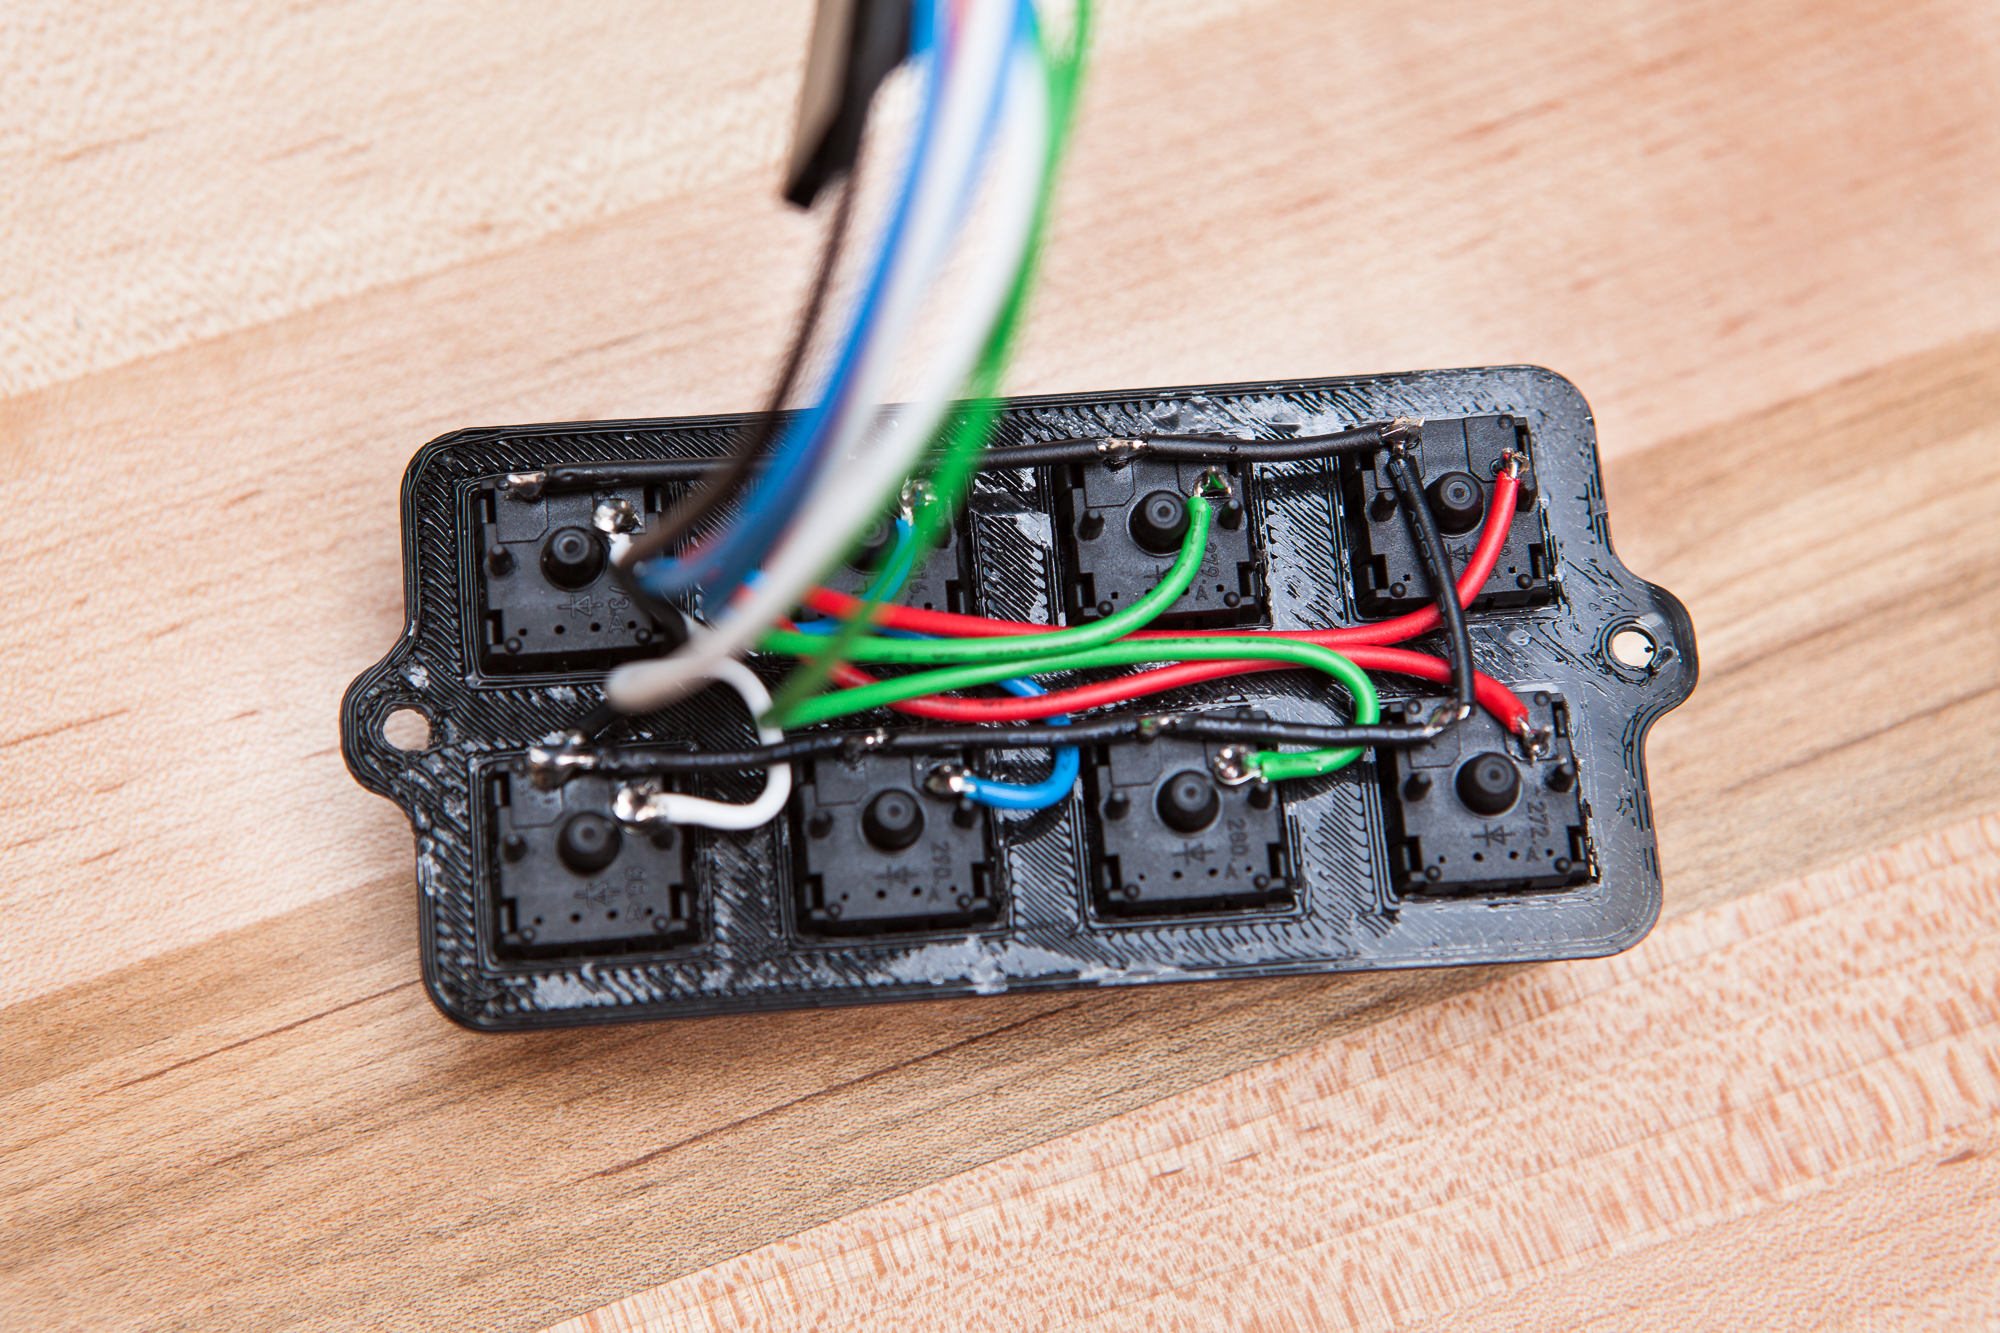
These wires all run to a female DuPont connector, which connects to a right-angle header on the Arduino Pro Micro acting as the brains of the operation. Using a header here allows me to pull out the switchboard or swap out the microcontroller as-needed. I’m using the DuPont connectors because they’re on-hand and easy to find, although it would have been wiser to use a polarized, positive-locking connector.
Update 2020-09-12: I keep getting comments that the wiring is confusing. I didn’t include a wiring diagram or a longer explanation than the one above because quite frankly the setup could not be any simpler. Each switch has two pins; it doesn’t matter which is which. One pin is a signal and connects to any I/O pin on the Arduino (I used pins 2-9). The other pin connects to ground (GND). Since ‘ground’ is the same for all of the switches, all of the ground connections were wired together and then connected to one pin on the Arduino (8 signal + 1 ground = 9 wires total). No diodes, no resistors, no matrix, no fuss.
Micro and Packaging
The microcontroller I’m using for this is a 5V Arduino Pro Micro, which is based around the Atmel 32U4 chip. The 32U4 supports native USB, which allows the Arduino to imitate an HID keyboard. It’s also small and very inexpensive.
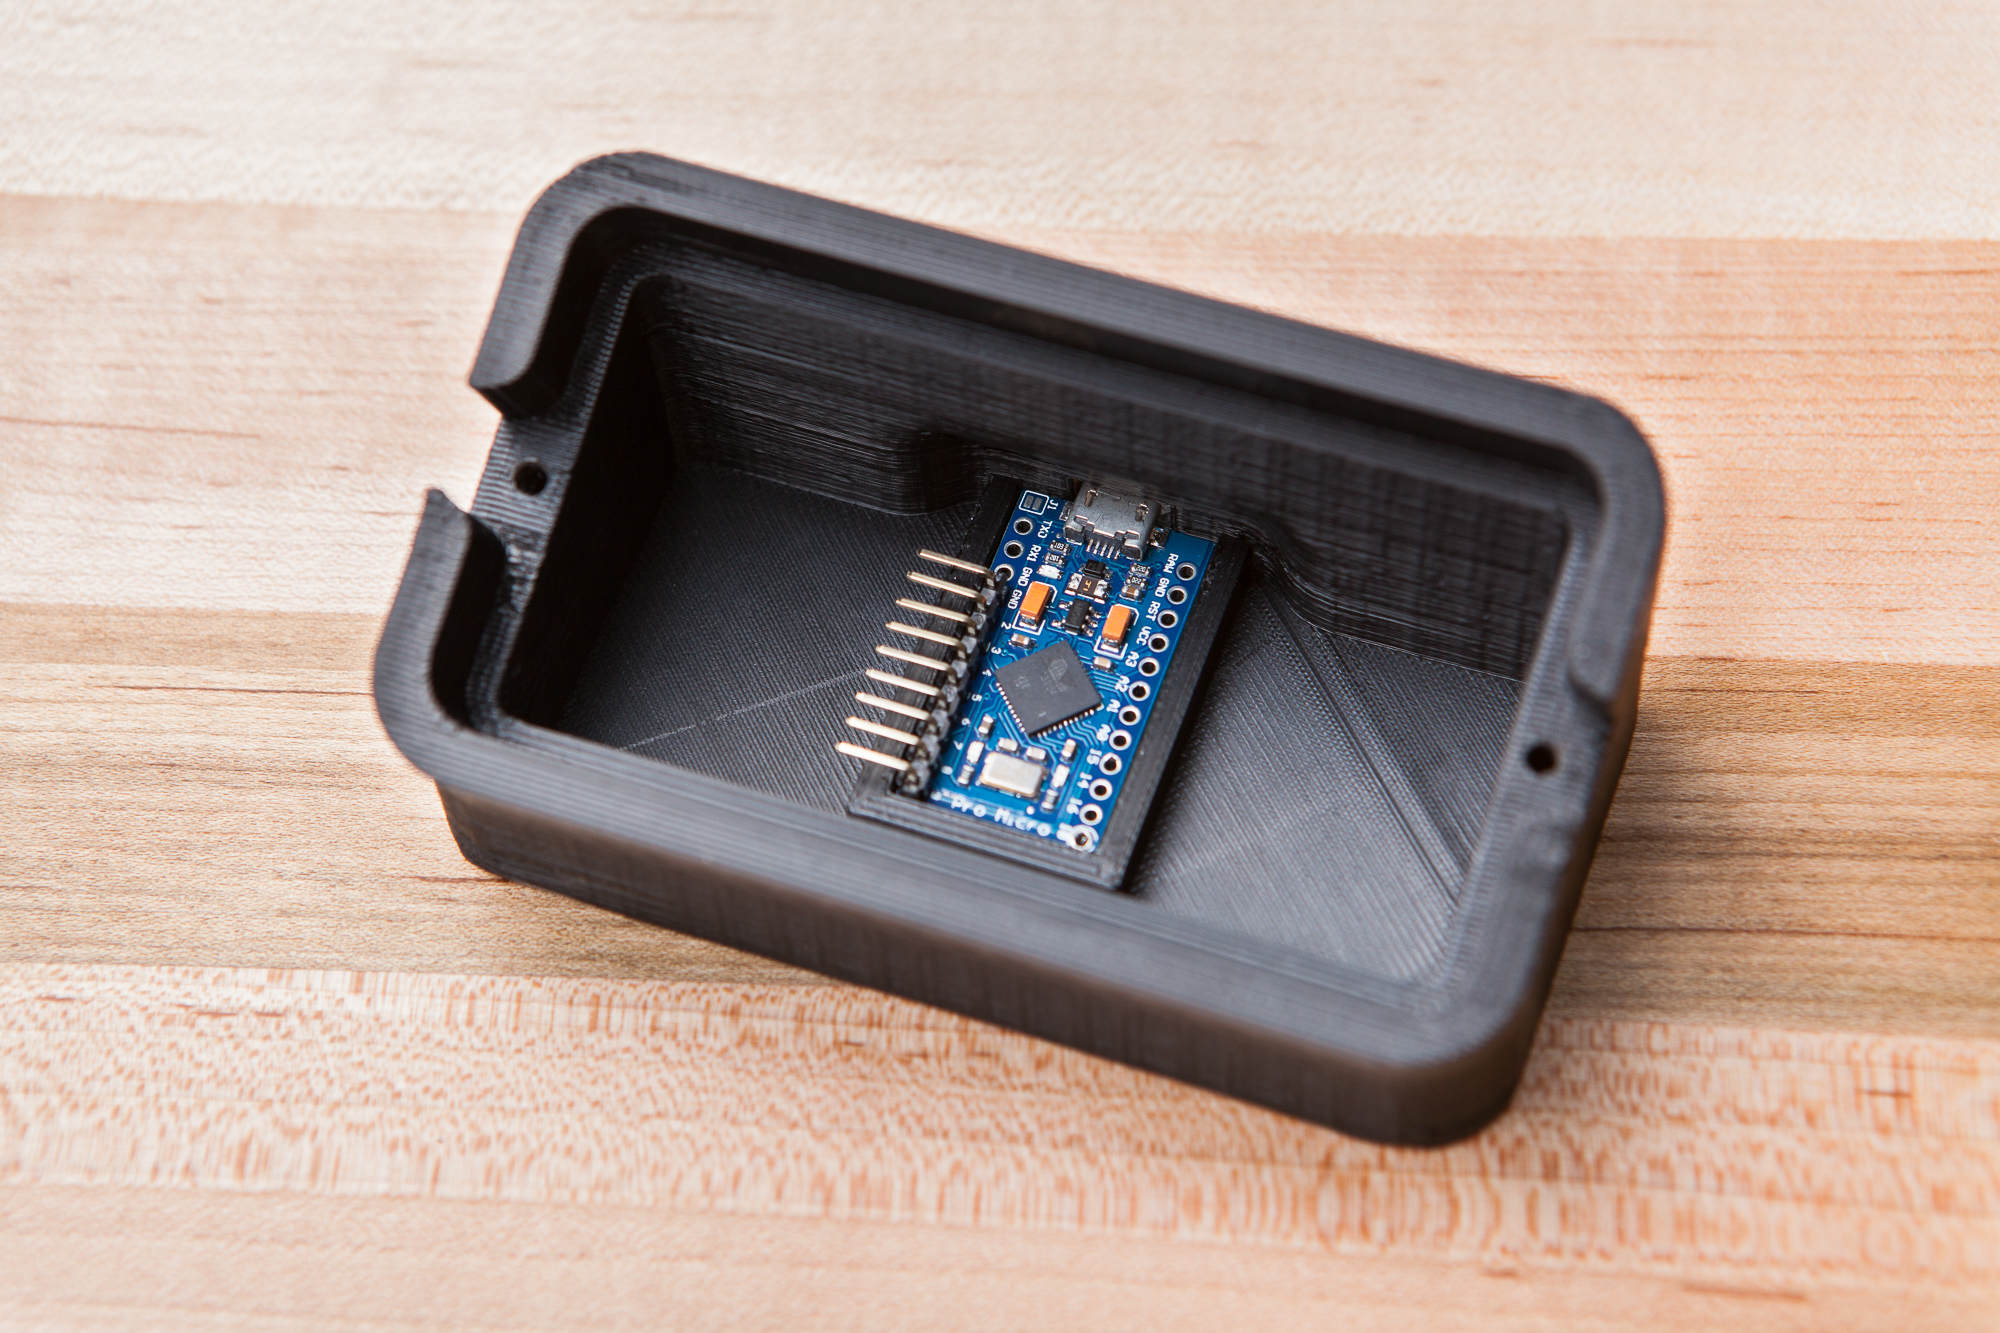
The footprint for the Arduino in the case has cutouts for the underside pins, and a cutout in the back for the USB port. Otherwise the walls around its perimeter should prevent it from sliding around, and support it during USB connects / disconnects.
After testing the switch and Arduino setup, it was time to stuff everything into the case. The two holes on the side of the case were tapped with an M3 tap, and then the Arduino was taped into its mounting position. The switchboard was connected and then the faceplate was attached using two M3 screws.
Keycap Icons
The last step to finish off the hardware was adding keycaps with custom images. I could just as well use regular run-of-the-mill keycaps with stock lettering or images, but where is the fun in that?
In anticipation of building this way-back-when, I purchased 20 re-legendable keycaps from MassDrop last year at about $1.40 each. These are the Rolls-Royce of re-legendable keycaps (har), but I really liked the styling. Although these are hard to find and pricey, you can find cheaper relegendable keycaps at places like Amazon or B&H.
The inside of each keycap is approximately 0.55 x 0.55″. I created an Illustrator template and set to work. This is what I came up with:
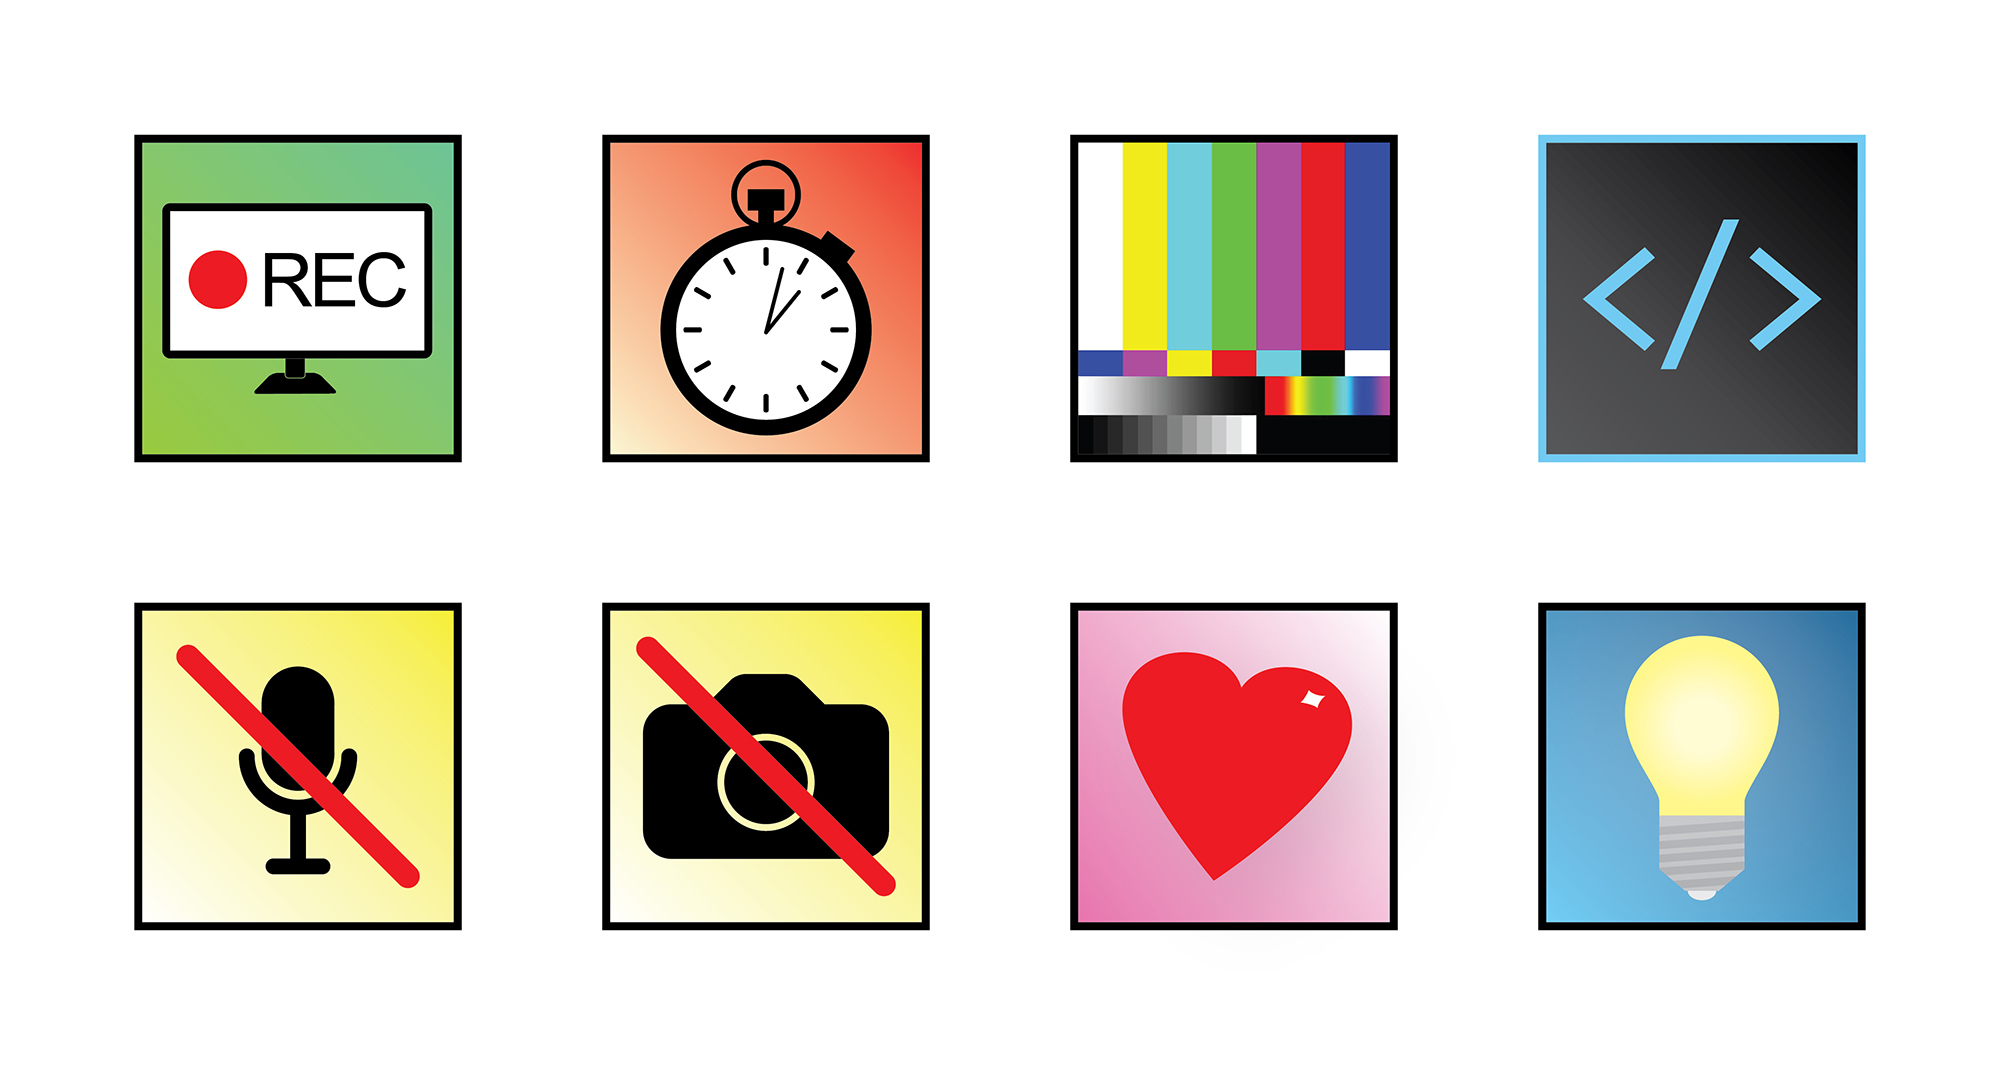
They’re a little campy, but they’re colorful and they’ll do the job. I printed these out on glossy photo paper using my home inkjet printer and cut them to size.
Stream Cheap Software
The last step is to make the software for the board. This is going to be relatively simple, as I can rely heavily on a pre-existing Keyboard library.
Secret Keys
When I set everything up to start streaming, I set a few hotkeys to do things like mute my microphone or switch scenes. Unfortunately it can be difficult to find an unused key to use as a hotkey, even on a full-sized keyboard. Often times I would accidentally tap a hotkey (e.g. numpad ‘-‘) while typing something, and have to be told by a viewer that my microphone was muted.
To avoid this problem for the Stream Cheap, I’m going to rely on some “secret” keyboard keys. Included in the HID keyboard spec are twelve additional keys: F13 through F24. These function keys are available to be ‘pressed’ by the USB spec, but aren’t physically on the keyboard. Even though the user cannot accidentally press them, in all other ways they act exactly like every other key.
These keys are picked up by hotkey-enabled programs, but otherwise won’t affect the computer’s functionality. This makes them perfect for a macro board.
Arduino Code
As of this writing, the official Arduino keyboard library does support keys F13 – F24, but this update was done recently and it has not been included in the most recent IDE release. I downloaded the updated library from GitHub and included it in the sketch folder to get access to these keys.
As of May 9th, 2018 version 1.0.2 of the Arduino Keyboard library was released and adds support for keys F13 – F24! You can update your library version in the libraries manager of the Arduino IDE.
The rest of the sketch is very simple: it polls each switch to check if the button has been pressed, and if so sends the respective key stoke to the PC. I’m also using a small helper class to poll each pin and handle press/release functions and debouncing.
As with all smartly-written programs that spam keyboard inputs, there is a failsafe if there is a hardware issue or an error was made during programming. On startup a safety catch will check if pin #1 (arbitrary) has been grounded, which will halt any further action.
/*
 *  Project     'Stream Cheap' Mini Macro Keyboard
 *  @author     David Madison
 *  @link       partsnotincluded.com/electronics/diy-stream-deck-mini-macro-keyboard
 *  @license    MIT - Copyright (c) 2018 David Madison
 *
 * Permission is hereby granted, free of charge, to any person obtaining a copy
 * of this software and associated documentation files (the "Software"), to deal
 * in the Software without restriction, including without limitation the rights
 * to use, copy, modify, merge, publish, distribute, sublicense, and/or sell
 * copies of the Software, and to permit persons to whom the Software is
 * furnished to do so, subject to the following conditions:
 *
 * The above copyright notice and this permission notice shall be included in
 * all copies or substantial portions of the Software.
 *
 * THE SOFTWARE IS PROVIDED "AS IS", WITHOUT WARRANTY OF ANY KIND, EXPRESS OR
 * IMPLIED, INCLUDING BUT NOT LIMITED TO THE WARRANTIES OF MERCHANTABILITY,
 * FITNESS FOR A PARTICULAR PURPOSE AND NONINFRINGEMENT. IN NO EVENT SHALL THE
 * AUTHORS OR COPYRIGHT HOLDERS BE LIABLE FOR ANY CLAIM, DAMAGES OR OTHER
 * LIABILITY, WHETHER IN AN ACTION OF CONTRACT, TORT OR OTHERWISE, ARISING FROM,
 * OUT OF OR IN CONNECTION WITH THE SOFTWARE OR THE USE OR OTHER DEALINGS IN
 * THE SOFTWARE.
 *
 */

// ---------------------------------
// Key definitions
#define BUTTON_KEY1 KEY_F13
#define BUTTON_KEY2 KEY_F14
#define BUTTON_KEY3 KEY_F15
#define BUTTON_KEY4 KEY_F16
#define BUTTON_KEY5 KEY_F17
#define BUTTON_KEY6 KEY_F18
#define BUTTON_KEY7 KEY_F19
#define BUTTON_KEY8 KEY_F20

// Pin definitions
#define BUTTON_PIN1 2
#define BUTTON_PIN2 3
#define BUTTON_PIN3 4
#define BUTTON_PIN4 5
#define BUTTON_PIN5 6
#define BUTTON_PIN6 7
#define BUTTON_PIN7 8
#define BUTTON_PIN8 9
// ---------------------------------

#include "Keyboard.h"

// Button helper class for handling press/release and debouncing
class button {
  public:
  const char key;
  const uint8_t pin;

  button(uint8_t k, uint8_t p) : key(k), pin(p){}

  void press(boolean state){
    if(state == pressed || (millis() - lastPressed  <= debounceTime)){
      return; // Nothing to see here, folks
    }

    lastPressed = millis();

    state ? Keyboard.press(key) : Keyboard.release(key);
    pressed = state;
  }

  void update(){
    press(!digitalRead(pin));
  }

  private:
  const unsigned long debounceTime = 30;
  unsigned long lastPressed = 0;
  boolean pressed = 0;
} ;

// Button objects, organized in array
button buttons[] = {
  {BUTTON_KEY1, BUTTON_PIN1},
  {BUTTON_KEY2, BUTTON_PIN2},
  {BUTTON_KEY3, BUTTON_PIN3},
  {BUTTON_KEY4, BUTTON_PIN4},
  {BUTTON_KEY5, BUTTON_PIN5},
  {BUTTON_KEY6, BUTTON_PIN6},
  {BUTTON_KEY7, BUTTON_PIN7},
  {BUTTON_KEY8, BUTTON_PIN8},
};

const uint8_t NumButtons = sizeof(buttons) / sizeof(button);
const uint8_t ledPin = 17;

void setup() {
  // Safety check. Ground pin #1 (RX) to cancel keyboard inputs.
  pinMode(1, INPUT_PULLUP);
  if(!digitalRead(1)){
    failsafe();
  }

  // Set LEDs Off. Active low.
  pinMode(ledPin, OUTPUT);
  digitalWrite(ledPin, HIGH);
  TXLED0;

  for(int i = 0; i < NumButtons; i++){
    pinMode(buttons[i].pin, INPUT_PULLUP);
  }
}

void loop() {
  for(int i = 0; i < NumButtons; i++){
    buttons[i].update();
  }
}

void failsafe(){
  for(;;){} // Just going to hang out here for awhile :D
}
With this uploaded, I went into OBS and tried setting a few hotkeys. IT WORKS!
Hotkey Assignments
This will probably change in the future, but here’s how I have the hotkeys set up. The key numbering goes from left to right, top to bottom:
- OBS Scene: Main
- OBS Scene: Be Right Back
- OBS Scene: Technical Difficulties
- (Custom button for stream integrations)
- OBS Source: Mute microphone
- OBS Source: Hide camera
- Twitch Chat: Spam “<3”
- Twitch Chat: Spam “💡” (Unicode 1F4A1)
The Twitch chat macros uses an OBS script I wrote, which stops and starts with OBS and hooks into its hotkey menu as well. The custom button (code symbol) is the odd man out – this is going to be a custom button that changes based on whatever interactive stream thing I use that day.
Conclusion
And it’s built! Total cost was around $20, although only because I splurged on the expensive keycaps and the nice switches. You could definitely build this for less.
As I stressed in the introduction, this device is not just limited to streaming! Because it works as a generic keyboard device, it can be used as a macro box for all sorts of programs! I could set simple shortcuts in any program, or use something like AutoHotkey for more complex commands without having to reupload the firmware.
All around this project was a huge success: the “StreamCheap” works exactly as I designed, taking the role of a Stream Deck at nearly a tenth of the cost!
If you’d like to build your own, you can download the 3D files from Thingiverse. Have fun!
Parts List
Per tradition, I linked parts throughout the post as they’re used. But it’s handy to have a single point of reference, so here’s a complete list. Be aware that some of these are Amazon Affiliate links that help fund the content on this site. Thank you for your support!
- 5V Arduino Pro Micro
- Cherry MX Black switches (8x)
- Massdrop Relegendable Keycaps (1 set) or X-Keys Relegendable Keycaps
- 9 Pin Male Right-Angle Connector
- 9 Pin Female Connector
- M3-10 Bolts (2x)
You’ll also need a USB cable, solder, and a little bit of double-sided tape. I used an M3 tap for the bolt holes but you could probably get away with using a heated bolt.
To build this project more cheaply, you might consider ordering the Arduino from AliExpress, and purchasing less expensive keycaps.
I’d recommend keeping the Cherry switches, even though they’re somewhat pricey. A quality switch can make or break a project and these switches are very well-built. All of the switches in the MX line should have the same footprint, so feel free to switch out the MX Blacks for a different color if you want a lighter feel or a tactile response. WASD Keyboards has a good overview of the switch types here.