We are living in unprecedented times. There’s economic uncertainty, civil unrest, and a global pandemic that’s causing chaos and threatening our way of life. In 2020 these are the times we live in. But this also describes the events from The Last of Us, Naughty Dog’s widely acclaimed action-adventure survival horror game from 2013.
The game’s story follows Joel and Ellie, two survivors living in the post-pandemic United States. Ellie is a teenage girl who is immune to the cordyceps infection that has ravaged humanity; Joel is an older man who, twenty years later, is still reeling from the murder of his own daughter during the early days of the outbreak. He has been charged with taking Ellie to find the “Fireflies” – a rebel group that is working to find a cure.
In light of current events and in anticipation of the game’s sequel The Last of Us Part II releasing on June 19th, I decided to build my own “Firefly” armbands from the first game.
Reference Material
For reference material I’m using the 2014 “Remastered” version of the The Last of Us for PS4. The Remastered version includes a photo mode which allows you to freeze the scene and dolly the camera around Joel. This, combined with the remaster’s high resolution textures and the PS4’s screenshot capabilities, allowed me to take some close-up reference screenshots of the armbands in the game.
Fair Warning: this section contains spoilers for The Last of Us (2013).
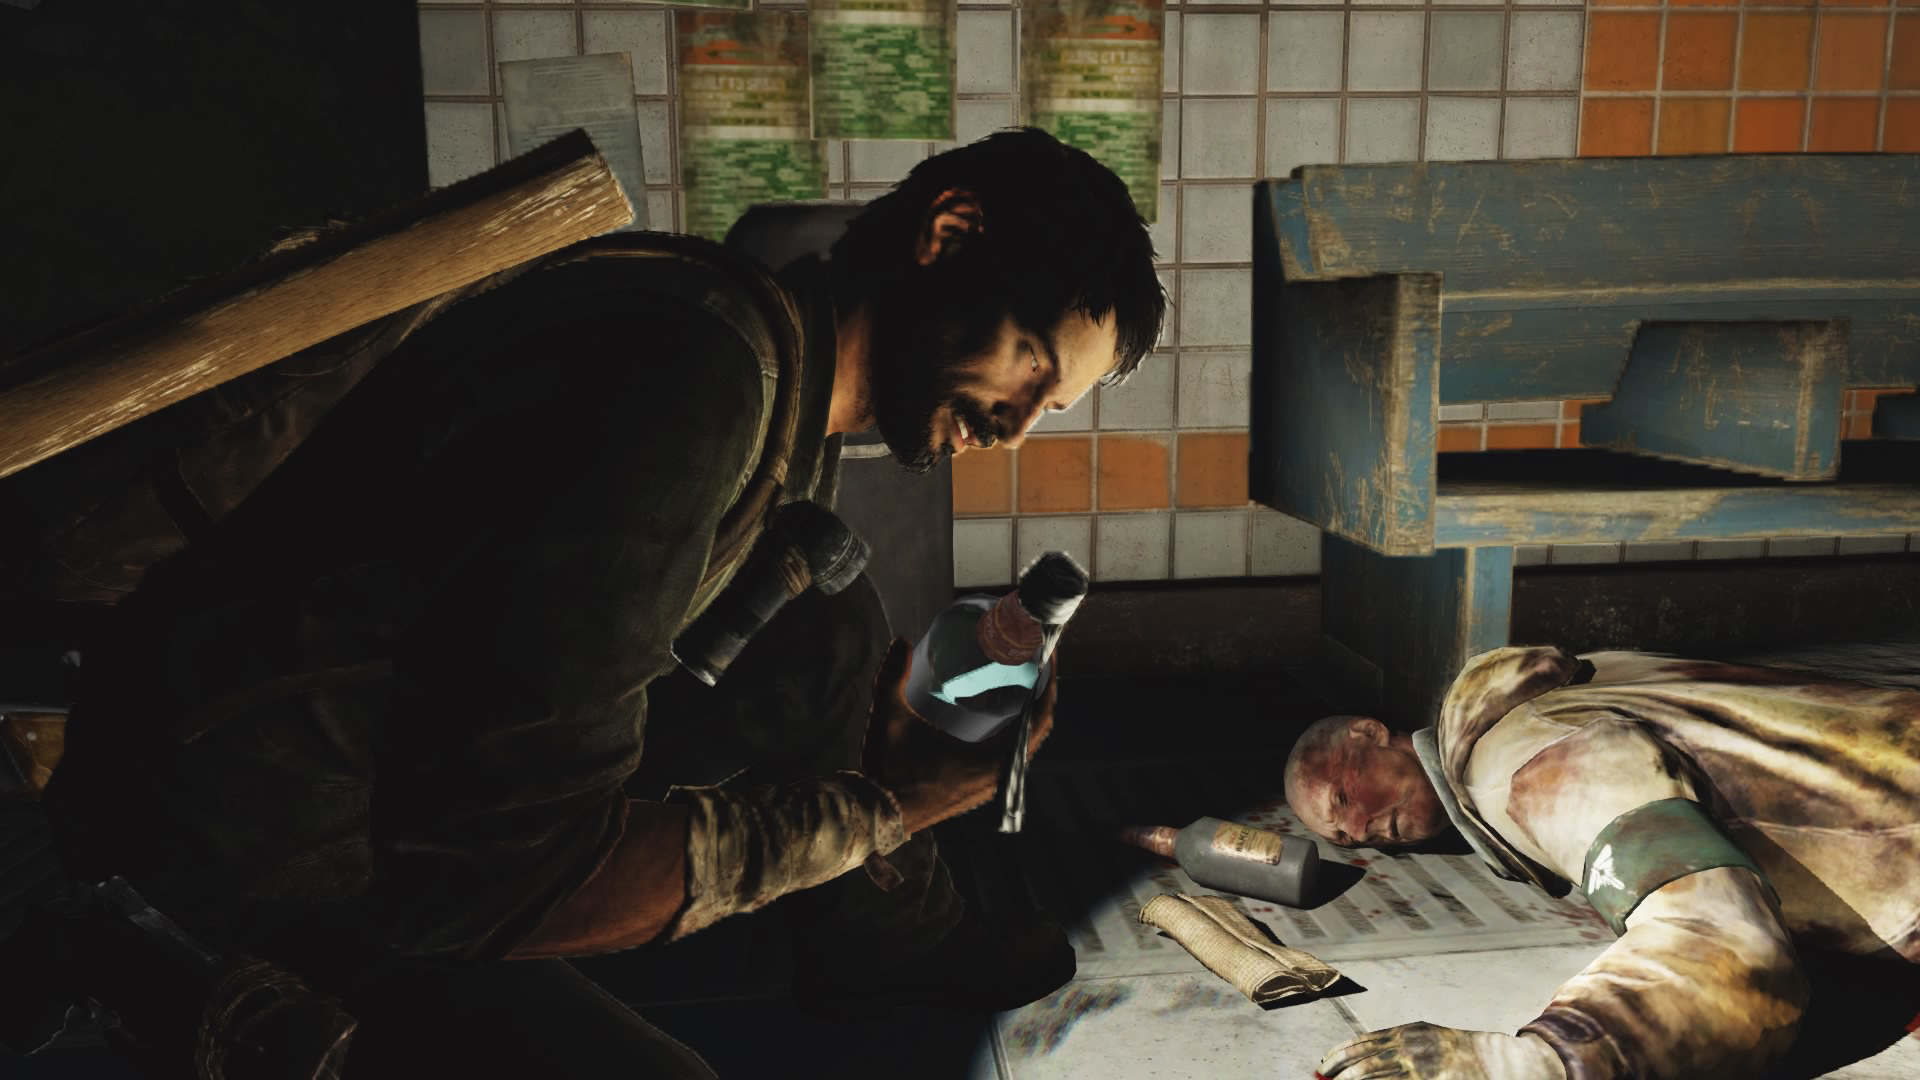
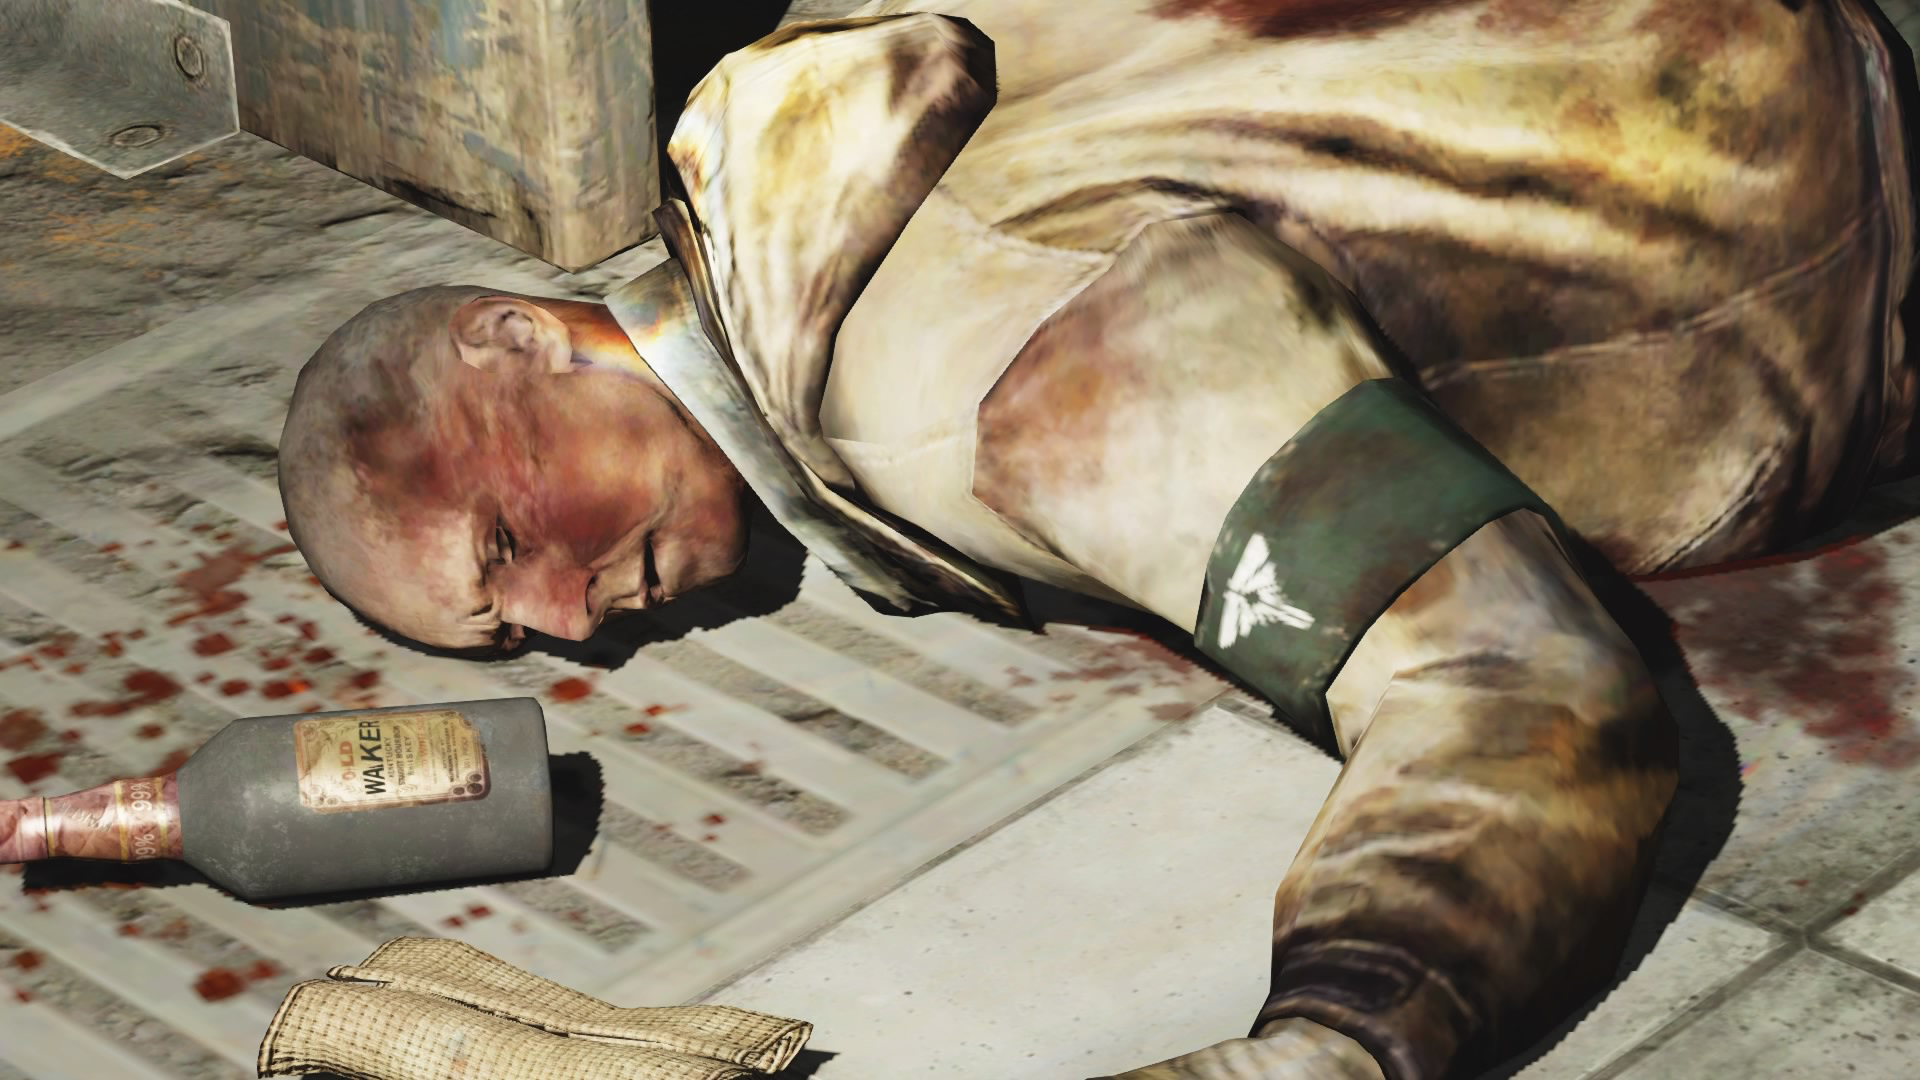
The first time you encounter a Firefly with an armband is in chapter 3 (“The Outskirts”) in the “Downtown” stage. After making their way through the wrecked skyscraper, Joel and company end up in a subway terminal with a bunch of clickers. At the beginning of this section there’s a fallen Firefly on the ground with a Molotov cocktail that Joel picks up in a scripted cutscene. Turning on the flashlight and activating photo mode gives us a good first look at his armband:
The other area where Firefly armbands are abundant is in the hospital at the end of the game (chapter 11: “The Firefly Lab”). Most of these character models are higher resolution than the Molotov Firefly, and since they’re standing up some careful camera moves allow for much tighter screenshots:
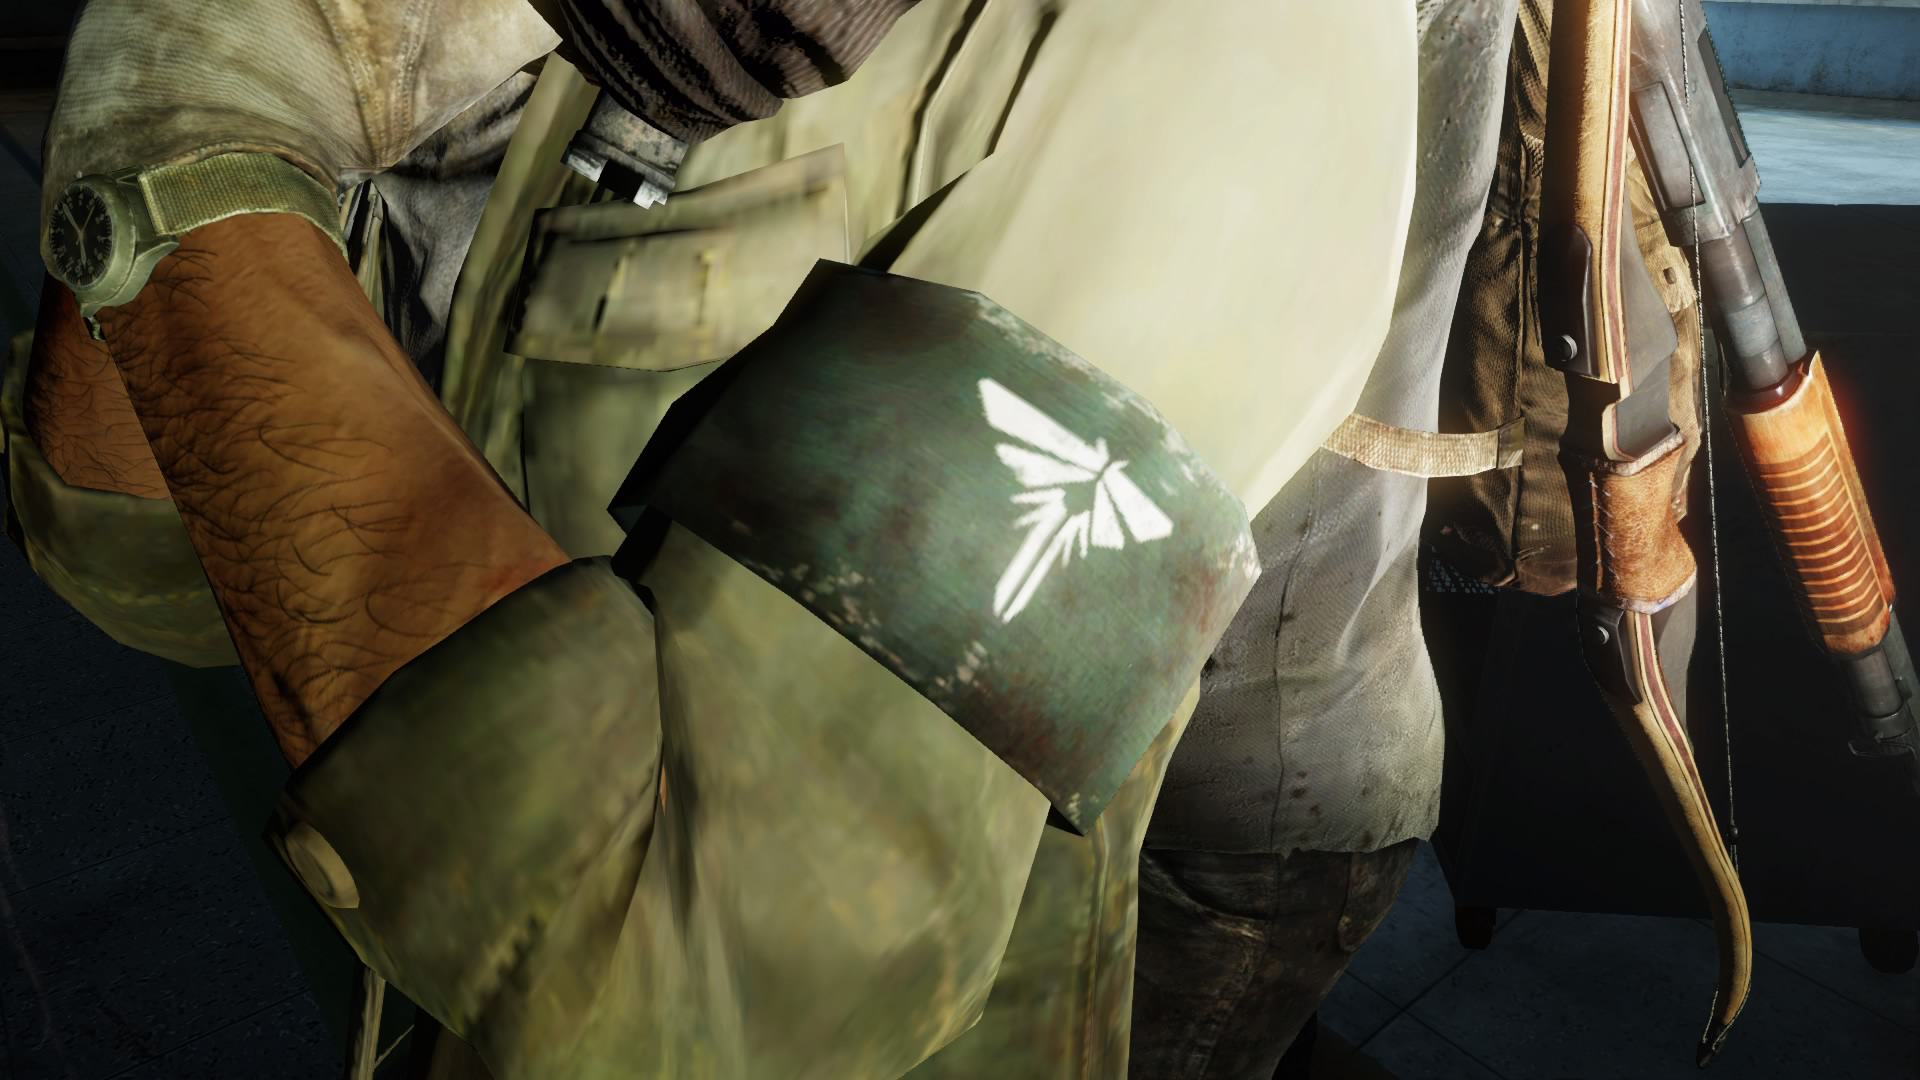


From these screenshots you can tell that the armband is a continuous piece of dark green cloth with a white Firefly logo in the middle placed slightly up from center. The armband is also covered in blood splatter and has some white fraying on the edges, while the logo itself looks distressed (worn). Looking from the top down, the band is wrapped “clockwise” around the arm and is tied in the back using what looks like two brass snaps or buttons.
Taking Measurements
After I had enough reference images on hand, I took to Photoshop to try and translate these images into real-life measurements I could use to replicate the armband. These measurements are going to be rough, since the game is only running at 1080p and there’s some “lens distortion” with the in-game camera.
To start, let’s look at this wide shot to figure out the relative height of the armband compared to the upper arm:
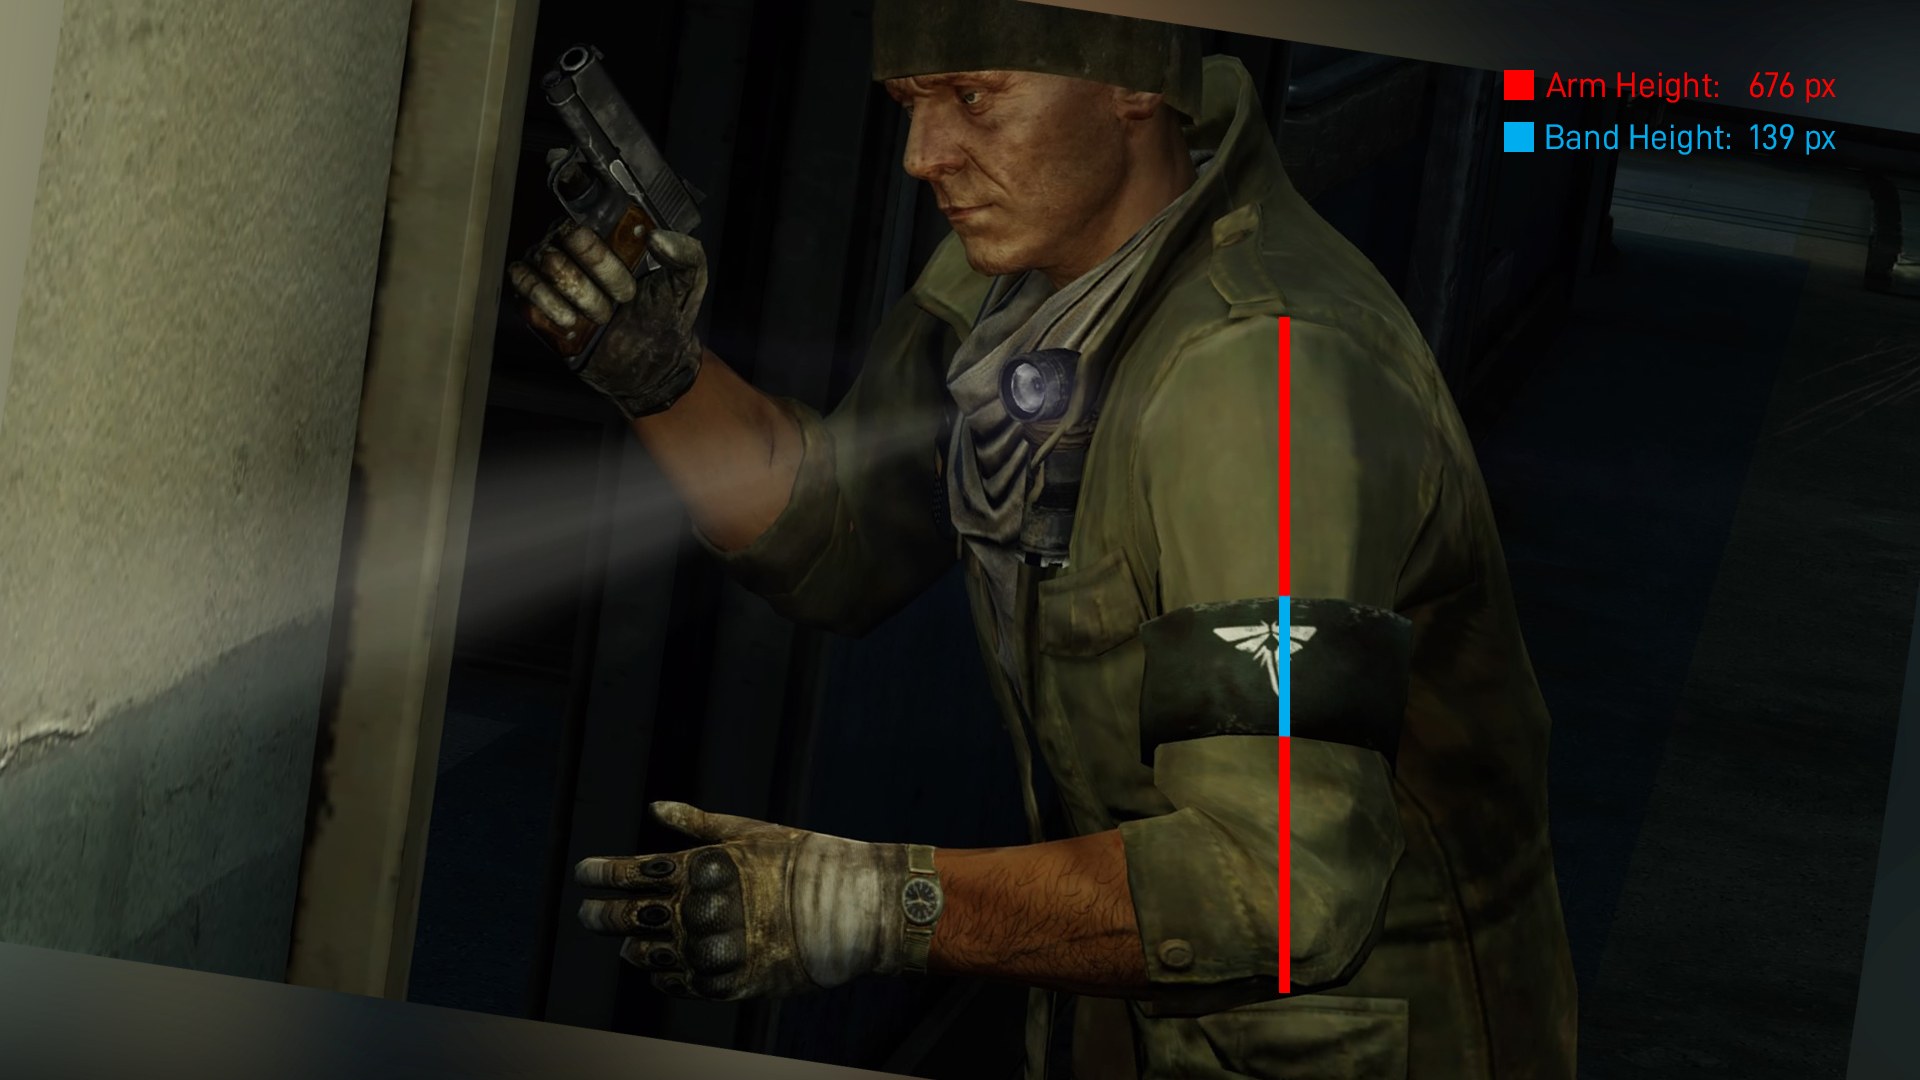
In this screenshot, this NPC’s upper arm is 676 px long down the center. Along the same axis, the armband is 139 px tall, or around 21% of the total arm height. For my own arms that equates to an armband about 2 ⅝” tall.
Next, let’s take a look at the logo:
Of a total armband height of 337 pixels the logo makes up 182, or around 54% of the total height. The center of the logo is positioned about 58% up the armband, with the top margin approximately half that of the bottom.
Creating a Pattern
The reference images and measurements gave me a good idea of what to aim for, so it was time to personalize these measurements for my own body and make a sewing pattern.
Measuring to Length
I already noted above that for my arms the armband should be about 2 ⅝” tall, and since the armband itself is just a long rectangle the last measurement needed is the armband’s total length (circumference). This is going to be different for everyone based on their outfit and the size of their bicep. To make this prop more flexible, I decided to ditch the brass snaps and go with large patches of hook + loop fasteners (Velcro).
I started by measuring my (unflexed) bicep circumference with a soft measuring tape, then added two inches to accommodate jackets and another two inches for overlap of the Velcro fasteners. I tested this with a piece of scrap cloth and it worked great: snug on my arm at the minimum size, and comfortable at the maximum size while wearing a thick jacket.
Pattern Making

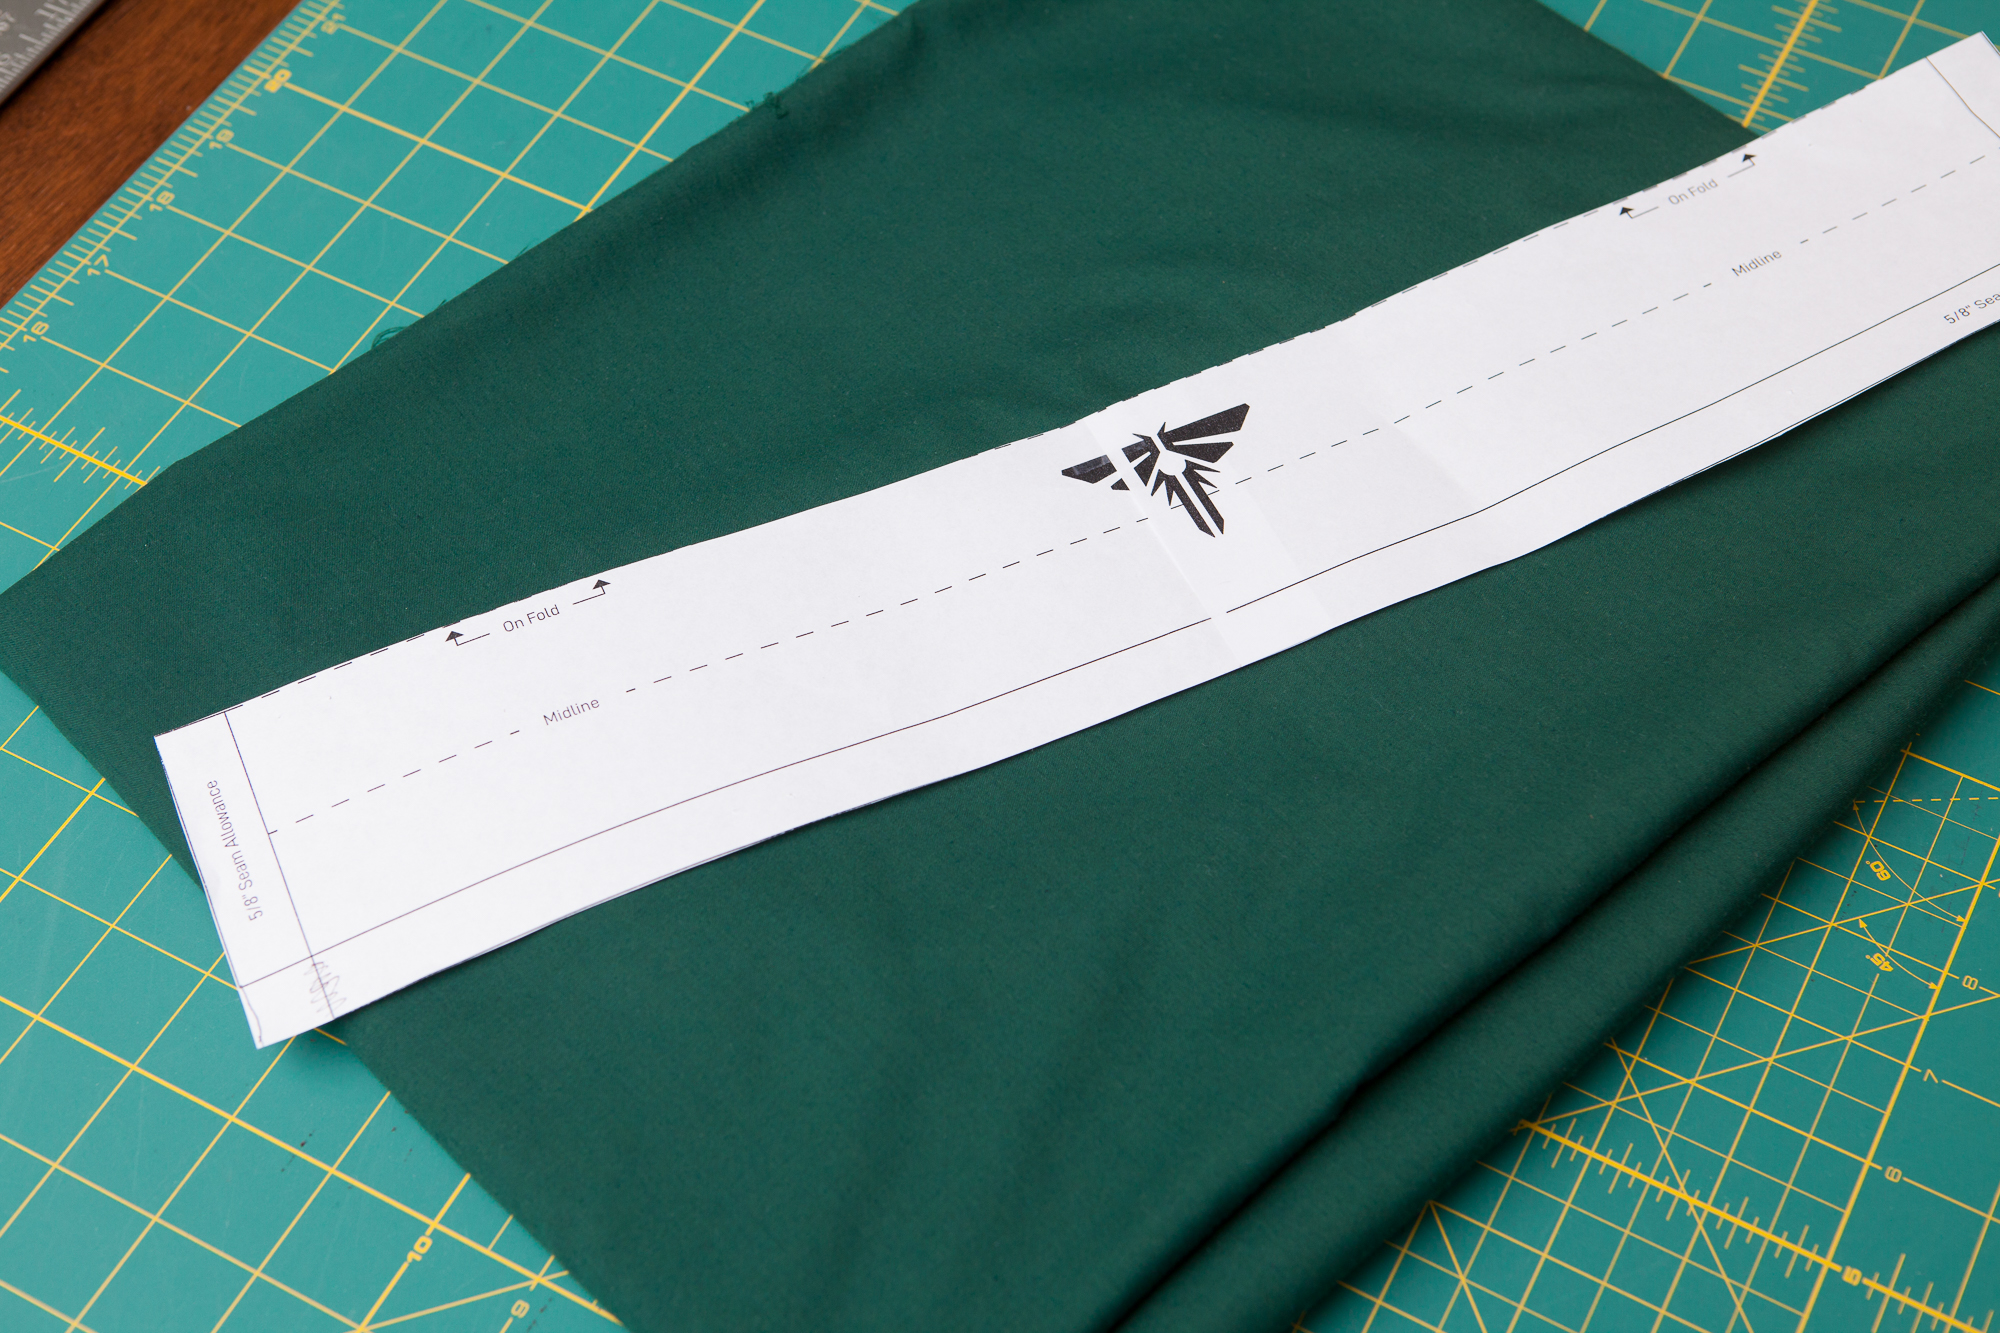
With all of the measurements in hand, I created a simple sewing pattern in Adobe Illustrator for use as a guide and a cutting template. I’m not much of a seamster, so let me know if anything looks out of place!
The plan is to cut the fabric using a fold along the top to double it up, then fold over the side edges and sew along the bottom to create a single seam. This seam is then going to be ironed flat and the whole assembly will be flipped inside-out, silkscreened, and stitched closed with the Velcro patches on top.
Sewing the Armband
Since I couldn’t go to a fabric store due to the quarantine (apropos for the prop at hand), I took a gamble on some fabric I found online at Amazon. I ended up with a yard of “Premium Cotton Blend Broadcloth” in hunter green. This fabric is a lovely color but is quite a bit thinner than I had imagined since the armbands in the game look so thick and rough. Still, it’ll have to do.
My fabric was 72″ by 36″, so cutting along the short side gave me 2 armbands per cut. Two seemed like too few given my lack of experience with silkscreening, so I ended up cutting another row for four armbands total. I used the printed sewing pattern as a cutting template, folding the top edge of the fabric over to double it up. After cutting the fabric to size with a rotary cutter I unfolded the piece and turned over the short edges by the seam allowance (⅝”) so they wouldn’t unfurl. These edges were then ironed flat, and the whole piece was folded over (while still inside-out) and generously pinned in preparation for sewing the one long edge.
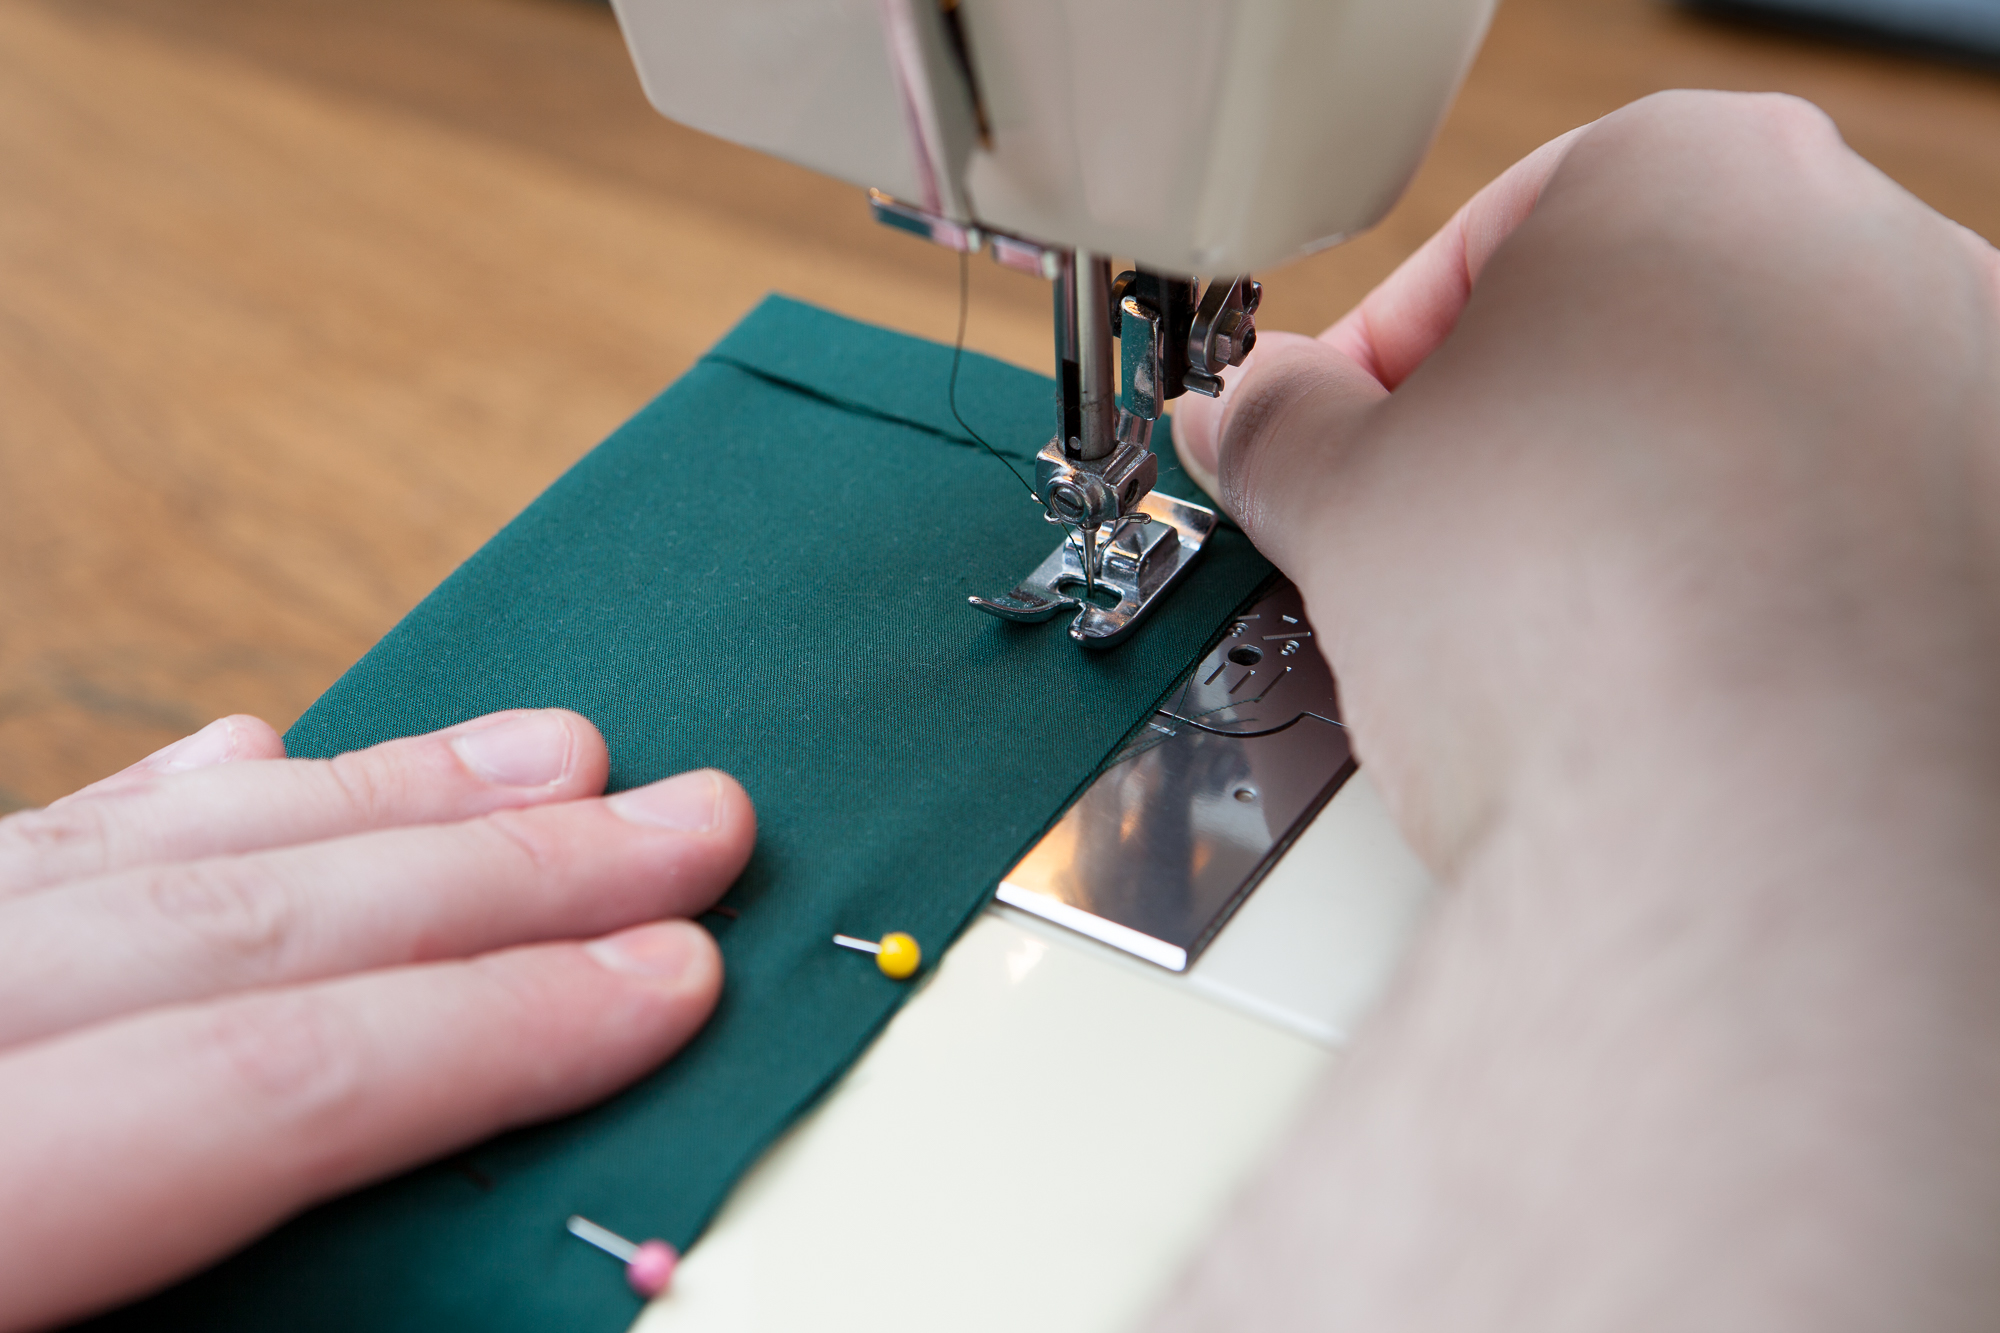
The thread I’m using is a matching hunter green from Coats & Clark that should blend nicely. I’m using my mother’s old Kenmore sewing machine for this at a moderate 12 stitches-per-inch. After sewing the full length of the long edge and cutting off the excess thread, the armband is now a complete “loop” – albeit inside out. To finish it, the fabric overhangs from the long seam were opened up and the whole assembly was ironed flat along the seam line. The armband was then turned inside out and ironed one last time to flatten it and remove any remaining creases from sewing.
At this point the armbands are long tubes of fabric, open at either end. The next step is to add the “Firefly” logo via silkscreening.
Silkscreening the Logo

Be forewarned: although I’ve long had interest in it, I have never silkscreened anything before. So this is going to be an adventure.
The post-apocalyptic nature of this prop means that the logo should probably be distressed – cracked, faded, patchy, or otherwise aged and weathered like it had been exposed to the elements. From my research the recommended way to do this is to “bake” the aging into the graphics you’re printing by using digital brushes or filters on the artwork before it’s added to the screen. But given the current state of the quarantined world I couldn’t get my hands on silkscreen emulsion, so I’m going to have to go with a less detailed, lower-tech process: silkscreening with vinyl stencils.
Cutting Artwork
The first step in any silkscreening project starts with the artwork. In this case, the “Fireflies” logo from the game. Luckily for me I didn’t have to recreate the design myself – it’s already available as an SVG from Wikimedia Commons.
And because it’s an SVG (Scalable Vector Graphics) the design is already in the form I need for cutting from vinyl – I just had to resize it to the 1.4175″ height to match the size of the armband (per my measurements above). The SVG also had an external stroke set, so I was sure to expand the paths in Illustrator before resizing the logo to its final height.
Before cutting the silkscreen stencil, I loaded in some generic white vinyl and cut out the logo to check the look and size of the logo on the armbands. Even though it matched my measurements from above, the 1.41″ height seemed a bit small so I bumped it up to an even 1.5″ (57% of the total armband height).
The vinyl I’m using is red Oracal 651 outdoor (“permanent”) vinyl. I’m using “permanent” vinyl because the adhesive is tackier and should hold better against the screen. And red because it’ll provide good contrast against the white ink and the green fabric (…and because it was the cheapest).
My vinyl roll is 12″ wide, so I set the firefly logos in the middle of a 5.75″ square (6″ + margin) and cut out a pair on my Silhouette machine. After cutting I weeded the center cutouts in the design and applied some transfer paper in preparation for application to the silkscreen.
Prepping the Screen
I read conflicting advice about whether vinyl for silkscreening should be applied to the top or the bottom of the screen. On the one hand, putting the vinyl on the top provides some thickness so the ink can form a “reservoir” for an even print. On the other hand, putting the vinyl on the bottom means the squeegee has less of a chance of disturbing the vinyl and pulling it off of the screen. I opted to be cautious and go for the latter, and because the firefly logo is symmetrical I didn’t even need to mirror it for cutting!
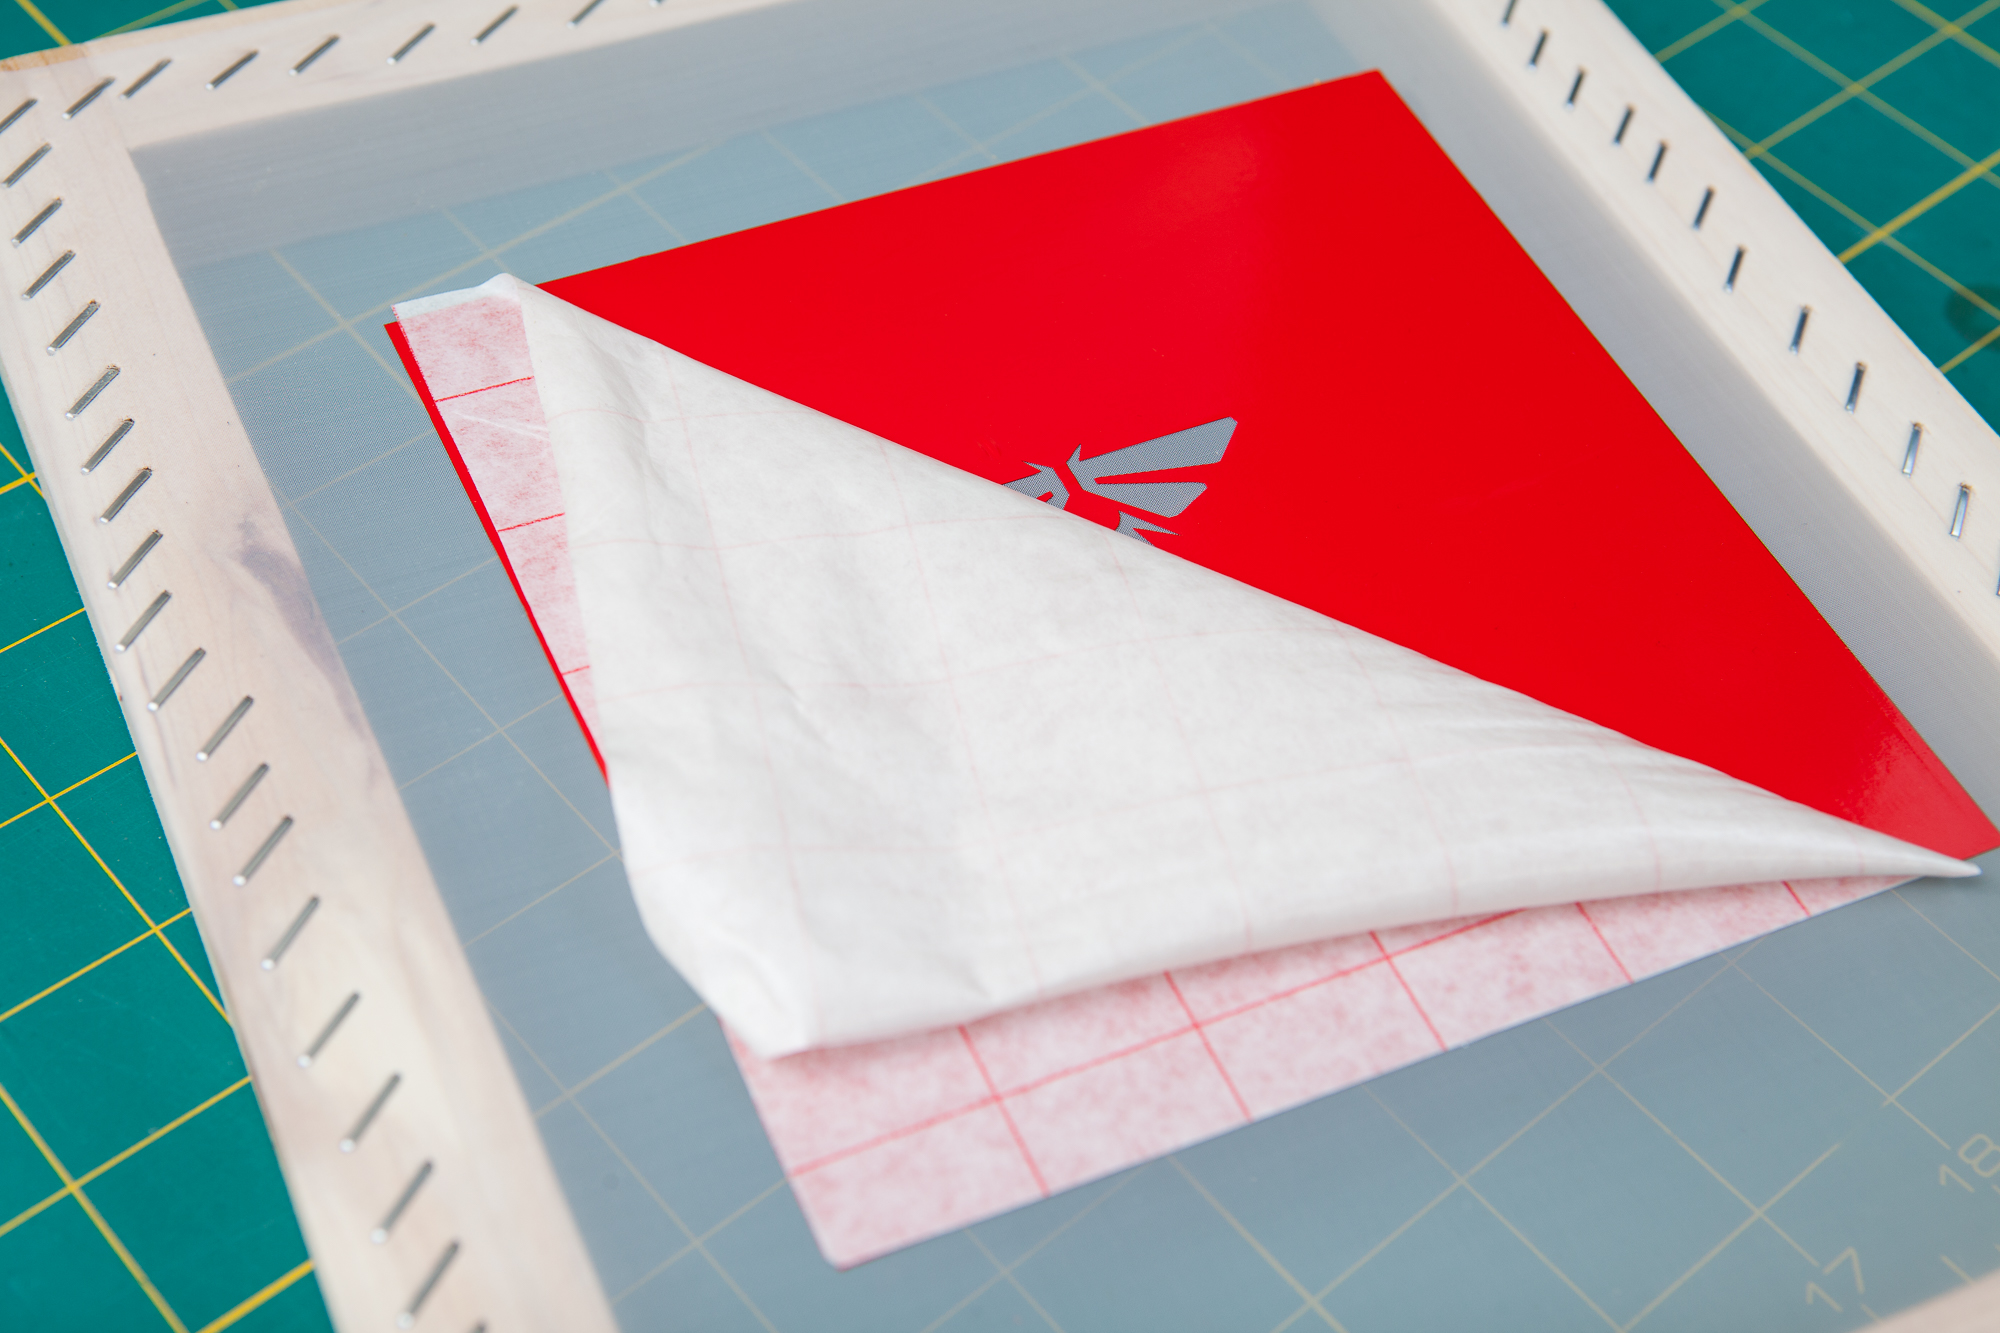
As this is my first time trying this, I used a cheap off-the-shelf screen that came with a 6″ squeegee. After washing the screen and leaving it to dry for 24 hours, I carefully peeled off the vinyl backing and applied the design to the center of the screen using a plastic scraper to keep the vinyl flat and remove any bubbles. Around the perimeter of the screen that the vinyl didn’t reach, I applied some 3″ painter’s tape to cover the open areas so no ink would leak through.
After doing a handful of test prints on scrap fabric (and then again washing and re-prepping the screen), it was time for the real deal.
Silkscreening
Because the armbands are already cut and sewn, alignment is going to be crucial for applying this logo accurately. I adjusted the sewing pattern I created earlier to properly position the (now slightly larger) logo in the center of the armband and printed out a new copy. The idea is that if I can align the logo on the paper template with the silkscreen, positioning the armbands using the same outline as the template should ensure they’re aligned properly.
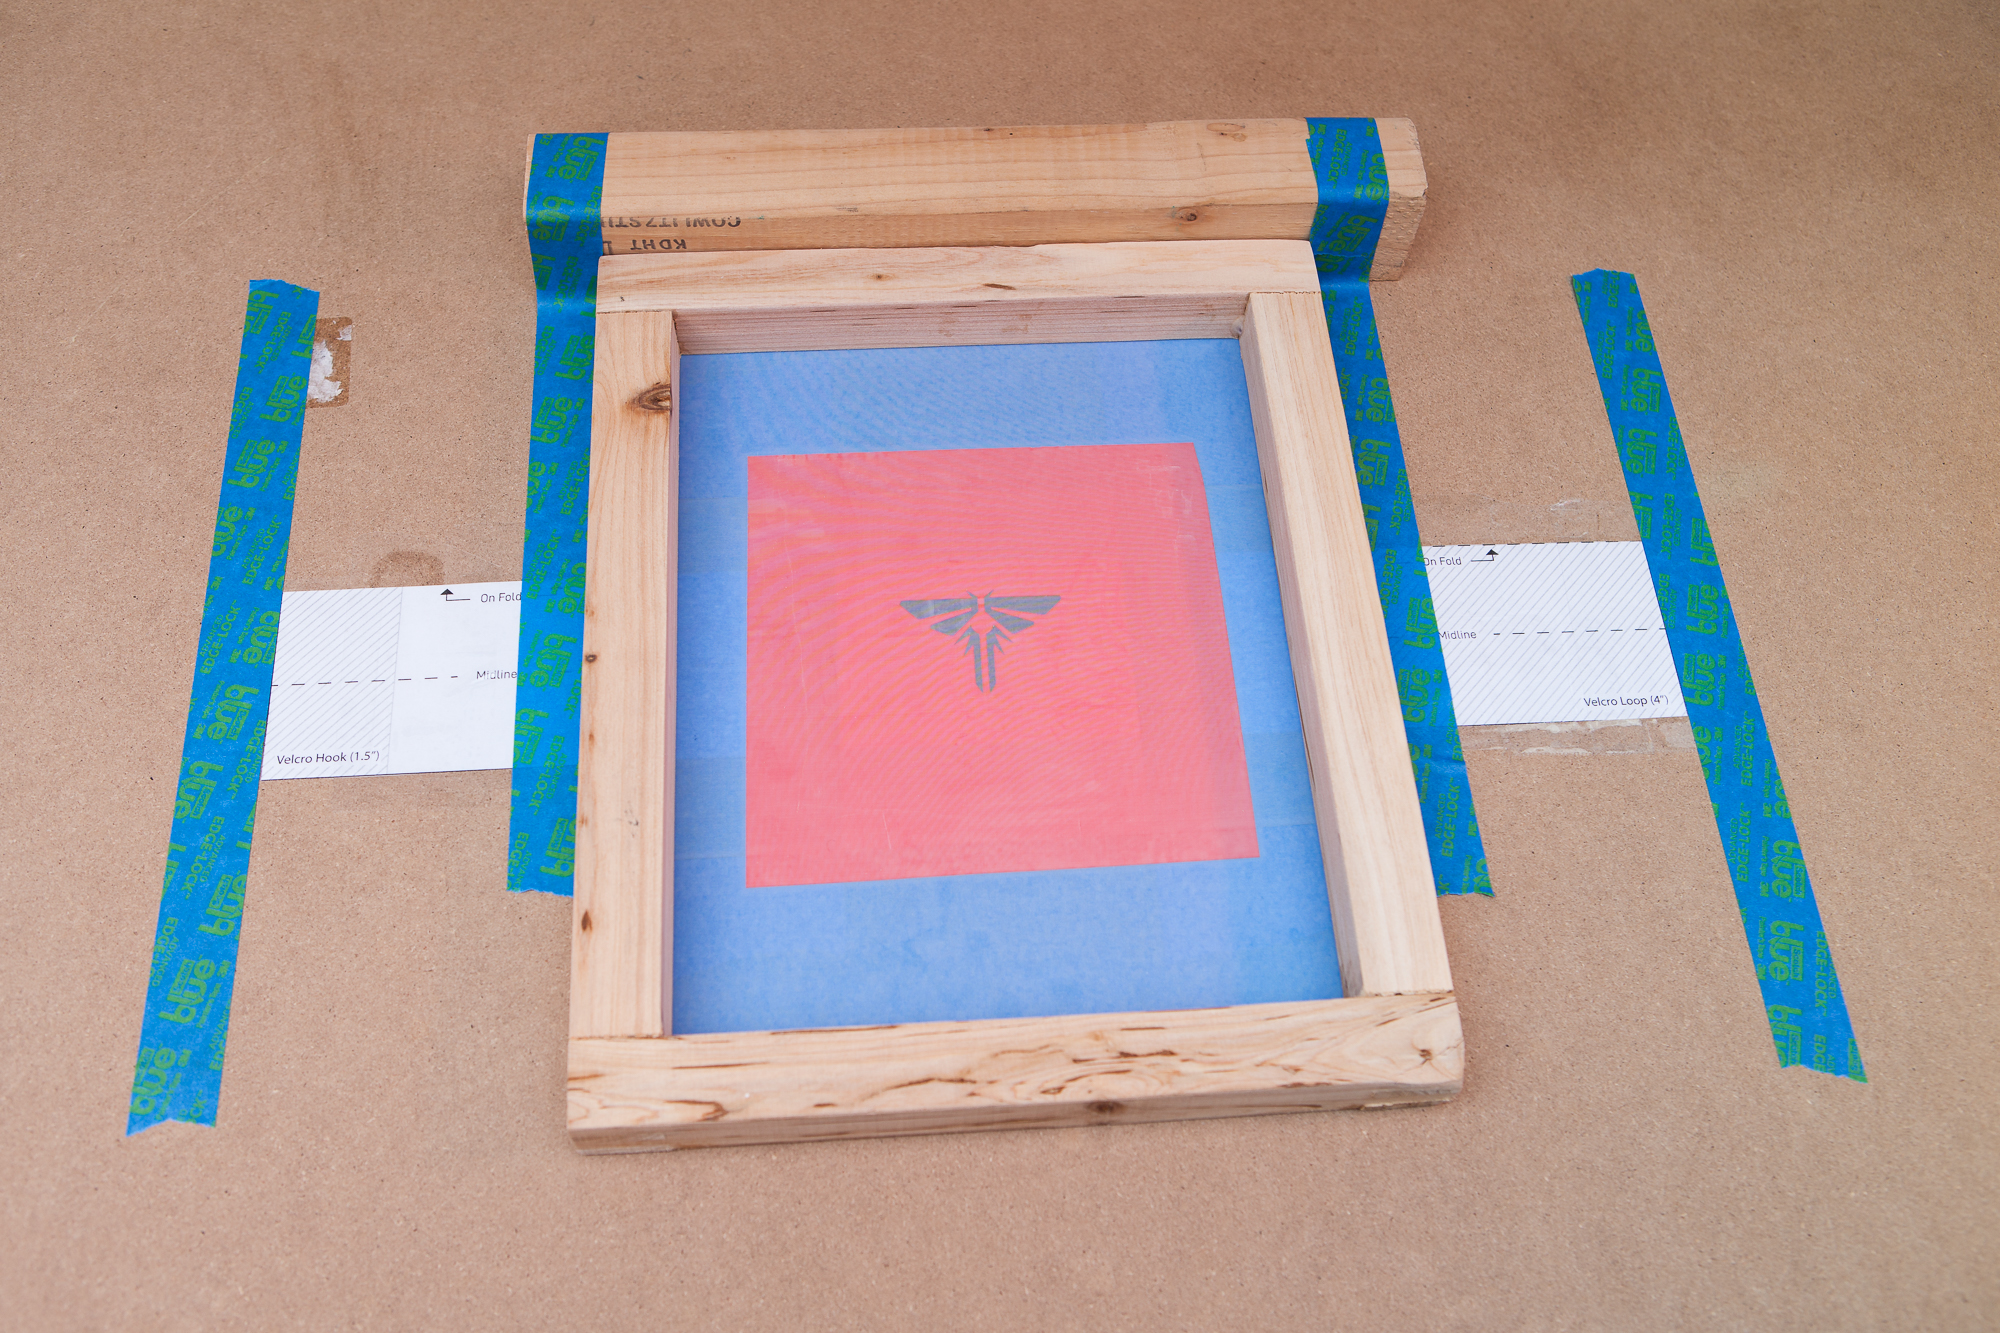
I didn’t want to spill any silkscreen ink on my workbench, so I cut a ¼” MDF board to use as a temporary tabletop. For the design’s vertical alignment, I screwed a block of wood to the board to act as a stop for the back edge of the screen. For the horizontal alignment, I carefully positioned the logo on the paper template with the Firefly cutout on the silkscreen. I then taped down the template with some packaging tape and marked the left/right edges of both the screen and template with some painter’s tape.
For each armband I cut a piece of 1/8″ corrugated cardboard about 2 7/16″ by 18″ and stuck it inside, being careful not to disturb the folds on the internal seam. This serves two purposes:
- It provides a flat, even surface for the fabric being silkscreened
- It absorbs any extra ink so that the design doesn’t imprint on the back of the armband.
After placing the armbands on the silkscreening table, I aligned the fabric with the ends of the template and then weighed it down with some 3 lb. weights to keep it in place.
The silkscreening process itself was relatively easy and took no time at all. I used a craft stick to apply a line of white paint above the design, then held everything in place and applied two firm downward strokes of the squeegee on top of the design. After lifting the screen and removing the armband, I replaced the next one and repeated the process.
As fate would have it, I was smart to sew a few extra armbands. Although my test pieces worked well, I did not press firmly enough on the screen for the first armband and part of the design was not inked. I then lowered the screen to ink it again, which completed the design but ended up leaving a double-image. This also deposited some of the armband’s wet ink on the underside of the screen (vinyl) which then transferred to the second armband. Both of these armbands still look fine at a distance, but I’m glad I prepared extra.
Heat Setting
The final step in the silkscreen process is to “heat set” the ink. This removes the remaining moisture and bonds the ink to the fabric so that it won’t rub off or fade after washing.
Once all four armbands were silkscreened, I laid them out on a table and used the “low” setting on my heat gun to help speed the drying process. After waving the heat gun around for 5 minutes I then let the armbands sit another hour for good measure until the paint was dry to the touch and ready for heat setting.
Unfortunately I wasn’t able to find a lot of information about the Speedball fabric ink I’m using. The product page on their website has a “literature downloads” section with links to the MSDS and an instruction booklet, but no detailed information on the properties of the ink itself. On heat setting, the instruction booklet says:
Use only fabrics that can be subjected to temperatures of at least 275°-375° F. Do not use nonporous fabrics such as nylon. Place a piece of paper (simple copy paper is best) over top of your printed design and cure with a hot iron for 1-2 minutes.
Other information I found online recommended getting the ink up to 320° F (160° C) and then immediately stopping, while I also found sources that said you should use a clothes iron for 4-5 minutes, a heat gun on high for 1 minute, or 40 minutes in a clothes dryer. Hmm.
After running a few tests with both my iron and my heat gun, I decided to use the iron on its “cotton” (highest) setting for about 1:30. This seemed to give more even results than using the heat gun, and the ink did not fade after washing.
Note that it’s important to remove the cardboard insert before ironing, as it will otherwise leave corrugation marks on the surface of the fabric. Don’t ask me how I know…
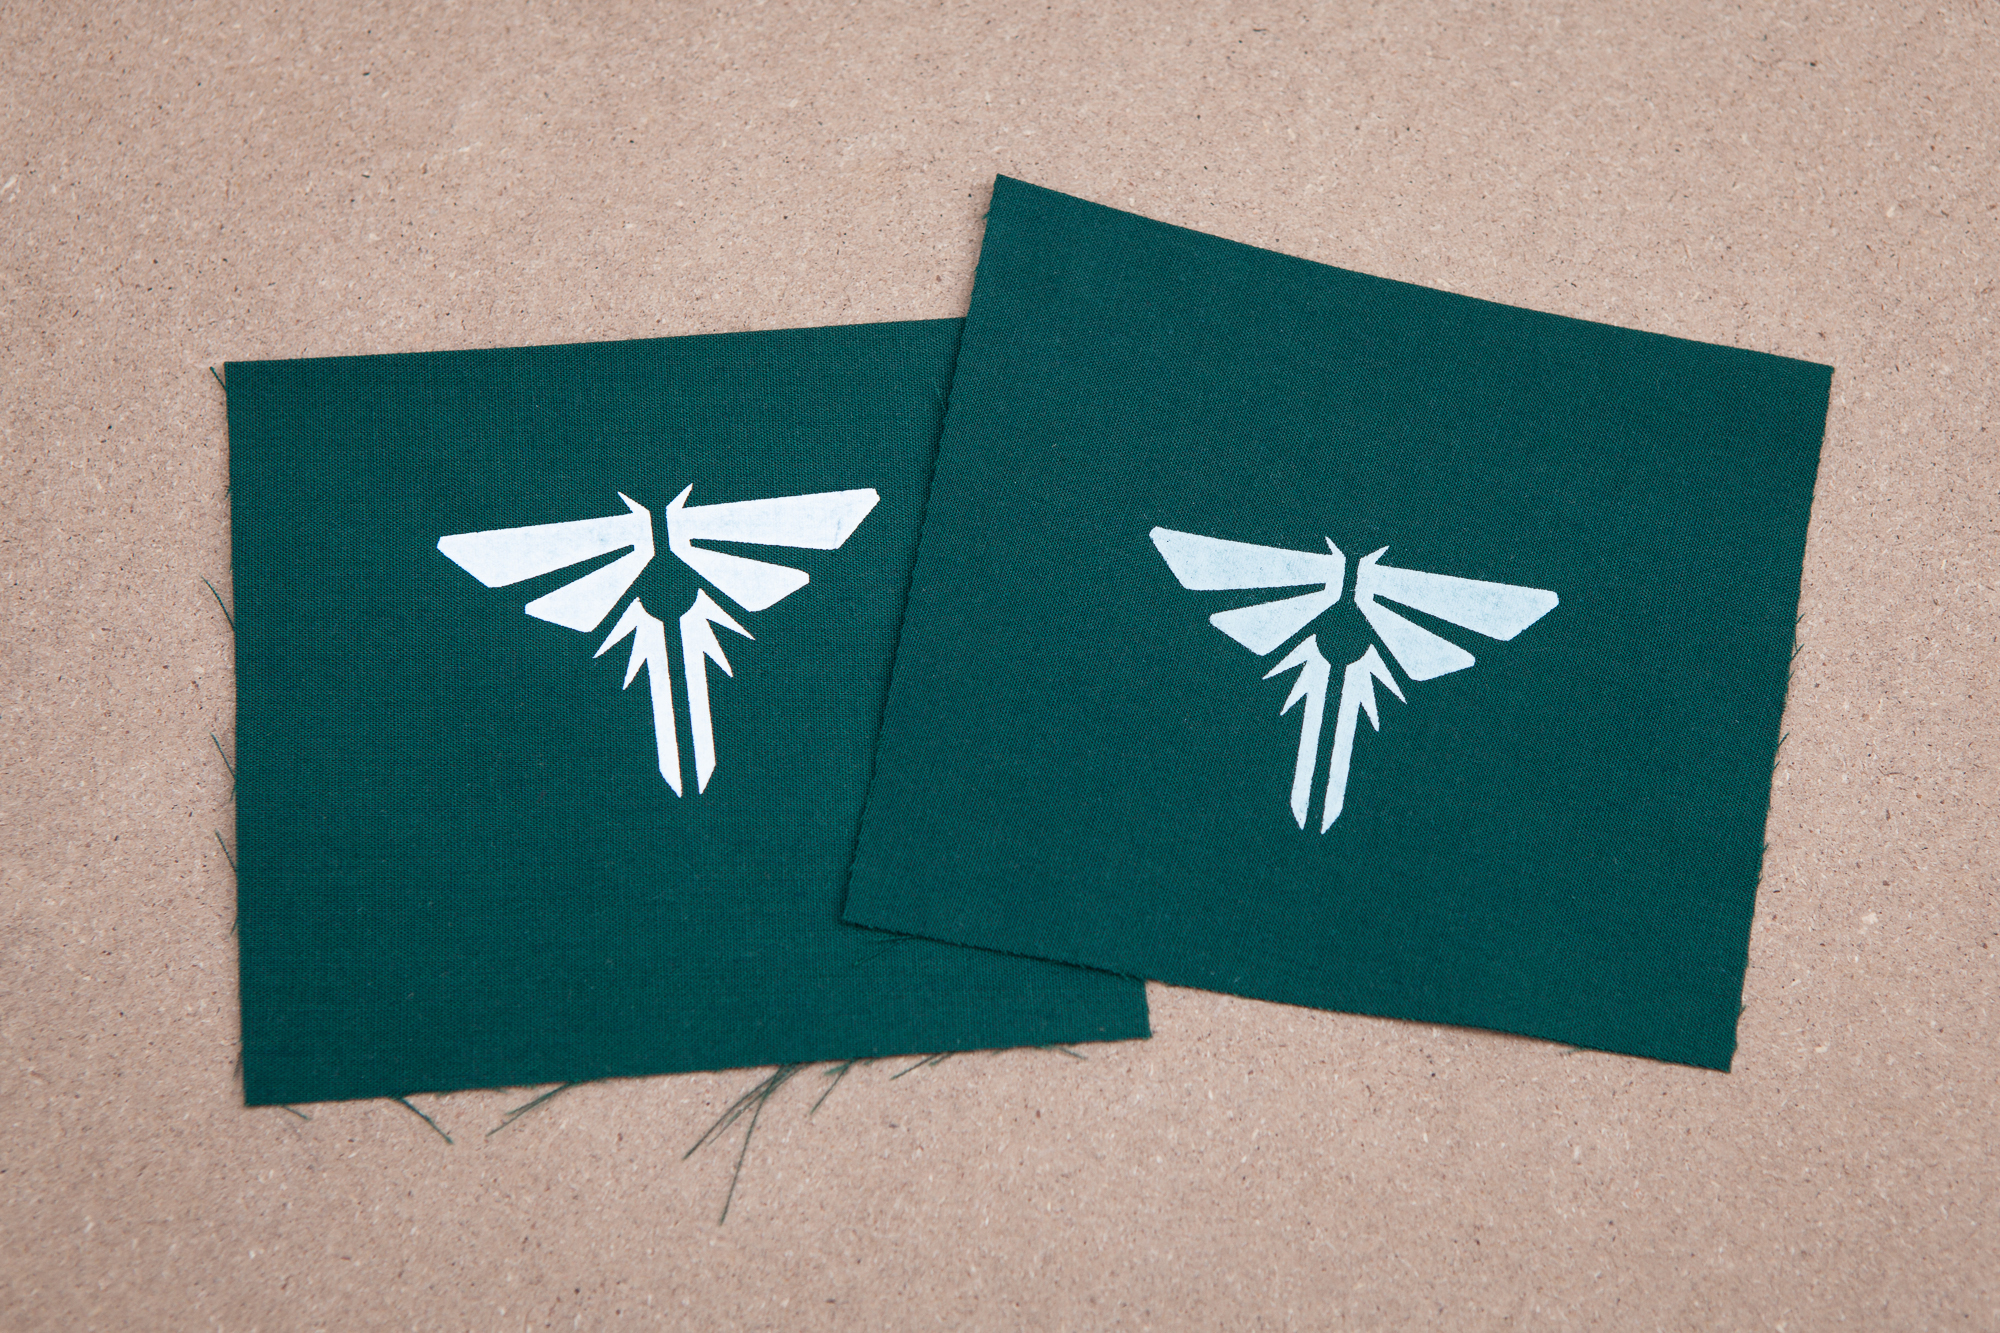
Faded
Unfortunately applying heat to “cure” the ink had an unfortunate side effect: it faded the logo.
I’m not entirely sure what happened here. The ink itself isn’t faded, but it appears as though the base fabric is showing through the ink giving it a dull and almost transparent look. Although it’s appearing after the curing process I’m not sure that it’s being caused by it.
Inspecting the armband closely shows that there are some cloth fibers on top of the logo, which would seem to indicate that this is due to “fibrillation“. According to that article this can happen if the material is cheap (check) or if the screen is not tight or suspended properly above the cloth (double check) and pulls up fibers when the screen is raised after printing. Heat setting then presses these (uninked) fibers back into the ink of the design, which gives the “scratchy” look.
When I heat set the silkscreen I also noticed a green stain on my ironing board underneath the fabric, so this could also partially be due to “dye migration” – meaning that the heat leeched the dye out of the fabric and deposited it on (in?) the silkscreen ink. Although I had pre-washed the fabric to pre-shrink it and clean out some of the dye, apparently that wasn’t enough to keep the remaining dye put. This, again, is likely due to the fabric I used in combination with the imprecision of the clothes iron’s temperature setting.
I’m going to chalk this up to my poor silkscreen technique and the inexpensive cheap fabric I bought from Amazon because I couldn’t go to a “real” fabric store due to quarantine. Damn you quarantine!
On the plus side, it’s difficult to tell that the logo is faded unless you see the two versions side-by-side. The logo is still crisp and clear and this does make the design look more distressed and therefore better for an “aged” post-apocalyptic prop. So… thank you quarantine?
Weathering
Before I apply the velcro and seal up the armbands for good, I’m going to apply some weathering. Originally I had planned to do this at the end, but after thinking about it it makes more sense to apply the paint while I could still re-insert the cardboard backing to absorb the excess.
There are two effects to apply here: the white along the edges for the “fraying” of the fabric, and the bloody splotches along the length.
“Fraying” Edge Whites
The first effect is the “fraying” of the fabric around the logo. Within the game this was likely done by Fireflies brushing the armband against doors or other obstacles as they navigated the world, wearing down the fabric and revealing some of the bare threads underneath.
Normally for a prop you would do this by actually fraying the fabric – typically by rubbing it against sandpaper or some other abrasive material. The fabric I’m using is thin and abrasives didn’t give a good effect, so instead I’m going to paint on this “fraying” with some acrylic paint.
The paint I’m using is some generic dollar-store white acrylic paint I have on hand from a few years back. I don’t have any fabric medium to mix with this to keep it pliable, but I’m sure that in the tiny quantities I’m using it’ll work just fine.
I applied the paint to a bristle brush, blotted it until the brush was “dry”, then ran the brush lengthwise along the armband. Most of this effect was focused around the logo and the center of the armband, as that’s the part that’s most exposed and easily damaged while it’s being worn.
The final effect is subtle – much more subtle than the fraying in the game. But it does make the armband look a little more “alive”.
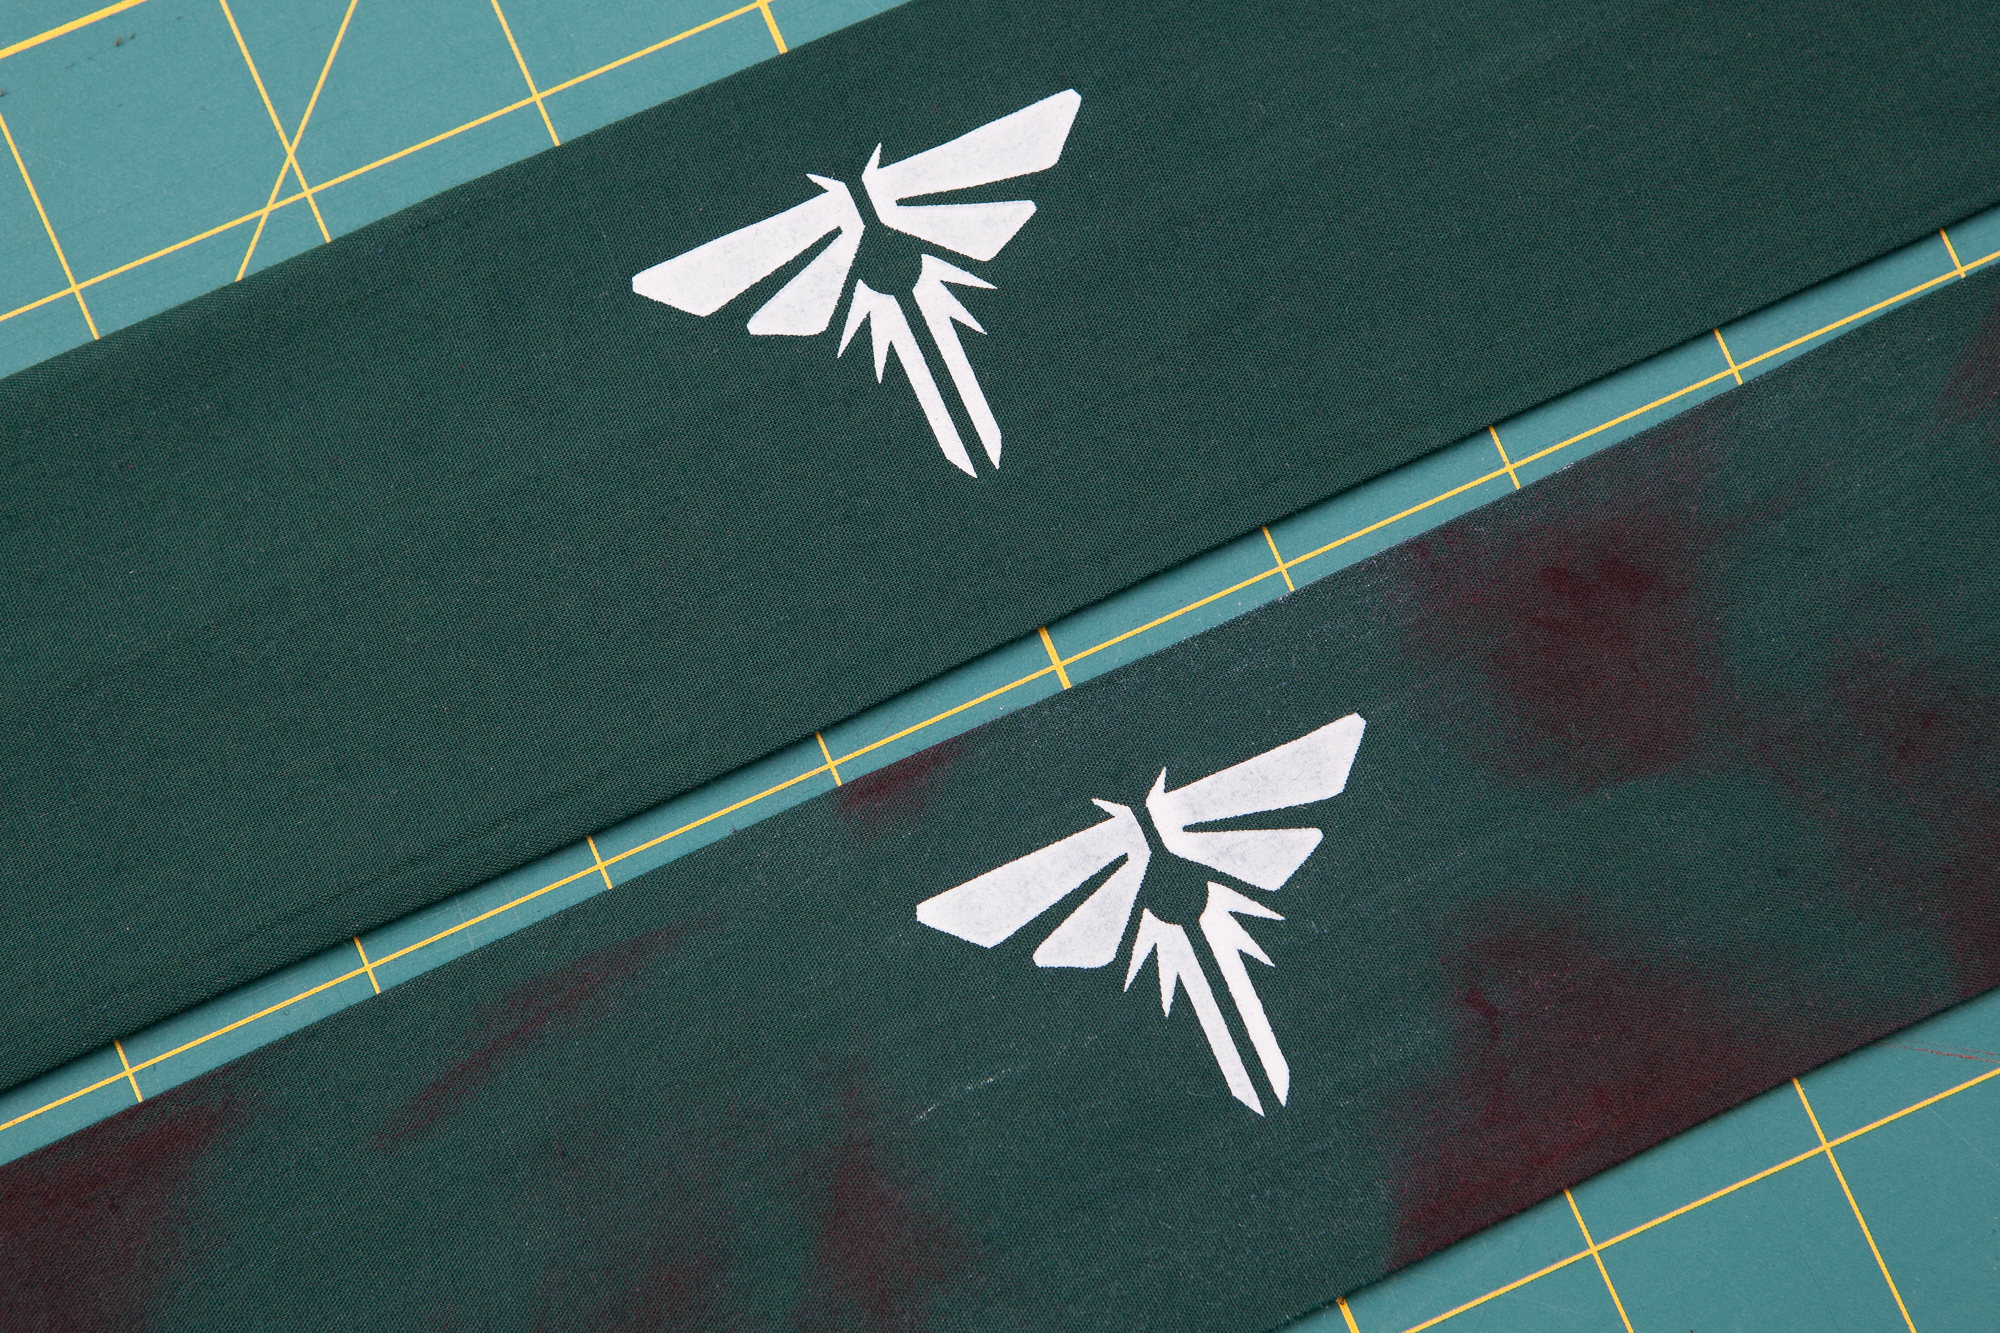
Bloody Splotches
The bloody splotches are critical for getting this to look ‘right’, so I pulled out all the stops. I’m using ruby red textile paint mixed with some burnt umber to get the right shade of dried blood. The pigmentation of the red paint varies wildly depending on how thickly it’s applied, so after running a few tests I came up with the following recipe:
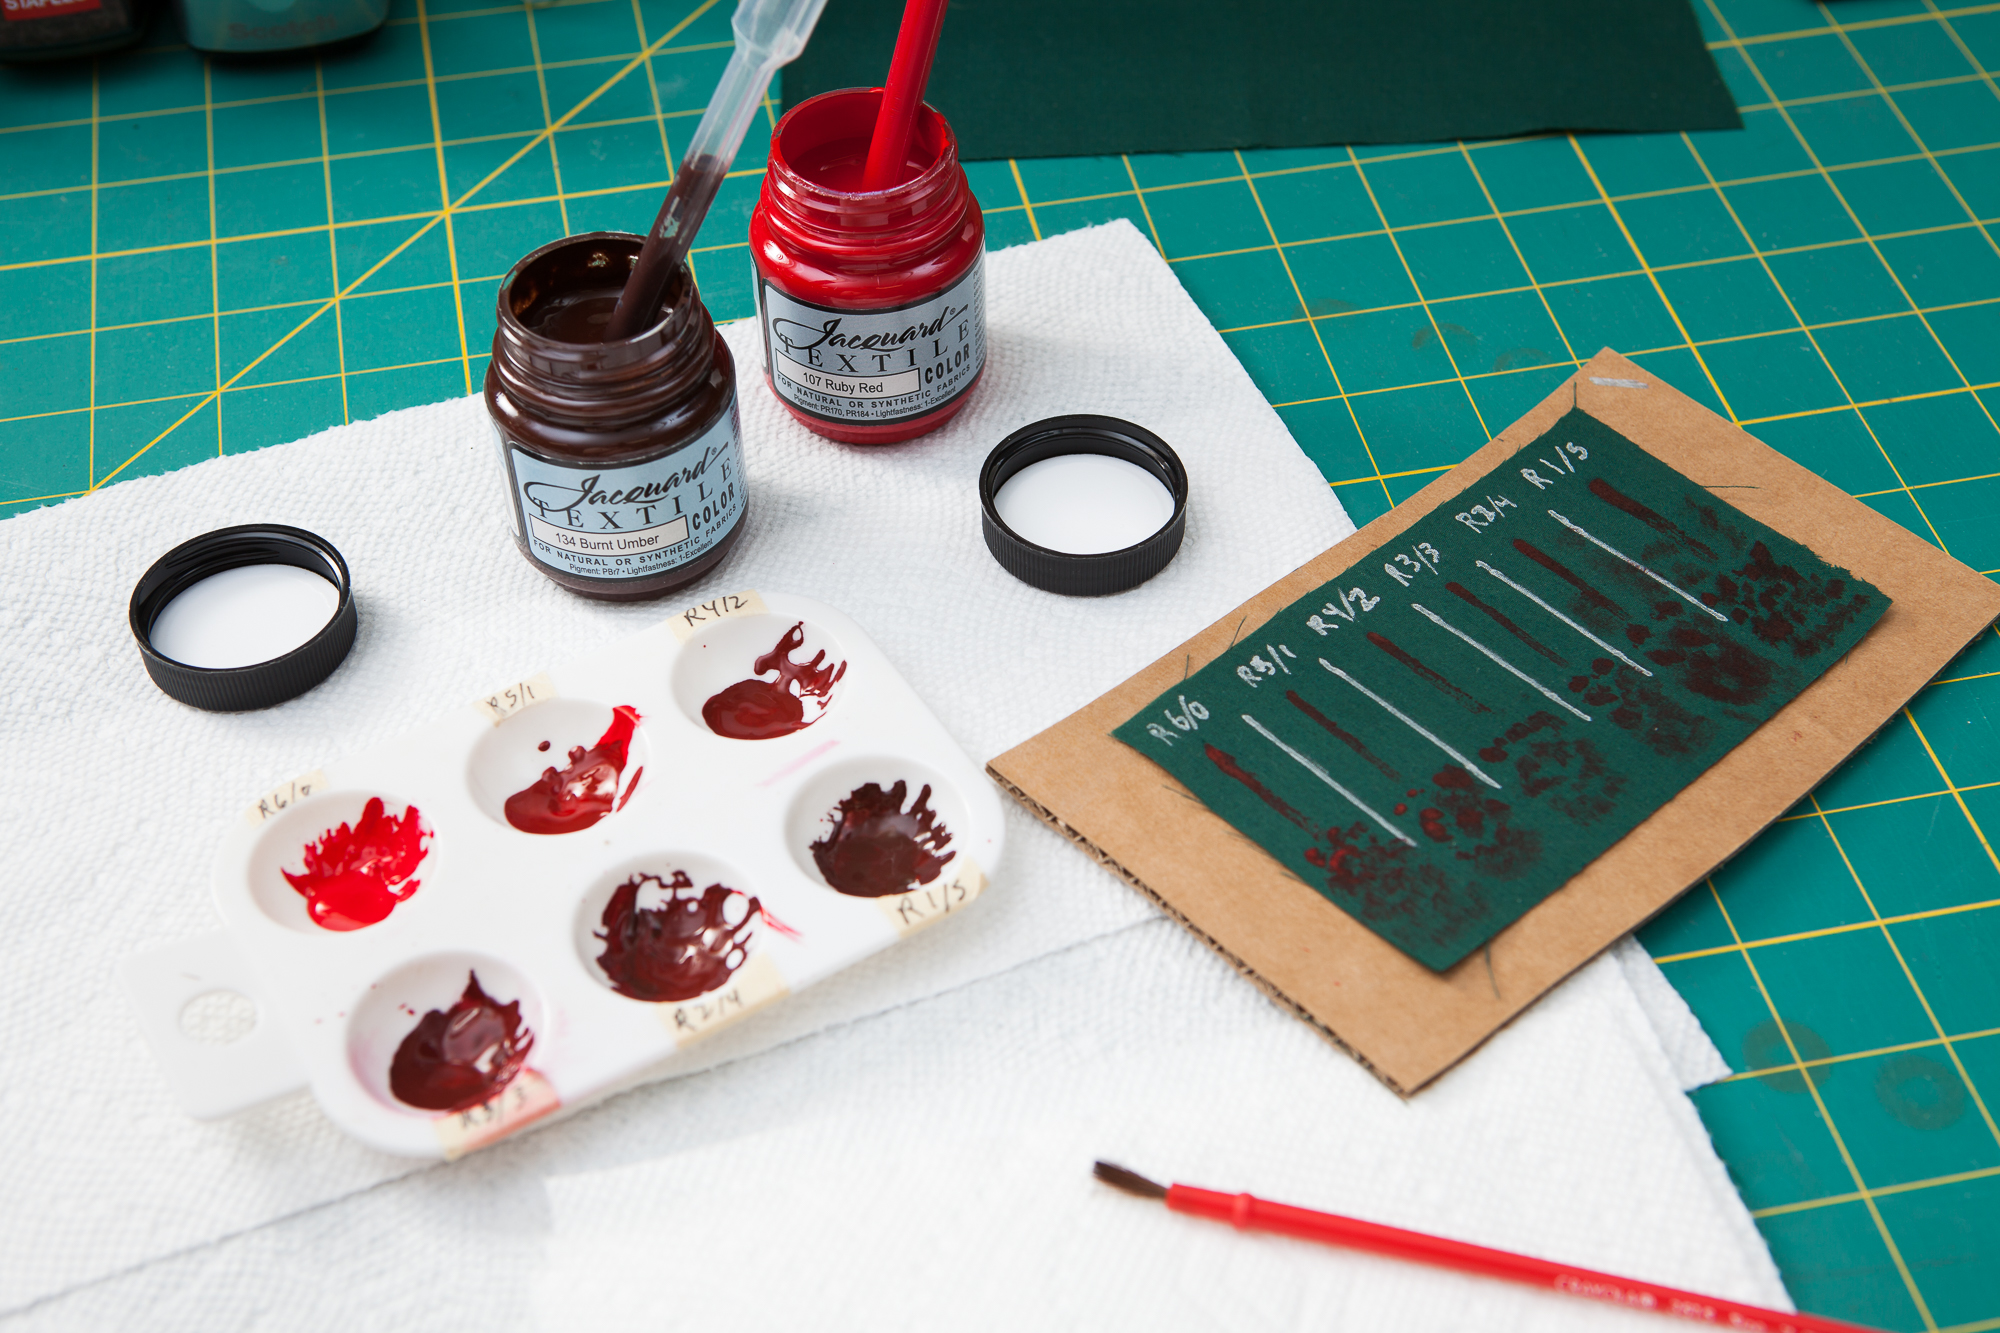
- 5 parts Ruby Red
- 1 parts Burnt Umber
- 1 part water
The resulting mix has a dark red sheen which looks the part as dried blood regardless of the application thickness. This was applied with a dry 1″ foam brush and built up in layers until I got the “splotching” I liked. In trying to match the look of the in-game prop, I wanted to apply “splotches” of blood rather than individual droplets – as if the blood was smeared across the band rather than sprayed. For a few areas I applied a few “drops” using the corner of the brush and then smeared them to provide a little extra depth.
I got a bit carried away here with how good the “blood” looked, and applied a little more than I should have. But that’s okay, it’ll look more spread out once the armband is wrapped around the arm. In hindsight I also shouldn’t have used the cardboard insert for the weathering paint, as the thickness of the insert created an edge slightly offset from the “real” edge of the flat fabric. This extra area near the edge needed to be touched up once the insert was removed.
Once all of the weathering was applied, I set the armbands aside for a day to let the paint dry then heat-cured them with the iron again for 30 seconds each.
Applying Velcro
We’re so closed to being finished! The armband is sewn, silkscreened, and weathered. The final step is to sew on some Velcro fasteners in order to hold the armbands onto the arm.
The Velcro I’m using is a cheap military green hook and loop set I got from Amazon. This came with a foot long portion of each half, 4″ wide. I decided to put a full 4″ section of the soft “loop” on the inside (right side top) of the armband for both maximum security and maximum adjustability. For the scratchy “hook” segment on the outside (left side bottom) of the armband I decided to use a 1.5″ strip. I only needed an inch or so to make a secure connection, but I decided to extend it an extra half inch for some added stability and peace of mind.
On either side of the Velcro is a little 1/8″ strip of extra backing that sticks out away from the hooks / loops. For both Velcro halves I trimmed this off on one side and kept the other that was facing the center of the armband. This was so the mechanical fastener portion of the Velcro went all the way to the edges of the armband, while that extra backing could be used for a clearer sewing line. The plastic backing on the Velcro is stiff and a little brittle, so I also dropped down the threads-per-inch to 10 (from 12).
I was worried about this but it ended up being straightforward: sew close to the edge in a counter-clockwise pattern, back up over the beginning of the stitches to “trap” the ends, then sew the ‘X’ pattern by going across and doubling back over the inside edge of the patch. Because some of the armband edges weren’t sewn perfectly straight, I backed off the Velcro patches about 1/8th of an inch away from the short edge to be sure that ends were sealed by the seam. Once all of the Velcro patches were sewn I tied off the threads and trimmed the excess leads.
Endure and Survive
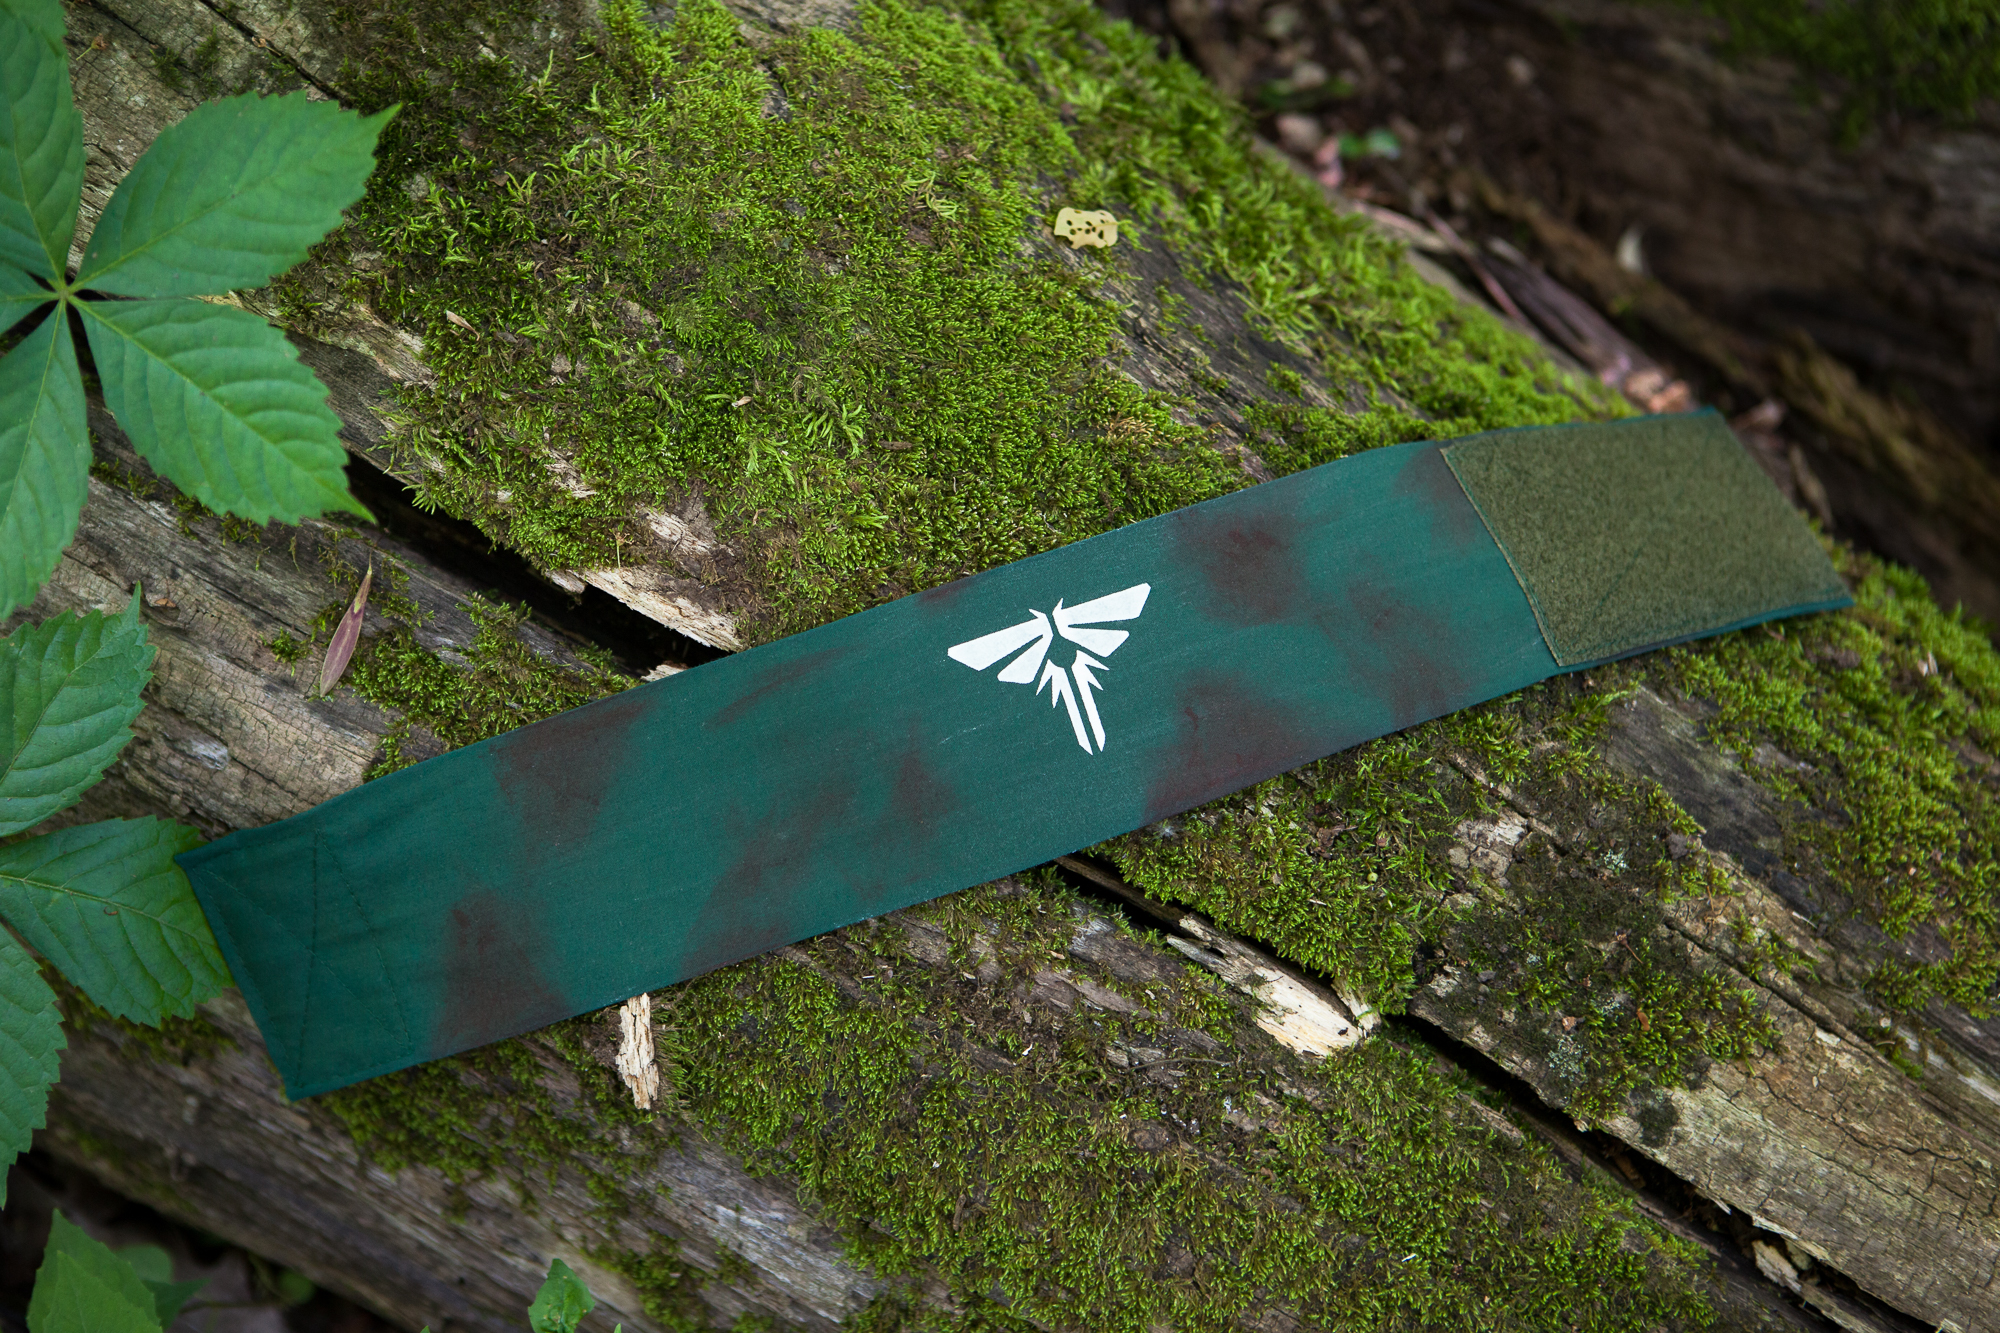
These turned out better than I expected, especially considering the difficulty in finding the right materials due to the pandemic. Thankfully I got lucky with some of my material choices and the final product really does look the part. The sizing and layout design is just about perfect, the switch from brass snaps to Velcro worked out great, the logo is crisp, and the bloody weathering looks awesome. In fact I was a little shocked at how well the blood effect turned out all things considered.
I do think this project could use a second attempt once shops open back up and it’s easier to source materials, most notably the fabric which was the source of a number of issues. It’s partially the lighting, but the material is a little bluer than would be ideal. The fabric is also thin which means it doesn’t fray well for weathering and it shows the seam line on the front of the armband when stretched tight. Last but not least the fabric was a blend and not 100% cotton, which is one of the reasons why the silkscreened logo “faded” once it was heatset.
Speaking of silkscreening, I’d also like to take another shot at the silkscreen process with a proper bracket that suspends the screen above the fabric. Although I did a number of tests before I silkscreened the armbands themselves, I had a few issues keeping the silkscreen lines clean and sharp. Some more experience and a bracket to hold the screen would go a long way towards improving the quality of the logo.
All of that being said, I’m still quite happy with the way these props turned out and I feel like I’ve done the game’s prop justice. I can’t wait to experience Part II.
To the edge of the universe and back. Thanks for reading, and stay safe out there!
Parts List
As usual I’ve linked various parts and supplies throughout the post as they’re used. Because it’s useful to have everything in one place, here’s a (mostly) complete list of the supplies and tools I used to make these armbands a reality.
Please note that some of these links (and many above) are Amazon Affiliate links which help fund the content on this site. Earnings from affiliate links funded this entire project, so thank you for your support!
Armband Base
- “Premium Cotton Blend Broadcloth” in hunter green
- Coats & Clark Dual Duty Plus General Purpose Thread in Forest Green (on hand, not 100% sure on the color)
- 4″ Olive Drab Sew-On Hook and Loop Fasteners (Velcro)
Silkscreened Logo
- Silhouette Cameo 3 Vinyl Cutting Machine
- Oracal 651 Outdoor Vinyl in Red (for the stencil)
- Plastic scraper with replaceable blades (for vinyl application)
- 8×10 Screen Printing Frame with 110 White Mesh and 6″ Squeegee
- 3M Blue Painter’s Tape, 3″
- Speedball Fabric Screen Printing Ink, White
